
This no-bake cornflake cookies recipe is my secret weapon for quick, nostalgic treats that still feel special. I love how simple ingredients come together with just a bit of heat and a lot of love, no oven needed. It’s the kind of thing I make when I want something sweet but don’t want to mess around in the kitchen for hours.
What really keeps me coming back to this recipe is how adaptable it is—swapping in different nut butters or chocolates, it’s forgiving and forgiving. Plus, the smell of melting butter and toasted cornflakes fills the kitchen with a cozy, comforting aroma that instantly takes me back to lazy afternoons as a kid. It’s a little ritual I’ve kept for years, especially when I need a quick fix of childhood joy.
This recipe taps into childhood nostalgia, but with a twist—using a secret ingredient that transforms the classic into something unexpectedly sophisticated, yet still comforting.
A nostalgic shortcut with a twist
- Making these cookies always feels like a small rebellion—no oven, no fuss, just pure cookie magic.
- I remember sneaking bites of these as a kid and feeling like I’d discovered a secret treat I wasn’t supposed to have.
- There’s something oddly satisfying about crushing cornflakes and watching the mixture come together in that glossy, sticky mess.
- Every time I make these, I think about how they’re the perfect antidote to a hectic day—simple, sweet, and honest.
The story behind this recipe
- This recipe is a throwback to summers at my grandma’s house, where she’d whip up a batch whenever the garden was bursting with corn. She’d let me crush the cornflakes with my tiny fists, making a sticky mess that I thought was pure magic. That simple act of crushing and mixing somehow made me feel like I was part of a secret club, creating something sweet from just a few everyday ingredients.
- Years later, I realized how much those no-bake cookies represented more than just childhood nostalgia—they were a lesson in simplicity and improvisation. Whenever I need a quick, honest treat, I go straight to this recipe. It’s a reminder that sometimes, the best things come together in a rush, with a little bit of chaos and a lot of heart.
- heading
- story_type
Historical and Cultural Notes
- These cookies likely originated during the Great Depression, when resourcefulness made simple ingredients into treats.
- Cornflakes were invented in the late 19th century and quickly became a staple for quick, no-fuss snacks like these cookies.
- Variations of no-bake cereal cookies appeared in cookbooks from the 1950s, often as easy, kid-friendly desserts.
- The combination of butter, sugar, and cereal was a clever way to turn pantry staples into something sweet and satisfying.
Key Ingredients Breakdown
- Butter: I love the richness it adds, making the mixture glossy and smooth. Use real butter for best flavor, but margarine can work in a pinch if you want a lighter touch.
- Cornflakes: Fresh, crispy cornflakes are essential—they give that crunch and nostalgic aroma. Toast a quick handful for an extra toasty scent if you like a deeper flavor.
- Sugar: I prefer granulated for straightforward sweetness, but honey or maple syrup can be swapped in for a chewier, more complex profile.
- Chocolate: Melts into a silky pool that coats everything—dark, milk, or even white chocolate. Use good quality chocolate for that melt-in-your-mouth moment.
- Peanut Butter: Adds creamy texture and a salty contrast—natural peanut butter is my go-to, but tahini works if you want a nutty twist. Just watch the oil content to keep it firm.
- Vanilla Extract: A splash of vanilla brightens the whole batch, making the flavors pop. Skip if you want a more subdued, classic taste.
- Optional Add-ins: Nuts, dried fruits, or even a pinch of sea salt can elevate these cookies—think of them as personal touches to make each batch unique.
Spotlight on key ingredients
Cornflakes:
- I love the way they crackle when coated with the warm butter and sugar mixture, releasing a toasted aroma that instantly transports me back to childhood mornings.
- During mixing, they soften slightly but still retain a satisfying crunch once set. Toasting them briefly can add a smoky depth that’s hard to resist.
Butter:
- It melts quickly, creating a glossy, rich coating that binds everything together. Use real butter for that unmistakable, savory aroma and smooth texture.
- In the heat, it releases a nutty scent, signaling that it’s just right—if it starts to brown too much, lower the heat or remove from stove to prevent over-torching.
Notes for ingredient swaps
- Dairy-Free: Swap butter for coconut oil or vegan margarine. Expect a slightly different richness and a hint of coconut aroma.
- Sweetener Options: Use honey, maple syrup, or agave instead of sugar. These will add moisture and a more complex sweetness.
- Chocolate Variations: Replace regular chocolate with dairy-free or flavored varieties like mint or orange for a twist.
- Nut Butter: Almond or cashew butter can replace peanut butter, changing the flavor profile but maintaining creaminess.
- Cornflakes: Rice Krispies or other crispy cereals can be used if you want a lighter crunch or different texture.
- Add-ins: Dried cranberries, shredded coconut, or chopped nuts can be mixed in for extra flavor and texture.
- Vegan Version: Use plant-based butter and chocolate, and ensure any add-ins are vegan-friendly for a fully plant-based treat.
Equipment & Tools
- large mixing bowl: to combine ingredients before forming cookies
- saucepan: to melt butter and sugar smoothly
- spoon: for folding and scooping mixture
- parchment-lined baking sheet: to hold cookies as they cool and set
Step-by-step guide to no bake cornflake cookies
- Gather your equipment: a large mixing bowl, a saucepan, a spoon, and a baking sheet lined with parchment. The saucepan will melt your butter and sugar; the bowl is for mixing everything together.
- Melt the butter: Place 1/2 cup (113 g) of butter in the saucepan over medium heat (~150°C / 300°F). Wait until it’s just melted and starts to smell nutty—about 2 minutes.
- Add sugar and vanilla: Stir in 1 cup (200 g) sugar and 1 teaspoon vanilla extract. Continue stirring until the sugar dissolves completely and the mixture is smooth—about 1 minute.
- Pour in cornflakes: Measure 4 cups (120 g) of cornflakes. Add them to the saucepan and gently fold with a spoon, ensuring every flake gets coated with the buttery mixture. Be gentle to keep cornflakes crispy.
- Check for doneness: The mixture should be glossy and sticky, with a rich buttery aroma. If it looks dull or dry, warm it slightly more to loosen it up.
- Scoop onto baking sheet: Use a spoon or small ice cream scoop to drop mounds onto the prepared parchment. Shape as needed with the back of the spoon—don’t press too hard.
- Let cool and set: Allow the cookies to rest at room temperature for 20-30 minutes. They will firm up as the butter sets, creating that satisfying crunch.
- Finish and serve: Once cooled, transfer to a plate or container. These cookies are best enjoyed within 2-3 days, but they keep well in an airtight container for a week.
Allow cookies to cool and set at room temperature for 20-30 minutes. Store in an airtight container at room temp for up to a week, or freeze for longer storage. Serve as is or with a drizzle of melted chocolate for extra flair.
How to Know It’s Done
- The mixture is glossy and well-coated, not dry or crumbly.
- Cookies hold their shape easily when scooped, not falling apart.
- A sweet, buttery aroma fills the kitchen, signaling readiness.
No-Bake Cornflake Cookies
Ingredients
Equipment
Method
- Gather your ingredients and line a baking sheet with parchment paper to prevent sticking.
- Place the butter in a saucepan over medium heat, allowing it to melt slowly with a gentle sizzle and a nutty aroma filling the air.
- Add the sugar to the melted butter, stirring continuously until it dissolves completely and the mixture becomes glossy and slightly thickened, about 1 minute.
- Remove the saucepan from heat and stir in the vanilla extract, combining until fragrant.
- Pour the warm butter and sugar mixture over the cornflakes in the large mixing bowl.
- Gently fold the cornflakes into the mixture with a spoon, ensuring every flake is coated evenly without crushing them—this keeps the crunch intact.
- Using a spoon or small scoop, drop mounds of the mixture onto the prepared parchment-lined baking sheet, shaping them into neat, round cookies.
- Let the cookies rest at room temperature for 20-30 minutes, allowing the butter to firm up and the cookies to set into their final crunchy form.
- Once cooled and set, enjoy these nostalgic treats immediately or store in an airtight container at room temperature for up to a week.
Pro tips for perfect cookies
- Bolded Mini-Head: Use fresh cornflakes for maximum crunch and aroma—stale flakes will soften too much during mixing.
- Bolded Mini-Head: Gently fold the cornflakes into the warm butter mixture—vigorous stirring will crush the flakes, losing that crispy texture.
- Bolded Mini-Head: Keep the heat moderate when melting butter—too high and it’ll brown or burn, risking bitter flavors.
- Bolded Mini-Head: Chill the mixture briefly before scooping—this helps it firm up and prevents sticking to your hands.
- Bolded Mini-Head: Use a cookie scoop or two spoons for uniform size—makes presentation neater and ensures even setting.
- Bolded Mini-Head: Let cookies sit undisturbed for at least 20 minutes—this allows the butter to set fully, giving that satisfying crunch.
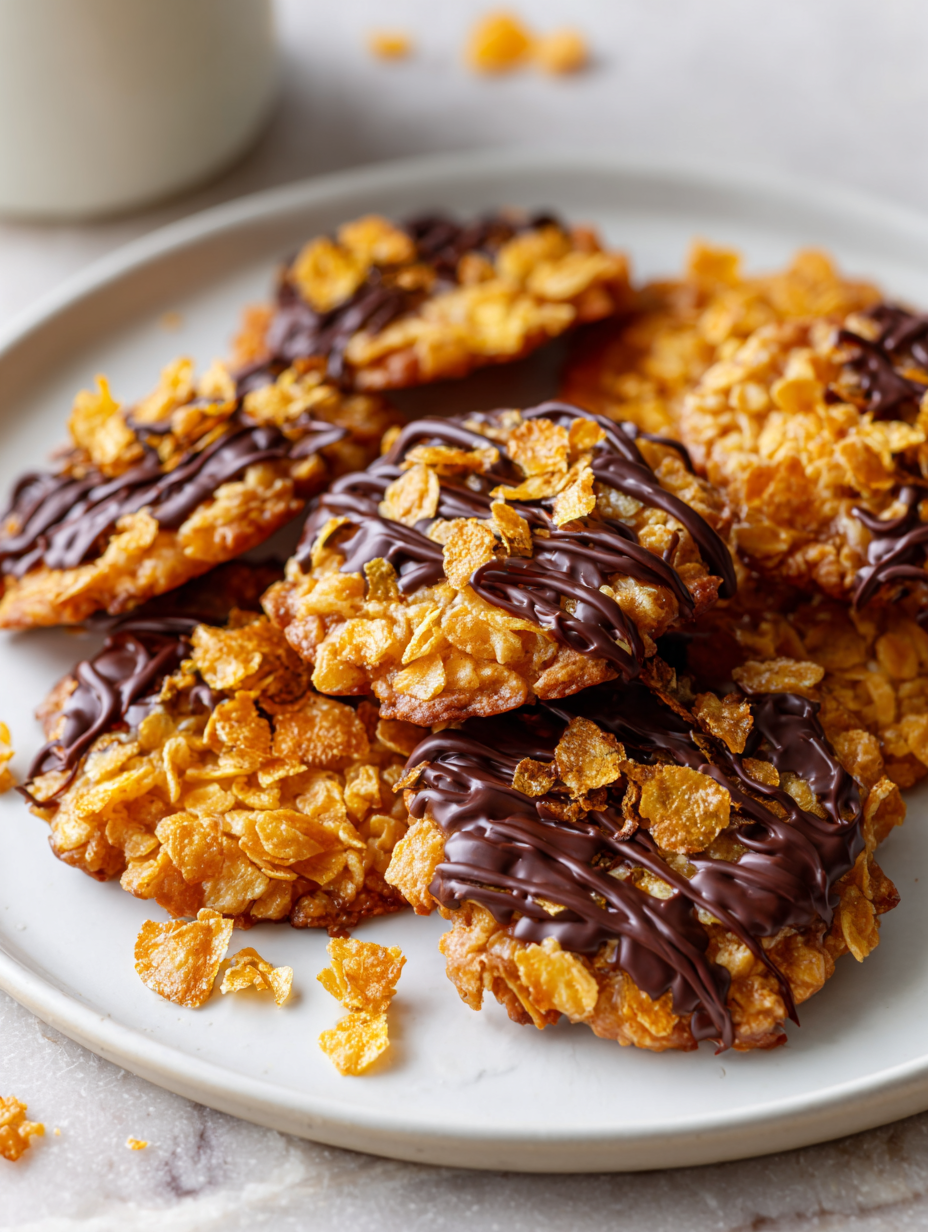
- Bolded Mini-Head: For extra shine, drizzle melted chocolate on cooled cookies—wait until they’re completely set for a clean finish.
Common mistakes and how to fix them
- FORGOT to check mixture before scooping → Ensure glossy, sticky texture before shaping.
- DUMPED mixture on unlined sheet → Always use parchment to prevent sticking and make cleanup easier.
- OVER-TORCHED butter → Remove from heat once it smells nutty, not burnt, to avoid bitterness.
- MISSED cooling time → Let cookies set at room temp to firm up properly and avoid crumble.
Quick fixes and pantry swaps
- When mixture is dull or crumbly, splash in a little hot water to loosen and revive.
- If cookies crack when scooping, patch with a tiny bit of melted chocolate or caramel for glue.
- Over-torched butter smells bitter; shield it with a splash of milk and stir quickly to cool.
- Dumped too much mixture on sheet? Patch with extra cornflakes pressed gently into cracks.
- When cornflakes soften too much, quickly sprinkle with a few toasted flakes for added crunch.
Prep, store, and reheat tips
- Prepare the cookie mixture a day ahead; keep it covered in the fridge to meld flavors and ease scooping.
- Stored cookies in an airtight container at room temperature stay fresh for up to 5 days, with a slight increase in sweetness as they sit.
- For longer storage, freeze the cookies for up to 3 weeks; thaw at room temperature for a chewy, still crispy treat.
- Reheat briefly in a low oven (~150°C / 300°F) for 3-5 minutes if you want a warmed, melty chocolate sensation, watching for melting and aroma.
Top questions about no bake cornflake cookies
1. Can I use stale cornflakes?
Use fresh, crispy cornflakes for the best crunch and aroma. Old flakes may turn soggy or dull.
2. Can I make these dairy-free?
Yes, you can swap the butter for coconut oil for a dairy-free version. Expect a slightly different richness and aroma.
3. My mixture is too soft, what do I do?
Chill the mixture briefly if it feels too soft or sticky—this helps with scooping and shaping.
4. Can I add chocolate on top?
Yes, melting chocolate and drizzling it over the cookies once set adds a rich, glossy finish and extra flavor.
5. How long do these cookies last?
Store in an airtight container at room temperature for up to a week. For longer, freeze for 2-3 weeks.
6. My cookies are cracking or crumbling?
If your cookies crack or fall apart when scooping, gently press them back together with a spoon or add a dab of melted chocolate as glue.
7. How do I get uniform cookies?
Use a cookie scoop or two spoons for uniform size. This helps cookies set evenly and look neat.
8. How do I know when the mixture is ready?
Ensure the butter mixture is glossy and sticky but not too runny. It should coat the cornflakes well without pooling.
9. Can I toast the cornflakes first?
For a more toasted flavor, briefly toast the cornflakes before mixing, but watch carefully to avoid burning.
10. Can I customize these cookies?
Yes, you can add nuts, dried fruits, or a pinch of sea salt to customize your cookies. Just fold in after mixing.
These cookies are more than just a quick treat; they’re a window into childhood memories and simple pleasures. The aroma of melted butter mingling with toasted cornflakes in the air feels like a small act of nostalgia, grounding me in a moment of honest, homemade comfort.
Whenever I make these, I’m reminded that sometimes the best recipes are the simplest—no fuss, just good ingredients and a little bit of chaos. They’re perfect for when time is short but you still crave something sweet, honest, and satisfying.

Hi, I’m Mia Bennett, the chef and storyteller behind Grounding in Tradition. I’m so glad you’re here. This blog is my way of preserving the flavors, techniques, and rituals that shaped me as both a cook and a professional chef. Grounding in Tradition is not about trends or shortcuts. It is about honoring where food comes from, understanding the hands that prepare it, and carrying forward recipes that deserve to be remembered.


Leave a Reply