
This recipe is inspired by a childhood memory of helping my grandma in her cluttered kitchen, where she’d mix these peanut clusters while chatting about her day. It’s a simple, honest treat that reminds me how a handful of ingredients can make something unexpectedly comforting. No-bake means I can whip it up during chaos or quiet moments, with no fuss or heat to worry about.
There’s something about the tactile process—stirring, folding, watching the chocolate melt into the peanuts—that feels grounding. It’s a recipe I turn to when I need a quick fix of sweetness that’s honest, not fussy. Plus, the smell of melting chocolate and roasted peanuts is pure nostalgia, filling the house with a warm, inviting aroma.
This recipe is inspired by a childhood memory of helping my grandma in her cluttered kitchen, where she’d mix these peanut clusters while chatting about her day. It’s a simple, honest treat that reminds me how a handful of ingredients can make something unexpectedly comforting. No-bake means I can whip it up during chaos or quiet moments, with no fuss or heat to worry about.
Nostalgic No-Bake Comfort
- Making these peanut clusters always takes me back to lazy weekend afternoons with my grandma, the kitchen filled with a sweet and smoky aroma that lingered long after. It’s a simple joy that reminds me how comforting good food can be, even when no oven is involved.
- There’s a rush of pride every time I pull these out of the fridge—like a little triumph in minimal effort, maximum flavor. The crunch of roasted peanuts combined with the smooth chocolate feels like a small victory against busy days.
- Sometimes, I make a double batch just to have a stash in the freezer for when friends drop by unexpectedly or I need a quick pick-me-up. It’s my secret weapon for spreading happiness, one bite at a time.
- These clusters are my go-to during hectic weeks—they come together quickly, and the messy, tactile process is oddly therapeutic amidst the chaos. Plus, the smell of melting chocolate and salty peanuts is pure comfort, grounding me whenever I need it.
The story behind this recipe
- This recipe came together one chaotic afternoon when I was rummaging through my pantry, looking for a quick sweet fix. I remembered how my mom always kept a jar of roasted peanuts and a stash of chocolate chips for moments just like this. No oven, no fuss, just a handful of ingredients that come together in the most satisfying way, layered with memories of childhood afternoons spent sneaking bites of peanut butter straight from the jar.
- What makes these peanut clusters special isn’t just the simplicity, but how they feel like a tiny act of rebellion—no baking, no complicated steps, just raw, honest ingredients melting and mingling in a warm kitchen. I love that I can whip up a batch when I need comfort or want to share something sweet without turning on the stove. The aroma of melting chocolate and roasted peanuts drifting through the house is a little reminder that sometimes, the easiest treats carry the most warmth.
- heading: ‘The story behind this recipe’
Historical and Cultural Trivia
- These peanut clusters likely originated in the American South, where peanuts are a staple crop and sweet treats often involve simple, hearty ingredients.
- Historically, no-bake confections like these emerged during times of resourcefulness, especially during wartime shortages when oven use was limited.
- The combination of chocolate and peanuts became popular in the early 20th century, with companies like Reese’s pioneering the flavor pairing that still feels nostalgic today.
Ingredient breakdown
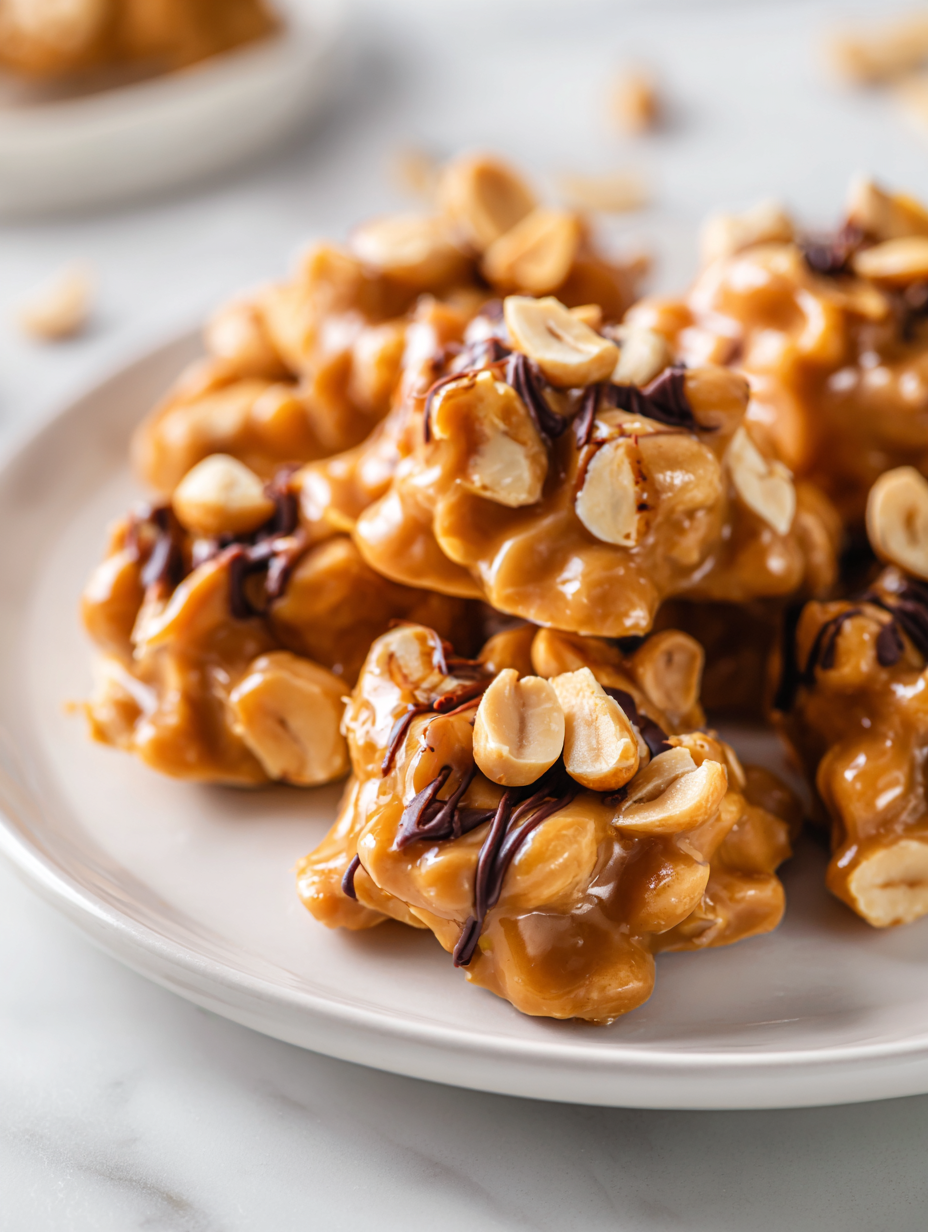
- Chocolate chips: I love using semi-sweet chips—they melt smoothly and give a rich, sweet backdrop. If you prefer a milder flavor, swap for milk chocolate, but watch the sweetness level.
- Peanuts: Roasted salted peanuts are my go-to—they add crunch and a salty punch. Unsalted work fine too; just consider adding a pinch more salt to balance.
- Butter: A touch of butter helps the chocolate melt better and adds a glossy finish. If you want dairy-free, coconut oil is a good stand-in, but it lends a subtle coconut aroma.
- Sweetener: I use honey or maple syrup for a hint of natural sweetness that complements the peanuts. You can skip it or substitute with agave, but the flavor shifts slightly towards more neutral.
- Vanilla extract: Just a splash deepens the chocolate flavor and adds warmth. Skip if you prefer a purer chocolate taste, but don’t skip entirely—small but mighty.
- Salt: A pinch of flaky sea salt on top enhances all the flavors. If you’re watching salt, reduce accordingly, but I recommend at least a tiny sprinkle for balance.
- Optional add-ins: Dried cranberries or chopped pretzels can add a fun twist. Go wild or keep it simple—these clusters are flexible.
Spotlight on key ingredients
Chocolate chips:
- I love using semi-sweet chips—they melt smoothly and give a rich, sweet backdrop. If you prefer a milder flavor, swap for milk chocolate, but watch the sweetness level.
- Peanuts: Roasted salted peanuts are my go-to—they add crunch and a salty punch. Unsalted work fine too; just consider adding a pinch more salt to balance.
Peanuts:
- Roasted salted peanuts are my go-to—they add crunch and a salty punch. Unsalted work fine too; just consider adding a pinch more salt to balance.
- Chocolate chips: I love using semi-sweet chips—they melt smoothly and give a rich, sweet backdrop. If you prefer a milder flavor, swap for milk chocolate, but watch the sweetness level.
Notes for ingredient swaps
- Chocolate-Free: Use carob chips instead for a sweet, earthy flavor without caffeine, though the texture may be a tad grainier.
- Peanuts: Swap with roasted almonds or cashews for a different crunch and flavor profile—just watch for their oils, which can make the mixture greasy.
- Butter: Replace with coconut oil for dairy-free, but expect a subtle coconut aroma that pairs nicely with chocolate.
- Sweetener: Maple syrup or honey work well if you want a natural sweetness; agave is a good neutral option if you prefer less flavor impact.
- Salt: Sea salt flakes add a bright contrast; if avoiding salt, skip or substitute with a pinch of smoked paprika for a smoky twist.
- Add-ins: Dried cranberries or chopped pretzels can add texture and flavor variety—feel free to experiment with dried fruits or candies.
- Chocolate Type: Milk or dark chocolate can be used based on your preference; dark offers a richer, more intense flavor.
Equipment & Tools
- Medium mixing bowl: To hold and mix the ingredients.
- Microwave-safe bowl: For melting chocolate evenly.
- Spatula: To fold and coat the peanuts.
- Parchment paper-lined tray: For setting the clusters without sticking.
Step-by-step guide to peanut clusters
- Gather your equipment: a medium mixing bowl, a microwave-safe bowl, a spatula, and a baking sheet lined with parchment paper. The bowl is for melting, the sheet for setting.
- Combine 1 ½ cups of chocolate chips and 2 tablespoons of butter in the microwave-safe bowl. Microwave in 30-second bursts on medium power (about 600W), stirring after each, until smooth. This usually takes 1-2 minutes.
- While the chocolate melts, measure 1 ½ cups of roasted peanuts. If they’re salted, that’s perfect; if not, consider adding a pinch of salt later for balance.
- Pour the peanuts into the melted chocolate. Use the spatula to fold and coat the peanuts evenly, about 2-3 minutes, until everything is nicely combined and glossy.
- Using a tablespoon or small scoop, drop spoonfuls of the mixture onto the prepared parchment-lined sheet, spacing them about 2 inches apart. Slightly press down if you want a flatter cluster.
- Optional: sprinkle a tiny pinch of flaky sea salt on each cluster for extra flavor. It enhances the sweet and salty contrast.
- Place the tray in the fridge for at least 30 minutes. The clusters should firm up and set completely.
- Check for doneness: they should be firm to the touch, shiny, and hold shape without sticking to your fingers. If not, give them a little more time in the fridge.
- Once set, gently peel the clusters from the parchment. Store in an airtight container in the fridge for up to a week, or freeze for longer storage.
Let the clusters rest in the fridge until fully firm, about 30 minutes. Serve directly from fridge or room temperature for a softer bite. For best texture, store in an airtight container in the fridge.
How to Know It’s Done
- Chocolate is fully melted and smooth, no lumps.
- Clusters are firm and hold shape when touched.
- Surface is shiny and not sticky to the touch.
Nostalgic No-Bake Peanut Clusters
Ingredients
Equipment
Method
- Place the chocolate chips and butter in a microwave-safe bowl and microwave in 30-second bursts, stirring well after each, until the mixture is smooth and glossy. The chocolate should be fully melted, releasing a sweet aroma.
- Add the roasted peanuts to the melted chocolate and gently fold together with a spatula until the peanuts are evenly coated and the mixture is cohesive.
- Stir in the honey or maple syrup and vanilla extract, blending well to incorporate all flavors into the chocolate mixture.
- Scoop small spoonfuls of the mixture onto a parchment-lined tray, spacing them about 2 inches apart. Lightly press down if you prefer a flatter cluster.
- If desired, sprinkle a tiny pinch of flaky sea salt on top of each cluster to enhance the sweet and salty contrast.
- Refrigerate the tray for at least 30 minutes, until the clusters are firm, shiny, and hold their shape when touched.
- Once set, carefully peel the clusters from the parchment paper and transfer to an airtight container. Keep refrigerated until ready to enjoy.
Pro tips for perfect clusters
- melting: Microwave in short bursts to prevent overheating and burning the chocolate, and stir until smooth.
- coating: Fold the peanuts into the melted chocolate gently to keep some crunch in each cluster.
- shaping: Use a small scoop or tablespoon to evenly portion the clusters, ensuring uniform size and quick setting.
- chilling: Allow the clusters to chill fully in the fridge—at least 30 minutes—to achieve the perfect firm bite.
- finishing: Sprinkle a tiny pinch of flaky sea salt on top right before chilling to enhance flavor contrast.
- variation: For extra shine, gently warm the cooled clusters with a hairdryer for a few seconds—just don’t overheat.
- storage: Keep these in an airtight container in the fridge to maintain crispness and prevent melting.
Common mistakes and how to fix them
- FORGOT to stir thoroughly → Stir until chocolate is smooth and shiny.
- DUMPED in all ingredients at once → Add ingredients gradually for even coating.
- OVER-TORCHED chocolate → Remove from heat immediately to prevent burning and bitterness.
- FAILED to chill properly → Chill until clusters are firm and hold shape, about 30 minutes.
Quick Fixes for Smooth Clusters
- If chocolate seizes, splash in a teaspoon of warm milk and stir gently.
- When nuts stick together, patch with a tiny drizzle of melted chocolate and reshape.
- Splash cold water on over-torched chocolate to stop the burning smell instantly.
- DUMPED ingredients in the wrong order? Fix by gradually adding and folding for even coating.
- Shield fragile clusters with a light spray of non-stick spray if they crack during handling.
Prep, store, and reheat tips
- Prepare the clusters a day in advance; they taste better after flavors meld overnight in the fridge.
- Store in an airtight container in the fridge for up to a week; the chocolate stays shiny, and texture remains firm.
- For longer storage, freeze the clusters in a sealed bag or container for up to a month; they may develop a slight frost layer, but still delicious.
- Reheat by letting them sit at room temperature for 10 minutes or briefly warming in a low oven (around 90°C / 200°F) until just softening, then let cool slightly for a better bite.
Top questions about peanut clusters
1. Can I use natural peanut butter instead of roasted peanuts?
Yes, using natural peanut butter works, but it might make the mixture a bit runnier and less crunchy.
2. Can I substitute chocolate chips with chopped chocolate bars?
Absolutely. Just chop up your favorite chocolate bar and melt it the same way, keeping an eye on the texture.
3. How do I prevent the clusters from sticking to the tray?
To prevent sticking, make sure to line your tray with parchment paper and keep the clusters refrigerated until firm.
4. My chocolate isn’t melting properly—what should I do?
If the chocolate isn’t melting smoothly, try lowering the microwave power or melting it in a double boiler for more control.
5. Can I customize these clusters with other ingredients?
You can add dried fruits or shredded coconut for extra flavor and texture, depending on what you like or have on hand.
6. How should I store leftover peanut clusters?
Storing them in an airtight container in the fridge keeps them crisp for up to a week; freezing extends shelf life.
7. Can I re-melt the clusters if they break or lose shine?
Yes, you can melt and re-coat them if they lose their shine or break apart, just re-chill to set again.
8. What if my melted chocolate gets grainy or seizes?
If your chocolate seizes or becomes grainy, add a teaspoon of warm milk and stir gently until smooth again.
9. How do I get evenly-sized clusters?
Using a small cookie scoop helps shape uniform clusters quickly and makes the process less messy.
10. How can I make the clusters softer or crunchier?
For a softer texture, let the clusters sit at room temperature for a few minutes before serving, but keep them refrigerated for crunch.
Making these peanut clusters is a small act of rebellion against busy days. The way the chocolate and peanuts come together, melting into each other, is a reminder that simple ingredients can create something unexpectedly satisfying.
Whenever I need a quick, honest treat, I turn to this recipe. It’s a messy, tactile process that brings a little warmth and nostalgia, especially when the house fills with that smoky, sweet aroma of melting chocolate and toasted peanuts.

Hi, I’m Mia Bennett, the chef and storyteller behind Grounding in Tradition. I’m so glad you’re here. This blog is my way of preserving the flavors, techniques, and rituals that shaped me as both a cook and a professional chef. Grounding in Tradition is not about trends or shortcuts. It is about honoring where food comes from, understanding the hands that prepare it, and carrying forward recipes that deserve to be remembered.


Leave a Reply