
Making these no-bake granola bars takes me back to childhood afternoons, when my mom would toss together whatever she had in the pantry. There’s a satisfying moment in pressing the sticky mixture into the pan, feeling the oats and honey cling together. It’s a simple pleasure that somehow feels like a small act of rebellion against the fuss of store-bought snacks.
What I love about this recipe is how flexible it is—no oven needed, just a bit of patience for the bars to set. It’s the kind of project that fits in a busy moment, like while catching up on a podcast or watching the kettle boil. Plus, it’s endlessly customizable, so you can swap nuts, dried fruit, or even add a dash of spice—whatever makes you feel like a kid again.
Focusing on the nostalgic joy of making childhood snacks that are both simple and customizable, emphasizing the satisfaction of creating a healthy, no-bake treat with minimal fuss.
The story behind this recipe
This recipe came from a chaotic weekend when I needed something quick and satisfying, but didn’t want to turn on the oven. I remembered the joy of childhood snacks—those chewy, sticky bars I’d grab after school. It’s funny how something so simple can spark a wave of nostalgia and creativity. Now, it’s become my go-to for busy mornings and unexpected guests, always a hit with everyone who tastes them.
Ingredient breakdown
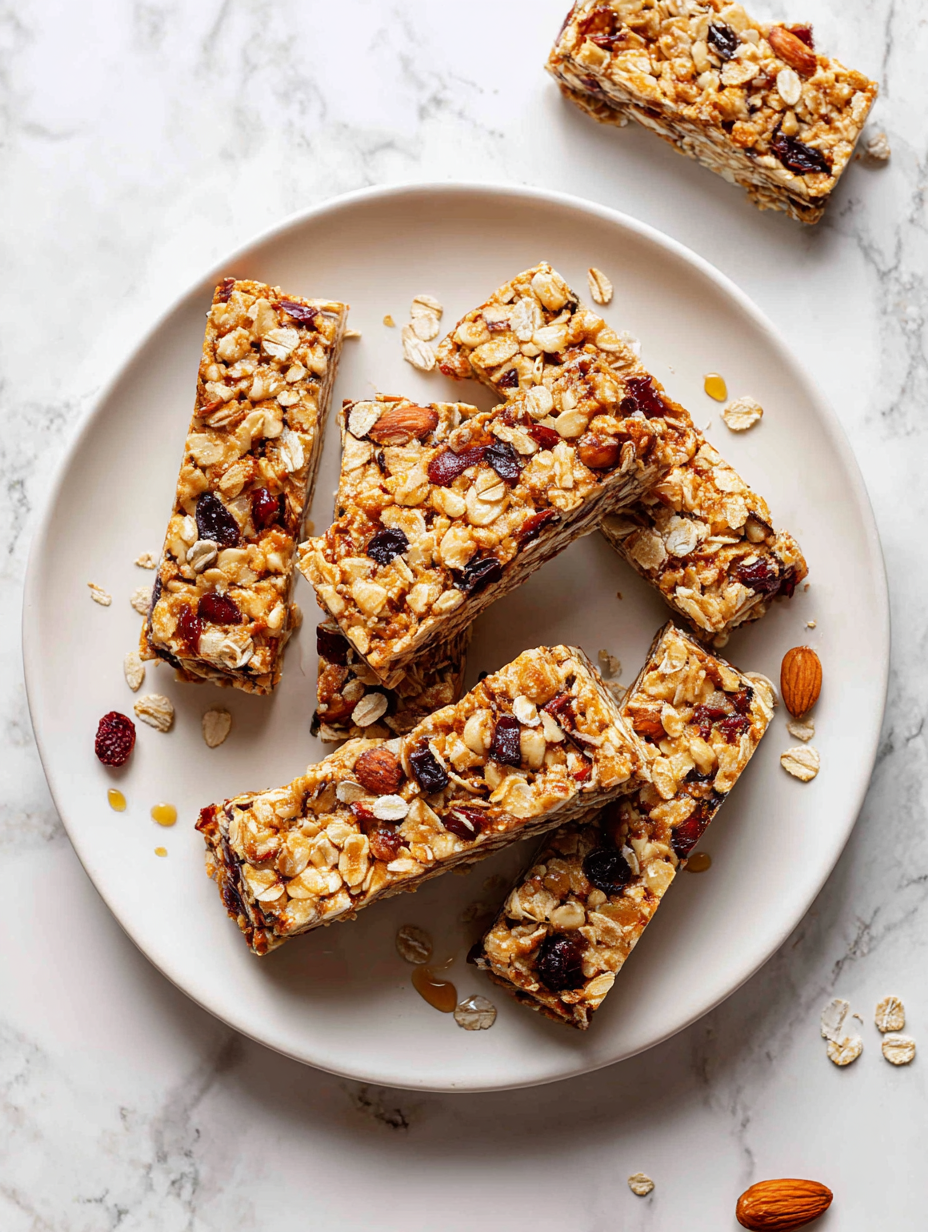
- Rolled oats: I like the hearty chew they add, but if you want a softer bar, try quick oats instead.
- Honey: It’s the glue that binds everything together—warmed slightly, it becomes oozy and easy to mix, but skip if you prefer a less sweet bar.
- Nut butter: I go for almond, but peanut or cashew work just as well—adds a rich, creamy texture that melts in your mouth.
- Dried fruit: Chewy bits of apricot or cranberry give a nice tang—use fresh or dried, just mind the added sugar content.
- Nuts and seeds: Toasted almonds or sunflower seeds give crunch and depth—toast lightly for extra smoky flavor, but skip if allergy concerns.
Spotlight on key ingredients
Rolled oats:
- I like the hearty chew they add, but if you want a softer bar, try quick oats instead.
- Honey: It’s the glue that binds everything together—warmed slightly, it becomes oozy and easy to mix, but skip if you prefer a less sweet bar.
- Nut butter: I go for almond, but peanut or cashew work just as well—adds a rich, creamy texture that melts in your mouth.
Honey:
- It’s the glue that holds the mixture together, giving a sweet, floral aroma when heated and a sticky texture when mixed.
- Nut butter: Creamy and rich, it melts into the oats giving that satisfying, smooth mouthfeel, with a faint roasted note if toasted beforehand.
Notes for ingredient swaps
- Sweetener: Maple syrup can replace honey, adding a slightly different, caramel-like flavor and a softer texture.
- Nut Butter: Sunflower seed butter works well for nut allergies, but expect a thinner, less creamy bar.
- Oats: Quinoa flakes can substitute rolled oats for a lighter, crunchier texture.
- Dried Fruit: Fresh chopped dried apricots or dates add natural sweetness and chew, but may alter shelf life.
- Nuts & Seeds: Pumpkin seeds or pecans can swap in for variety, bringing different crunch and flavor profiles.
Equipment & Tools
- 20cm (8-inch) square baking pan: Holds the mixture as it sets.
- Parchment paper: Prevents sticking and makes removal easy.
- Large mixing bowl: Combines dry ingredients.
- Small saucepan: Warms the honey and nut butter.
- Spatula: Folds ingredients and presses mixture.
- Sharp knife: Cuts the set mixture into bars.
Step-by-step guide to no bake bars
- Gather your equipment: a 20cm (8-inch) square baking pan, parchment paper, a large mixing bowl, a spatula, and a small saucepan. Line the pan with parchment, leaving overhang for easy removal.
- In the saucepan, combine 1 cup honey and 1/2 cup nut butter. Warm over low heat (about 70°C/158°F) for 2-3 minutes, stirring until smooth and oozy. This helps everything stick together.
- While the mixture heats, stir together 3 cups rolled oats, 1 cup chopped nuts (like almonds or walnuts), and 1/2 cup dried fruit in the large bowl. Feel free to customize here—add seeds or shredded coconut if you like.
- Pour the warm honey-nut butter mixture over the dry ingredients. Use the spatula to fold everything together until evenly coated and sticky. The oats should glisten, and the mixture will be thick but still spreadable.
- Transfer the mixture into the prepared pan. Use the spatula or your hands (dampened slightly) to press it firmly into the corners and flatten the surface. Make sure it’s compacted so the bars hold together well.
- Let the mixture set at room temperature for at least 1 hour, or refrigerate for 30 minutes to speed up the process. The longer they chill, the better they hold together when cut.
- Once set, lift the bars out using the parchment overhang. Slice into 8-10 bars with a sharp knife. For clean cuts, wipe the knife between slices.
- Finish by storing in an airtight container at room temperature for up to 3 days, or in the fridge for up to a week. Wrap individually for on-the-go snacking.
Allow the bars to rest at room temperature or in the fridge until firm. Slice into bars, then store in an airtight container. Wrap individually for portability or serve immediately.
How to Know It’s Done
- Mixture should be sticky and hold together when pressed.
- Bars should feel firm and set after chilling, not sticky or soft.
- Color should be golden brown around the edges when pressed into the pan.
No-Bake Granola Bars
Ingredients
Equipment
Method
- Line your baking pan with parchment paper, leaving overhang for easy removal.
- In the small saucepan, combine honey and nut butter. Warm over low heat, stirring gently, until the mixture is smooth, fragrant, and slightly runny—about 2-3 minutes.
- Meanwhile, in the large mixing bowl, combine oats, chopped nuts, and dried fruit. Mix them together until evenly distributed, creating a colorful, textured dry mixture.
- Pour the warm honey and nut butter mixture over the dry ingredients. Use a spatula to fold everything together, ensuring each oat and nut is coated in the sticky mixture. It should be thick, glossy, and sticky to the touch.
- Transfer the mixture into your prepared pan. Press down firmly with the back of the spatula or your damp hands to create an even, compact layer—this helps the bars hold together.
- Let the bars set at room temperature for at least 1 hour, or chill in the refrigerator for about 30 minutes for quicker firming. You’ll notice the mixture becomes more solid and easier to cut as it cools.
- Once set, use the parchment overhang to lift the block of mixture out of the pan. Place it on a cutting board and cut into 8-10 bars with a sharp knife, wiping the blade between slices for clean edges.
- Enjoy your homemade bars immediately or store them in an airtight container at room temperature for up to 3 days, or in the fridge for up to a week. Wrap individually for on-the-go snacking or packing in lunchboxes.
Notes
Tips for perfect no bake bars
- Bolded mini-head: Use room temperature honey and nut butter for easier mixing, avoiding clumps.
- Bolded mini-head: Warm the honey just until it’s oozy—overheating can make it sticky and difficult to spread.
- Bolded mini-head: Press mixture firmly into the pan with damp hands or a spatula to ensure compact bars.
- Bolded mini-head: Chill the bars thoroughly—at least an hour—to achieve clean, crisp edges when slicing.
- Bolded mini-head: Wipe your knife between cuts for smooth, even slices without sticking or tearing.
- Bolded mini-head: Feel the mixture for stickiness; it should hold together but not be overly greasy or dry.
- Bolded mini-head: For extra crunch, toast nuts and seeds before mixing—adds smoky depth and richer flavor.
Common mistakes and how to fix them
- FORGOT to measure ingredients precisely → Use a scale for accuracy.
- DUMPED mixture into pan without pressing → Firmly press for better bars.
- OVER-TORCHED the mixture → Remove from heat once it just melts and smells toasted.
- MISSED to chill adequately → Chill at least 1 hour for firm, clean cuts.
Quick fixes and pantry swaps
- When mixture is too sticky, splash a little warm water on your hands before pressing.
- If bars crack when cutting, patch with a dab of nut butter for a smoother edge.
- Dumped too much honey? Shield with a sprinkle of oats to absorb excess moisture.
- Over-torched your mixture? Rescue by stirring in a splash of cold water to cool and loosen.
- When bars feel soft, quick freeze for 5 minutes—shimmering edges mean they’re ready to slice.
Prep, store, and reheat tips
- Prep the mixture ahead by measuring and mixing dry ingredients the night before—this saves time and keeps things simple.
- Store the unpressed mixture in an airtight container in the fridge for up to 24 hours; it firms up slightly, making pressing easier.
- Once pressed and set, these bars can be kept at room temperature in an airtight container for up to 3 days, or refrigerated for a week, maintaining their chewy texture.
- Reheat by gently warming in a low oven (around 150°C/300°F) for 5 minutes—look for a slight shimmer and a warm aroma before slicing.
- For longer storage, wrap individual bars in parchment or plastic wrap and freeze for up to a month, maintaining freshness and chewiness.
Top questions about no bake bars
1. How do I know when the bars are set?
Look for bars that feel firm and hold their shape when pressed gently. They should crack slightly at the edges when sliced.
2. How should I cut the bars?
Use a sharp knife wiped clean between slices for neat, even cuts. If they crumble, chill a bit longer.
3. How long do they last?
Store in an airtight container at room temperature for up to 3 days, or refrigerate for a week for freshness.
4. Can I use a different sweetener?
Yes, you can swap honey for maple syrup or agave. Expect a slightly different texture or flavor, but it still works.
5. Can I customize with different nuts or seeds?
Use any nuts or seeds you like, but toasted ones add more flavor and crunch. Feel free to mix and match.
6. What if the mixture is too sticky?
If the mixture is too sticky, dampen your hands or spatula slightly before pressing into the pan.
7. How long should I chill the mixture?
Refrigerate the bars for at least 30 minutes to help them firm up before slicing. Longer chilling makes cleaner cuts.
8. Can I freeze the bars?
Yes, you can freeze the uncut or cut bars for up to a month. Wrap individually for easy grab-and-go snacks.
9. Can I add fresh fruit instead of dried?
When mixing in dried fruit, chop it small so it distributes evenly and doesn’t make the bars too sticky.
10. My bars are crumbling, what do I do?
If the bars crumble or fall apart, press the mixture more firmly into the pan and chill longer.
These no-bake granola bars are a little piece of childhood comfort, made with my own hands in the chaos of a busy day. The smell of toasted oats and honey filling the kitchen takes me back to simpler, slower mornings. They’re not just snacks—they’re a reminder that sometimes, the best things are the easiest to make.
Whenever I stash a few in the fridge, I feel a quiet pride in having whipped up something wholesome and customizable. It’s a small act of self-care, knowing I can reach for a chewy, nutty bar whenever needed. No matter how hectic life gets, these bars keep a little bit of calm within reach.

Hi, I’m Mia Bennett, the chef and storyteller behind Grounding in Tradition. I’m so glad you’re here. This blog is my way of preserving the flavors, techniques, and rituals that shaped me as both a cook and a professional chef. Grounding in Tradition is not about trends or shortcuts. It is about honoring where food comes from, understanding the hands that prepare it, and carrying forward recipes that deserve to be remembered.


Leave a Reply