
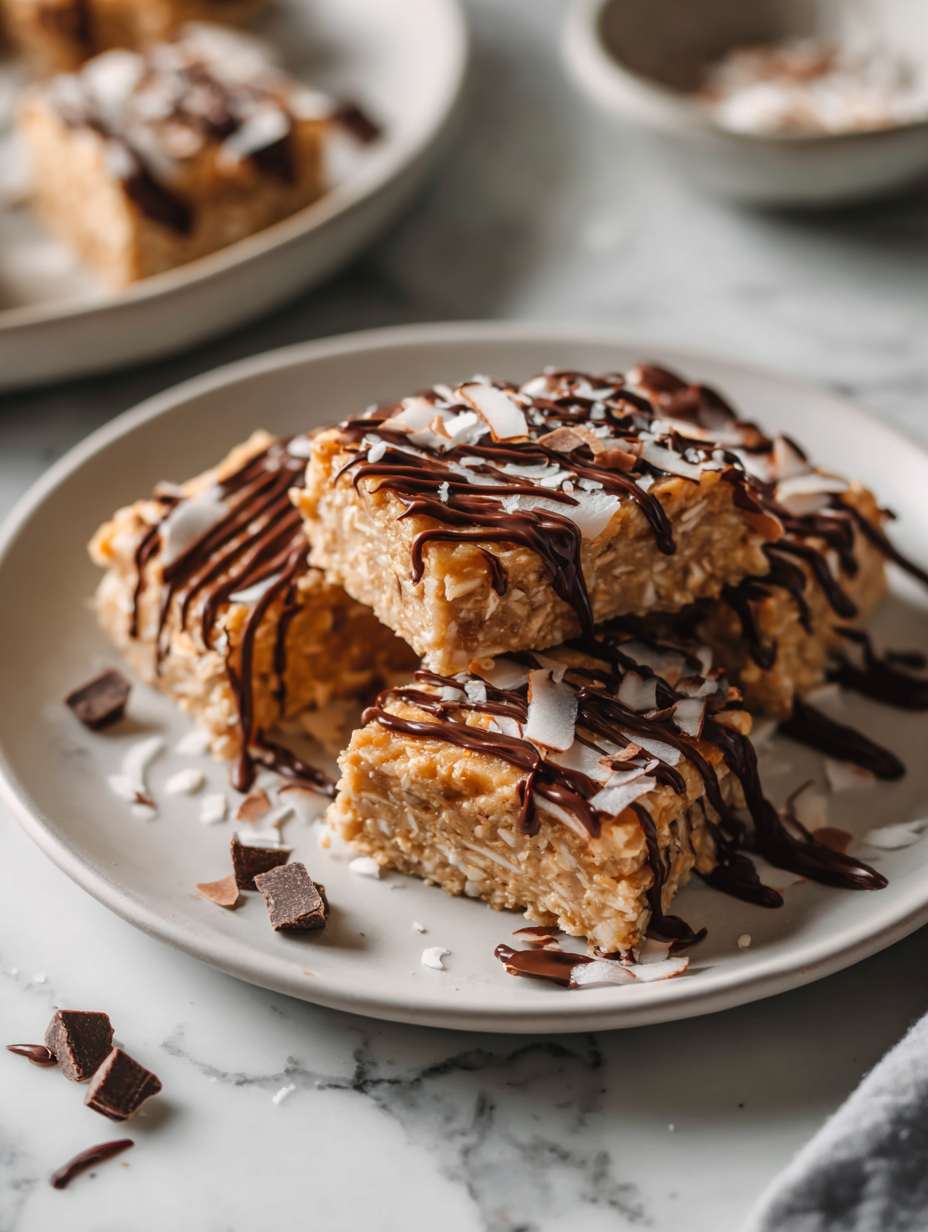
Sometimes, I just need a quick, no-fuss treat that hits all the right notes—sweet, coconutty, and perfectly chewy. These no bake coconut bars are my go-to when I want something satisfying without turning on the oven or fussing over complicated recipes. They come together in minutes, using simple ingredients I keep stocked in my pantry, which makes them a lifesaver on busy days or when unexpected guests drop by.
I love how forgiving this recipe is—no precise baking times, just a bit of melting, mixing, and pressing. It’s like reclaiming a bit of childhood joy, feeling the sticky coconut and chocolate melt together in your mouth. Plus, every bite has a nostalgic, tropical vibe that’s especially bright during summer or when I crave a little escape from the everyday.
This recipe focuses on how simple ingredients and a bit of intuition can create a satisfying treat, without the fuss of baking. It’s about reclaiming the joy of making something delicious with minimal tools, perfect for those busy days or when the oven is already busy with other dishes.
The story behind this recipe
- One afternoon, I was rummaging through my pantry, looking for a sweet fix that wouldn’t require turning on the oven. I remembered a childhood treat my grandma used to make—simple, coconut-packed, and coated in chocolate, but I’d never written down a recipe. That moment sparked the idea to create a version I could whip up anytime, with ingredients I always have nearby.
- It’s funny how these recipes come together—by accident, in a flash of nostalgia, or just because you need something quick and satisfying. Making these coconut bars feels like a small act of rebellion against the fuss of fancy desserts, a reminder that good, honest treats don’t need to be complicated. Now, they’re my go-to for a sweet boost after a hectic day or when I want a little tropical escape in every bite.
- paragraph
Ingredient breakdown: key components
- Unsweetened shredded coconut: I love the chewy texture and intense coconut flavor, but if you want a milder taste, try sweetened coconut and reduce the sweetener. The natural oils in shredded coconut give these bars a rich, oozy feel that’s hard to beat.
- Medjool dates: They’re my secret weapon for natural sweetness and sticky binding—just make sure to soak them briefly if they’re dry, so they blend smoothly without a gritty texture. For a more caramel-like flavor, try using soft, ripe dates.
- Honey or maple syrup: I prefer honey for its floral aroma that complements the coconut, but maple syrup keeps it vegan and adds a smoky sweetness. Adjust the amount depending on how sweet you like your bars—start with less, then tweak.
- Coconut oil: A little melted coconut oil helps everything bind and gives the bars a glossy finish. If you want a firmer texture, add a touch more. If you prefer less coconut flavor, substitute with a neutral oil like grapeseed.
- Dark chocolate: I recommend chopping it finely so it melts evenly over the bars, creating a shiny, crackly topping. For a sweeter finish, go for milk chocolate, but I like the bittersweet contrast of dark. Keep an eye on it while melting to avoid burning.
- Sea salt: Just a pinch enhances all the flavors and balances the sweetness. Sprinkle a tiny bit on top before chilling for a subtle salty crunch that surprises each bite.
- Vanilla extract: A splash boosts the coconut’s tropical aroma and adds depth. If you don’t have vanilla, a tiny dash of coconut extract can amplify that flavor even more.
Spotlight on key ingredients
Coconut:
- Unsweetened shredded coconut: I love its chewy texture and intense coconut flavor, but if you prefer a milder taste, try sweetened coconut and reduce the sweetener. The natural oils give these bars a rich, oozy mouthfeel that’s hard to resist.
- Medjool dates: They’re my secret for natural sweetness and sticky binding—just soak briefly if dry, for a smooth blend. For a caramel-like note, go for ripe, soft dates with a shiny exterior.
Chocolate:
- Dark chocolate: Finely chop it so it melts evenly, creating a shiny, crackly top. Its bittersweet depth contrasts beautifully with the coconut. Keep an eye while melting to prevent burning and ensure a glossy finish.
- Sea salt: Just a pinch enhances the sweetness and coconut aroma, adding a subtle crunch and flavor contrast that surprises with each bite.
Notes for ingredient swaps
- Dairy-Free: Use coconut butter or vegan chocolate. Expect a slightly different richness and melt-in-your-mouth feel.
- Sweetener Swap: Maple syrup or agave syrup can replace honey. They add a different floral or neutral sweetness, so adjust quantity accordingly.
- Nut-Free: Omit nuts or try sunflower seed butter for a similar creamy texture without nuts. The flavor will shift subtly.
- Coconut Variations: Toast the shredded coconut before mixing for a deeper, smoky flavor. Unsweetened keeps it more neutral and natural.
- Chocolate Alternatives: Use white chocolate or cocoa nibs for different flavor profiles and textures, but note melting points vary.
- Binding Agents: If dates aren’t available, mashed bananas or cooked sweet potato can work, though they bring different moisture and flavor.
- Oil Options: Swap coconut oil for avocado oil for a milder, less sweet flavor. Keep in mind, it may alter the overall aroma and texture.
Equipment & Tools
- 20cm (8-inch) square baking dish: Holds the coconut mixture and helps shape the bars.
- Food processor: Blends ingredients into a sticky, even mixture.
- Spatula: Spreads and presses the mixture evenly into the dish.
- Microwave-safe bowl: Melts the chocolate smoothly without burning.
- Sharp knife: Cuts the cooled bars cleanly.
Step-by-step guide to coconut bars
- Equipment & Tools: Line a 20cm (8-inch) square baking dish with parchment paper to prevent sticking. Use a food processor for easy blending, a spatula for pressing, and a microwave-safe bowl for melting chocolate.
- Prepare the dates: Pit the medjool dates and soak them in warm water for 10 minutes to soften. Drain well and set aside.
- Make coconut mixture: In the food processor, combine shredded coconut, soaked dates, honey or maple syrup, coconut oil, vanilla extract, and a pinch of sea salt. Blend until everything is finely chopped and sticky—about 1-2 minutes. Scrape down sides as needed.
- Press into dish: Transfer the mixture to your prepared dish. Use a spatula or your fingers to press it evenly into the bottom, creating a compact layer. Chill in the fridge for 15-20 minutes to firm up.
- Melt chocolate: Break dark chocolate into small pieces. Melt in a microwave-safe bowl in 20-second bursts, stirring between each, until smooth and shiny. Let cool slightly—about 2 minutes—so it doesn’t seize when poured.
- Top with chocolate: Pour the melted chocolate over the coconut layer. Use a spatula to spread evenly, smoothing the top. If you want, sprinkle a pinch of sea salt on top for contrast.
- Chill to set: Place the dish in the fridge for at least 1 hour, or until the chocolate is firm and the bars are solid when gently pressed. If in a hurry, freeze for 20-30 minutes, but don’t forget to watch for cracks or melting edges.
- Cut and serve: Once set, lift the entire block out using the parchment paper. Cut into squares with a warm, sharp knife for clean edges. Serve immediately or store for later.
- Resting & Finishing: Keep the bars in an airtight container in the fridge for up to a week. For longer storage, freeze for up to a month. Bring to room temperature for 5 minutes before serving to enhance flavors.
- Checkpoints & How to Know It’s Done: The chocolate should be shiny and firm, with no sticky or soft spots. The coconut layer should feel dense and hold together when pressed. The bars should crack slightly when cut, revealing a firm yet chewy interior.
Chill the assembled bars in the fridge for at least an hour until firm. For cleaner cuts, refrigerate or freeze briefly. Serve directly from the fridge for a chewy, chilled treat or at room temperature for softer, more aromatic bites.
How to Know It’s Done
- Chocolate topping is shiny and firm when cooled.
- Coconut mixture is sticky but holds shape when pressed.
- Bars crack slightly when cut, indicating firmness.
No-Bake Coconut Bars
Ingredients
Equipment
Method
- Line your square dish with parchment paper, creating an even layer to help with easy removal later.
- Pit the medjool dates and soak them in warm water for about 10 minutes to soften. Drain well and set aside.
- In a food processor, combine the shredded coconut, soaked dates, honey, melted coconut oil, vanilla extract, and a pinch of sea salt.
- Pulse the mixture until it becomes finely chopped and sticky, about 1-2 minutes, scraping down the sides as needed. You want it to hold together when pressed.
- Transfer the mixture into your prepared dish. Use a spatula or your fingers to press it evenly into a compact, smooth layer.
- Place the dish in the fridge for 15-20 minutes to help the mixture firm up.
- Meanwhile, break the dark chocolate into small pieces and melt in a microwave-safe bowl in 20-second bursts, stirring after each, until smooth and glossy.
- Once the coconut layer is chilled and firm, pour the melted chocolate evenly over the top, smoothing it out with a spatula.
- If desired, sprinkle a tiny pinch of sea salt on top for a subtle salty crunch.
- Return the dish to the fridge and chill for at least another hour until the chocolate is set and the bars are firm.
- Once set, lift the entire block out using the parchment paper and cut into squares with a warm, sharp knife for clean slices.
- Enjoy these chewy, chocolate-topped coconut bars straight from the fridge for a cooling treat or at room temperature for a softer bite. Store leftovers in an airtight container in the fridge for up to a week or freeze for longer storage.
Pro tips for perfect coconut bars
- Bolded mini-head: Use a food processor for a fine, sticky blend that binds well.
- Bolded mini-head: When melting chocolate, do so slowly in short bursts to prevent burning and achieve a glossy finish.
- Bolded mini-head: Press the coconut mixture firmly into the dish to ensure clean cuts and compact bars.
- Bolded mini-head: Chill the assembled bars thoroughly—at least an hour—to help them set and make slicing easier.
- Bolded mini-head: For a shiny chocolate top, let the melted chocolate cool slightly before pouring it over the coconut layer.
- Bolded mini-head: If the coconut mixture feels too dry, add a touch more coconut oil or honey for better binding.
- Bolded mini-head: Use a sharp, warm knife to cut the bars cleanly, wiping it between cuts for neat edges.
Common mistakes and how to fix them
- FORGOT to measure ingredients precisely? Use standard measuring cups and spoons for consistency.
- DUMPED hot chocolate over coconut? Wait until it cools slightly to avoid seizing.
- OVER-TORCHED chocolate? Reduce microwave time and stir often to prevent burning.
- MISSED the chilling step? Always chill until bars are firm for clean slicing.
Quick fixes and pantry swaps
- When mixture is too dry, splash in a little more coconut oil for better stickiness.
- If chocolate seizes, patch with a teaspoon of vegetable oil and stir vigorously.
- Splash a few drops of warm water onto the chocolate if it’s too thick to pour.
- DUMPED too much salt? Dampen with a tiny bit of cream or milk for balance.
- When bars crack during slicing, shield edges with a warm knife for cleaner cuts.
Prep, store, and reheat tips
- Prepare the coconut mixture and press into the dish a day ahead; keep covered in the fridge to save time later. The flavors meld overnight, and the texture becomes even more cohesive.
- Store the finished bars in an airtight container in the fridge for up to a week. The coconut stays chewy, and the chocolate retains its shiny snap, but the bars gradually soften if left too long at room temperature.
- For longer storage, freeze the bars for up to a month. Wrap each piece tightly in plastic wrap before freezing to prevent freezer burn. Thaw in the fridge or at room temp for a chewy, chilled treat—watch for condensation that might make the chocolate sticky.
- Reheat by letting the bars sit at room temperature for about 5 minutes; the chocolate will soften slightly, enhancing flavor and aroma. Avoid microwaving directly to prevent melting or blooming of the chocolate, which can dull the shine.
Top questions about coconut bars
1. Can I use other dates or dried fruit?
Use fully ripened medjool dates for the best sticky binding and natural sweetness. Soak dry dates briefly to soften before blending.
2. Can I omit or replace coconut oil?
Yes, coconut oil helps everything bind and gives a glossy finish. If you prefer less coconut flavor, swap with a neutral oil like grapeseed.
3. How do I know when the bars are set?
Chill the bars until the chocolate is firm and the coconut layer is dense, usually about an hour in the fridge. The edges should crack slightly when cut.
4. Can I make these vegan?
Absolutely. Use vegan chocolate or dark chocolate with no dairy. Melt slowly to avoid burning and ensure a shiny top.
5. Can I reduce the sugar content?
Adjust the sweetness by reducing or increasing honey or maple syrup. Start with less and taste the mixture for your preferred sweetness.
6. How should I melt the chocolate?
Use finely chopped chocolate to melt evenly, resulting in a crackly, shiny topping. Stir frequently and melt in short bursts to prevent burning.
7. How long do these bars last?
Store the bars in an airtight container in the fridge for up to a week. For longer storage, freeze for up to a month and thaw in the fridge before serving.
8. What if my mixture is too dry?
If the mixture feels too dry, add a splash more coconut oil or honey to help it bind better. It should be sticky but manageable.
9. How do I get clean slices?
Use a warm, sharp knife for clean cuts. Wipe the blade between slices to keep edges tidy and prevent sticking.
10. What if my chocolate seizes or hardens?
When melting chocolate, do so slowly in short bursts, stirring often. If it seizes, add a teaspoon of vegetable oil to loosen it.
Making these no bake coconut bars is a reminder that simple ingredients can come together into something unexpectedly satisfying. Each bite offers a chewy, tropical punch that’s perfect for brightening up any day. They’re a little bit nostalgic, a little bit indulgent, and honestly, just right for now.
Whenever I reach for one, I think about how easy it was to put together and how the flavors somehow brighten the mood. These bars aren’t just a treat—they’re a small act of making something delightful with minimal fuss, a bit of sweetness in an otherwise busy world.

Hi, I’m Mia Bennett, the chef and storyteller behind Grounding in Tradition. I’m so glad you’re here. This blog is my way of preserving the flavors, techniques, and rituals that shaped me as both a cook and a professional chef. Grounding in Tradition is not about trends or shortcuts. It is about honoring where food comes from, understanding the hands that prepare it, and carrying forward recipes that deserve to be remembered.


Leave a Reply