
On hectic days when the oven’s already working overtime or it’s just too hot outside, I turn to these no-bake oat squares. They come together in no time, no fuss, no heat, and still manage to satisfy that sweet, wholesome craving. It’s like a little bit of comfort you can whip up without breaking a sweat.
I’ve found that having a stash of these in the fridge is a lifesaver. They’re perfect for a quick snack, a lunchbox treat, or even a last-minute dessert. Plus, I love how adaptable they are—swap ingredients here and there, and they still turn out just right. It’s honesty in snack form, simple and honest, like catching a moment of calm in a busy day.
Focusing on how this no bake oat squares recipe offers a quick, no-fuss way to satisfy that craving for something wholesome and sweet after a hectic day or during a busy weekend, especially when the oven’s already busy or it’s just too hot outside to turn it on.
The story behind this recipe
- This recipe was born out of a lazy weekend afternoon, when I realized I had a fridge full of oats, a jar of honey, and a sudden craving for something sweet but wholesome. I didn’t want to turn on the oven or fuss over complicated ingredients, just something straightforward and satisfying.
- It’s become my go-to when I want a quick treat that feels a little special but requires zero baking. There’s a nostalgic charm to pressing together these simple ingredients and watching them set—reminding me of childhood snacks, only a bit more grown-up and textured.
- Over the years, I’ve tweaked the ratios, added nuts or dried fruit, and found that these squares are endlessly adaptable. They’re a small, honest pleasure—perfect for busy mornings or last-minute cravings—and always a reminder that sometimes, simple is best.
Ingredient breakdown
- Old-fashioned oats: I love the chewiness of these, and they soak up the sweet binder. If you prefer a finer texture, try quick oats instead, but the chew remains charming.
- Honey: It’s the glue that holds everything together, adding a natural, floral sweetness. For a darker, richer flavor, swap in maple syrup—just note it’s a bit more intense.
- Nut butter: I often use peanut, but almond or cashew work beautifully, too. They add creaminess and a nutty depth—try melting it slightly to mix better.
- Dried fruit: I toss in chopped dates or cranberries for a chewy burst. Skip if you want fewer sweets, or swap for chocolate chips for a richer treat.
- Nuts: Chopped almonds or walnuts add crunch. Toast them lightly before mixing for extra flavor and aroma—like a smoky whisper in every bite.
- Coconut flakes: They bring a subtle tropical aroma and chewy texture. Unsweetened is best, but sweetened works if you want a sweeter bite.
- Vanilla extract: A splash lifts all the flavors with a warm, fragrant note. If you don’t have vanilla, a pinch of cinnamon can add cozy richness.
Spotlight on key ingredients
Old-fashioned oats:
- I love their chewy texture and how they soak up the sweet binder. If you prefer finer grains, quick oats work, but keep the chewiness.
- Honey: It’s the sticky glue that binds everything with a floral sweetness. Swap in maple syrup if you want a richer, darker flavor—just expect a more intense aroma.
Nut butter:
- I usually reach for peanut, but almond or cashew are lovely alternatives. Warm it slightly to help it blend smoothly and evenly distribute throughout.
- Dried fruit: Chopped dates or cranberries add chewy bursts of sweetness. If you want less sugar, skip it or replace with chocolate chips for a richer bite.
Notes for ingredient swaps
- Sweetener: Maple syrup or agave nectar can replace honey, offering a different flavor profile—richer or more neutral, respectively.
- Nut butter: Almond or cashew butter work well as swaps, adding a slightly different nutty flavor and creaminess—try melting first for easier mixing.
- Oats: Quick oats can be used instead of old-fashioned, but they will make the squares slightly softer and less chewy.
- Add-ins: Chopped dried apricots or cherries can replace or supplement dried cranberries, providing a different chewy fruit experience.
- Coconut: Swap shredded coconut for toasted sesame seeds for a nutty crunch with a hint of smokiness.
- Flavor enhancer: Vanilla extract is classic, but a splash of almond or lemon extract can add a bright, distinctive note—use sparingly.
- Binders: If honey isn’t available, a mix of mashed banana and a bit of honey or syrup can substitute, but expect a softer texture and more moisture.
Equipment & Tools
- 20×20 cm (8×8 inch) baking pan: Holds the mixture and helps shape the squares.
- Spatula: Presses the mixture evenly into the pan.
- Mixing bowl: Combines the ingredients thoroughly.
- Parchment paper: Prevents sticking and makes removal easy.
- Sharp knife: Slices the set mixture into squares.
Step-by-step guide to no bake oat squares
- Gather your equipment: a 20×20 cm (8×8 inch) baking pan, a spatula, a mixing bowl, and a parchment paper sheet. The parchment helps when pressing the mixture flat.
- Line the pan with parchment, leaving some overhang for easy removal. This keeps things tidy.
- In a medium bowl, combine 2 cups old-fashioned oats, 1/2 cup honey, and 1/2 cup nut butter. Stir until well mixed. If the mixture feels too thick, microwave the nut butter for 20 seconds to loosen it up.
- Press the mixture into the prepared pan. Use the back of a spatula or your fingers (dampened slightly) to press firmly and evenly. Aim for a compact layer, about 1 inch thick.
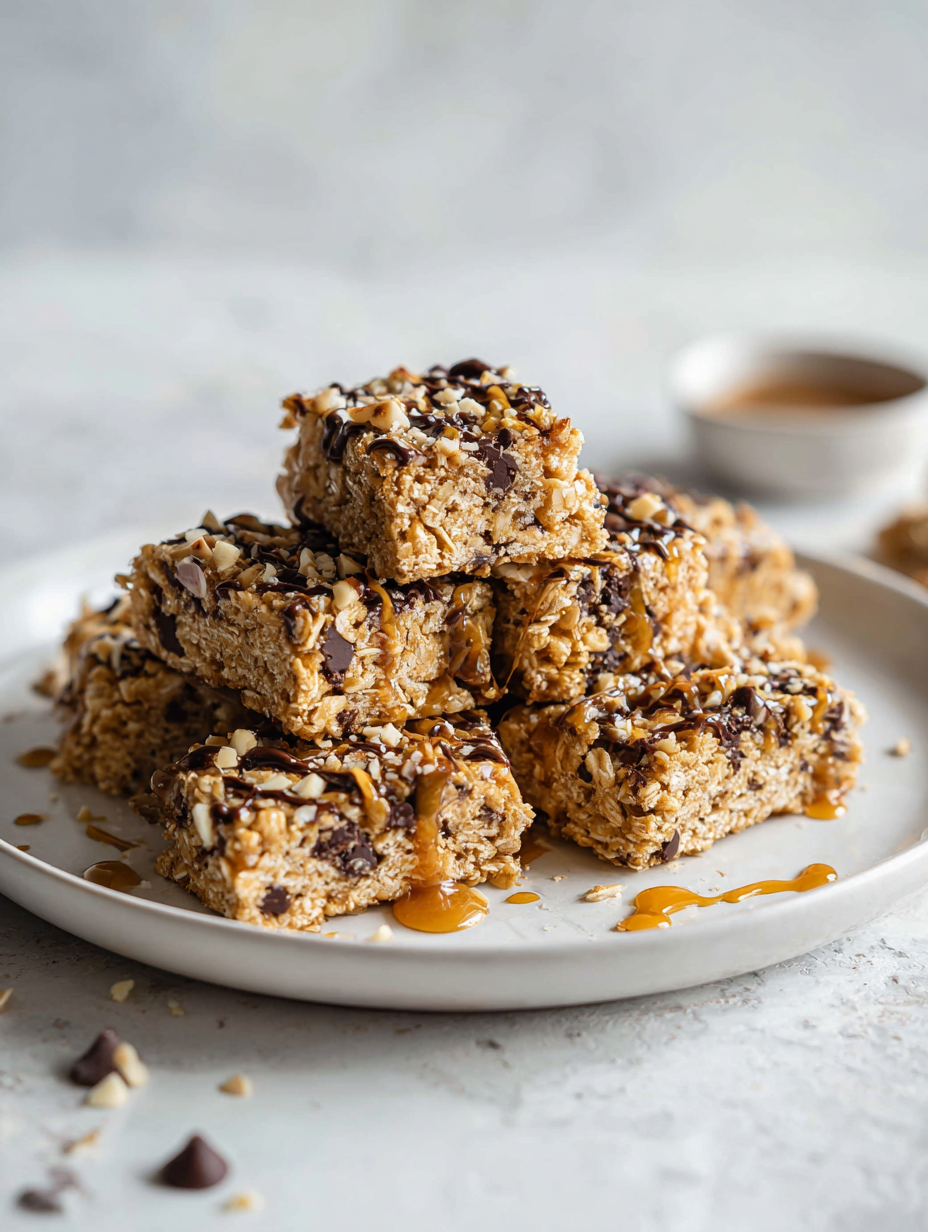
- Add any extras: chopped nuts, dried fruit, or chocolate chips on top, pressing lightly to embed them into the surface.
- Place the pan in the fridge for at least 2 hours, or until firm. The mixture will set as it cools, becoming chewy but holding together well.
- Once set, lift the block out of the pan using the parchment overhang. Slice into squares or rectangles with a sharp knife. Clean the knife between cuts for clean edges.
- Serve immediately or store in an airtight container in the fridge for up to a week. Keep in mind, they soften slightly over time but stay deliciously chewy.
Chill the squares in the fridge for at least 2 hours until firm. Then, lift out using the parchment overhang, slice into neat squares, and serve. Store leftovers in an airtight container in the fridge for up to a week.
How to Know It’s Done
- The mixture is evenly pressed and compact, with no loose oats on top.
- The squares hold their shape when lifted, indicating proper setting.
- The edges are firm and slightly shiny, with a fragrant, nutty aroma.
No-Bake Oat Squares
Ingredients
Equipment
Method
- Line your baking pan with parchment paper, leaving overhang for easy removal.
- In a mixing bowl, combine the oats, dried fruit, toasted nuts, coconut flakes, and vanilla extract. Mix until evenly distributed and fragrant.
- Warm the nut butter slightly in the microwave for about 20 seconds until it’s runny and easy to stir.
- Add the honey and warm nut butter to the dry mixture, stirring thoroughly until all ingredients are coated and sticky.
- Use a spatula to press the mixture firmly into the prepared pan, spreading it evenly and compactly to about 1 inch thickness.
- Add extra toppings like chopped nuts or dried fruit on top, pressing lightly to embed them into the surface.
- Place the pan in the fridge and chill for at least 2 hours until the mixture is firm and set.
- Once set, lift the whole block out using the parchment paper overhang and transfer to a cutting board.
- Slice into neat squares or rectangles with a sharp knife, pressing gently if cracks appear.
- Arrange the squares on a plate and enjoy immediately, or store in an airtight container in the fridge for up to a week.
Notes
Pro tips for perfect no bake squares
- Use a damp spatula → Helps press mixture evenly without sticking.
- Chill until firm → Ensures clean cuts and prevents crumbling.
- Toast nuts lightly → Boosts flavor and adds aroma, making every bite richer.
- Use parchment paper → Prevents sticking and simplifies removal.
- Microwave nut butter briefly → Loosens it up for easier mixing and even distribution.
- Press mixture firmly → Creates a compact, chewy texture that holds together well.
- Add extras before setting → Embeds toppings, avoiding slipping off later.
Common mistakes and how to fix them
- FORGOT to evenly press mixture → Use a damp spatula for compactness.
- DUMPED too much liquid → Adjust honey or nut butter for consistency.
- OVER-TORCHED the edges → Keep a close eye; remove once golden and fragrant.
- MISSED the refrigeration step → Chill thoroughly until firm before slicing.
Quick fixes and pantry swaps
- When mixture feels too sticky → Splash in a bit more oats, then re-press firmly.
- If squares crack when sliced → Patch with a tiny dab of nut butter to hold edges.
- Over-torched edges → Shield with foil or reduce heat slightly for a gentler finish.
- Forgot to chill thoroughly → Rest in fridge at least 2 hours for proper setting.
- If mixture is dry and crumbly → Open pantry swap: add a drizzle of honey to moisten and bind.
Prep, store, and reheat tips
- Prep the mixture ahead: combine oats, honey, and nut butter the night before for an even easier assembly the next day.
- Store the unpressed mixture in an airtight container in the fridge for up to 24 hours; it firms up slightly, making pressing easier.
- Once set, these squares stay good in the fridge for up to a week—expect a slight softening over time, maintaining their chewiness.
- Reheat gently: if you want warmer bites, microwave a square for 10-15 seconds until just warmed through—watch for melting or uneven heat.
- To keep them fresh longer, wrap individually in plastic wrap or store in an airtight container; the aroma of honey and oats will linger.
Top questions about no bake oat squares
1. Can I press the mixture by hand?
Yes, pressing mixture firmly helps the squares hold together better and stay chewy. Use a spatula or damp hands.
2. How long do no bake oat squares last?
Storing in an airtight container in the fridge keeps them fresh for up to a week. They soften slightly over time.
3. Can I substitute honey?
You can swap honey for maple syrup or agave nectar. They each add a different sweetness and flavor profile.
4. Should I toast the nuts first?
Yes, toasted nuts add extra flavor and aroma. Toast them lightly before mixing for a richer crunch.
5. What if my mixture is too sticky or dry?
If the mixture feels too sticky, add a few more oats. If too dry, a drizzle of honey or nut butter helps.
6. How long should I chill the squares?
Chill the squares in the fridge for at least 2 hours until firm. This makes slicing easier and neater.
7. Can I skip the parchment paper?
Use parchment paper to line your pan. It prevents sticking and makes removing the squares a breeze.
8. What add-ins work well?
You can add dried fruits like cranberries or chopped dates, or sprinkle chocolate chips on top before chilling.
9. Are quick oats okay to use?
Using old-fashioned oats gives a chewier texture. Quick oats are softer but still work if you prefer less bite.
10. What if my squares crack?
When mixture cracks when slicing, gently press together with a bit of nut butter to repair edges.
These no bake oat squares are my go-to for those hectic days when I need something quick and honest. There’s a real satisfaction in pressing together simple ingredients and watching them set into firm, chewy bites that remind me of childhood snacks, only a bit more grown-up. They’re a reminder that sometimes, the simplest treats are the most satisfying, especially when they come together without turning on the oven.
Having a stash in the fridge means I can always reach for something wholesome and sweet without much fuss. Whether it’s a quick snack or a last-minute dessert, these squares deliver a comforting, familiar flavor with every bite—honest, straightforward, and just right for busy moments.

Hi, I’m Mia Bennett, the chef and storyteller behind Grounding in Tradition. I’m so glad you’re here. This blog is my way of preserving the flavors, techniques, and rituals that shaped me as both a cook and a professional chef. Grounding in Tradition is not about trends or shortcuts. It is about honoring where food comes from, understanding the hands that prepare it, and carrying forward recipes that deserve to be remembered.


Leave a Reply