
This no bake chocolate almond bars recipe is a little nod to those quick moments when I need something sweet but don’t want to get caught up in a complicated process. It’s honestly my go-to because it’s fast, no oven required, and the flavors are just so honest—rich chocolate with a hint of toasted almond crunch.
I remember sneaking bites of similar bars as a kid, hiding in the kitchen while my mom wasn’t looking. Now, I keep a stash in the fridge for busy mornings or when friends drop by unannounced. It’s one of those recipes that feels like a small victory—simple, satisfying, and wildly adaptable.
This recipe is inspired by childhood memories of sneaking bites of my grandmother’s homemade chocolate almond bars, but I’ve adapted it for hectic weekdays—no oven, no fuss, just pure, rich flavor that feels like a little secret in your fridge.
The story behind this recipe
- Growing up, I always loved the crunch of toasted almonds and the silky melt of good chocolate. One summer, I accidentally left a mix of chopped almonds and melted chocolate in the fridge overnight, and the next day, it had set into these irresistible bars. That accidental discovery stuck with me, and I started tweaking it—making it a no-bake, simple treat I could whip up on busy days.
- This recipe became my small rebellion against the fuss of baking. It’s a bit like capturing a moment of childhood joy—crisp, rich, and secretly satisfying. I love that it’s flexible; you can add a pinch of sea salt or a sprinkle of flaky sea salt on top for a little extra kick. It’s honest, straightforward, and a reminder that sometimes, the best things come together without much effort.
- heading
- story_type
Key ingredients and tips
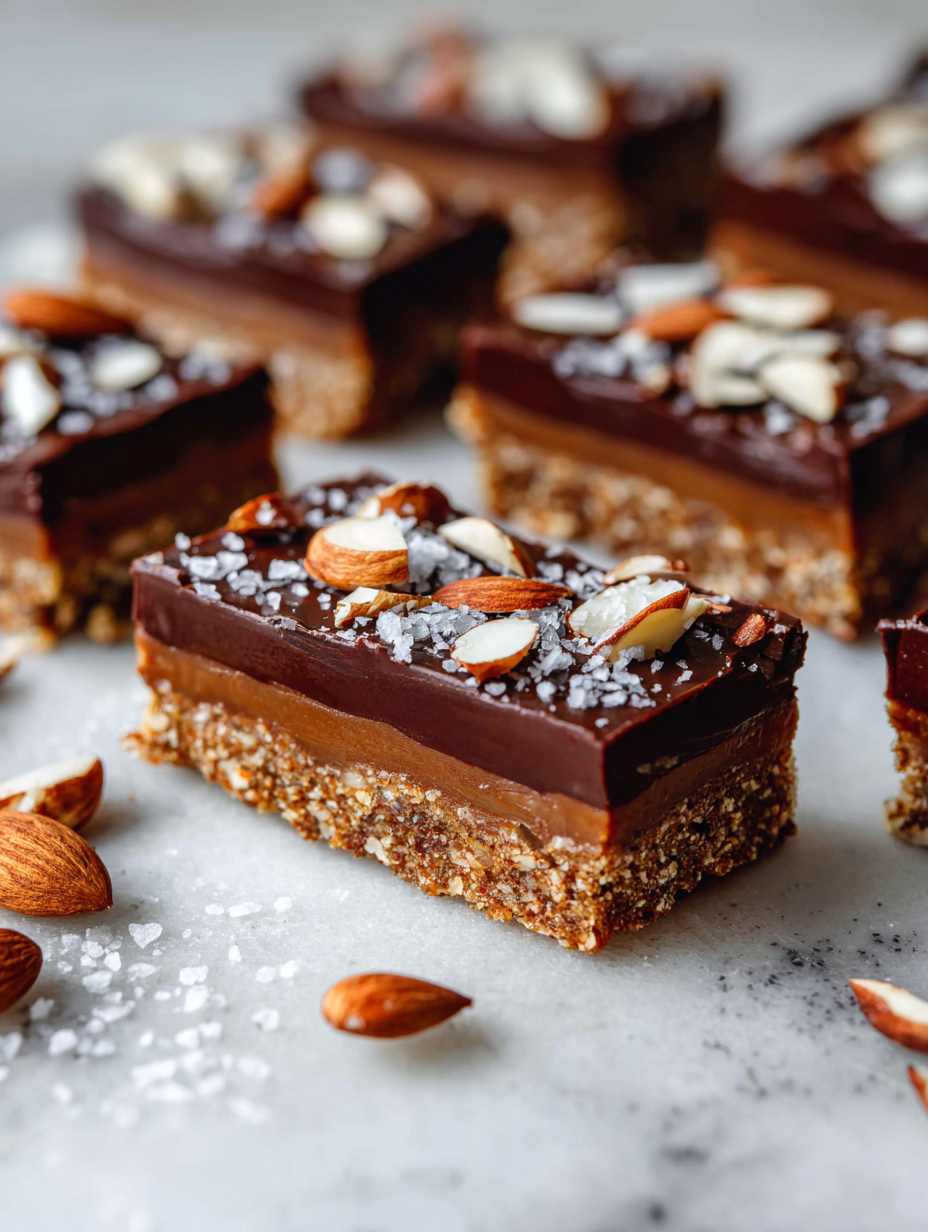
- Dark chocolate: I favor a rich, slightly bitter dark chocolate for that deep cocoa flavor, but you can swap in milk chocolate if you prefer it sweeter and creamier on the palate.
- Almonds: Toasted almonds add crunch and a smoky aroma; if you’re out, chopped pecans or walnuts work well, just keep the toast to bring out their nuttiness.
- Butter: I use unsalted butter for control over salt, but margarine can be a quick substitute—just note it may alter the richness slightly.
- Sweetener: Honey or maple syrup can replace the sugar for a more nuanced, slightly floral sweetness—just adjust quantities to taste.
- Vanilla extract: A splash of vanilla lifts the chocolate, but almond or hazelnut extract can add an interesting twist if you’re feeling adventurous.
- Salt: A pinch of flaky sea salt on top enhances all the flavors—skip it if you prefer a more straightforward, sweet bite.
- Optional add-ins: Dried cranberries or a handful of sea salt flakes can make each batch a little different—experiment to find your perfect combo.
Spotlight on key ingredients
Dark chocolate:
- I love a deep, slightly bitter chocolate that melts smoothly, coating your tongue with a rich cocoa flavor. It’s the backbone of these bars, and choosing good quality makes all the difference.
- Almonds: Toasted almonds add a smoky crunch and a nutty aroma that’s almost caramelized. During mixing, they become glossy and fragrant—like a tiny moment of toast in every bite.
Almonds:
- When toasted, they turn golden and release a warm, smoky scent. They stay crunchy after mixing, adding texture and a hint of roasted flavor that lingers on your palate.
- ingredient
Notes for ingredient swaps
- Dairy-Free: Swap regular butter for coconut oil or vegan butter. It might add a slight coconut aroma, but still keeps the bars rich.
- Chocolate: Use dairy-free dark chocolate or carob chips for a different flavor. Keep an eye on melting times, as some chocolates can seize more easily.
- Nuts: Substitute toasted walnuts or pecans if almonds aren’t available. They’ll add their own unique crunch and aroma.
- Sweetener: Maple syrup or agave nectar can replace sugar for a more floral or caramel note, but reduce slightly to prevent stickiness.
- Flavor Boosts: Add a pinch of cinnamon or espresso powder into the melted chocolate for a richer, more layered flavor.
- Salt: Use flavored sea salts like smoked or smoked sea salt to add an unexpected smoky dimension on top.
- Add-ins: Dried cranberries or chopped dried apricots work well for a tart contrast, or sprinkle with shredded coconut for extra texture.
Equipment & Tools
- 20cm (8-inch) square dish: To hold and shape the chocolate mixture
- Parchment paper: For easy removal and clean slicing
- Microwave-safe bowl: To melt the chocolate gently
- Skillet: For toasting almonds
- Spatula: To mix and press the mixture
- Sharp knife: To cut into bars
Step-by-step guide to no bake bars
- Equip a 20cm (8-inch) square baking dish with parchment paper, leaving overhang for easy removal.
- In a microwave-safe bowl, melt 200g dark chocolate on 50% power in 30-second bursts, stirring each time until smooth. (About 1-2 mins total)
- While melting, toast 1 cup chopped almonds in a dry skillet over medium heat, stirring until fragrant and golden, about 3-4 mins. Cool slightly.
- Pour the melted chocolate into a mixing bowl. Add 2 tablespoons unsalted butter and stir until glossy and smooth.
- Fold in the toasted almonds and 1 teaspoon vanilla extract. Mix until evenly combined; the mixture will be thick and shiny.
- Transfer the mixture into the prepared dish. Use a spatula to press it evenly into the corners, smoothing out the top.
- Lightly tap the dish on the counter to settle the mixture and remove air bubbles. Chill in the fridge uncovered for 1 hour until set.
- Once firm, lift the block out using the parchment overhang. Slice into 8 bars with a sharp knife, wiping it clean between cuts if needed.
- Finish with a sprinkle of flaky sea salt or extra toasted almonds on top if desired. Serve immediately or store.
Chill the bars uncovered in the fridge for at least 1 hour until firm. Slice with a sharp knife, then serve right away or store in an airtight container in the fridge for up to a week.
How to Know It’s Done
- Chocolate should be fully melted and glossy before mixing.
- Almonds should be toasted with a smoky aroma and golden color.
- The mixture should be firm and hold shape when pressed into the dish.
No-Bake Chocolate Almond Bars
Ingredients
Equipment
Method
- Line your square dish with parchment paper, leaving some overhang for easy removal.
- Place the dark chocolate in a microwave-safe bowl and melt it in 30-second bursts, stirring well after each, until smooth and glossy. This gentle melting keeps the chocolate silky and prevents burning.
- Meanwhile, toast the chopped almonds in a dry skillet over medium heat, stirring frequently until fragrant and golden, about 3-4 minutes. Let them cool slightly—you’ll want that smoky aroma and crunch in your bars.
- Add the butter to the melted chocolate and stir until smooth and shiny. The butter adds richness and a velvety texture to the mixture.
- Fold in the toasted almonds and vanilla extract, mixing until evenly combined. The mixture will be thick and glossy, ready to set into bars.
- Pour the mixture into your prepared dish and use a spatula to press it evenly into the corners, smoothing out the top for a clean finish.
- Tap the dish lightly on the counter to remove any air bubbles and help the mixture settle. Chill in the fridge uncovered for at least 1 hour until fully set and firm.
- Once set, lift the block out of the dish using the parchment overhang. Place on a cutting board and slice into 8 bars with a sharp knife, wiping the blade clean between cuts for neat edges.
- Finish by sprinkling flaky sea salt or extra toasted almonds on top if you like a little extra flavor and crunch. Serve immediately or store in an airtight container in the fridge for up to a week.
Tips for perfect no-bake bars
- Bolded mini-head: Use low heat → Melt chocolate gently, avoiding scorching and achieving a glossy finish.
- Bolded mini-head: Toast almonds thoroughly → Bring out smoky aroma and crunch, enhancing texture and flavor.
- Bolded mini-head: Chill in thin layer → Spread mixture evenly in the dish for quick, uniform setting.
- Bolded mini-head: Tap dish firmly → Remove air bubbles and settle the mixture for a smooth top.
- Bolded mini-head: Wipe knife between cuts → Ensure clean, sharp slices without crushing the bars.
- Bolded mini-head: Add sea salt last → Enhance contrast and flavor complexity with a sprinkle on top.
- Bolded mini-head: Work quickly with melted chocolate → Prevent setting before mixing with nuts and spreading.
Common mistakes and how to fix them
- FORGOT to measure ingredients accurately → Use a scale for precision.
- DUMPED hot chocolate into the pan → Let it cool slightly before mixing.
- OVER-TORCHED the chocolate → Melt on low power, stir frequently.
- MISSED the chilling step → Chill until firm for clean slicing.
Quick Fixes and Pantry Swaps
- If the chocolate seizes, splash in a teaspoon of vegetable oil and stir gently.
- When almonds are too dull, toast them a bit longer until fragrant for extra crunch.
- Patch cracks by pressing gently with a spatula and chilling again for a smooth top.
- Shield delicate edges by chilling the bars thoroughly before slicing for clean cuts.
- Rescue melted chocolate by adding a pinch of salt or a teaspoon of hot cream to loosen it.
Prep, store, and reheat tips
- Prepare the mixture and press it into the dish the night before; it firms up better when chilled overnight, making slicing easier.
- Store the bars in an airtight container in the fridge for up to a week; the cool environment keeps the chocolate glossy and prevents melting.
- For longer storage, wrap bars individually in parchment and freeze for up to a month. Thaw in the fridge before serving.
- Refrigerated bars develop a firm, slightly crackly texture; to soften, leave at room temperature for 5-10 minutes before slicing.
- Reheat just slightly in a warm, low oven (about 90°C/200°F) for a few minutes if you prefer a softer, melty bite—watch for melting chocolate.
Top questions about no bake bars
1. Can I use milk chocolate instead of dark?
Use good quality dark chocolate for a rich, smooth melt that coats your palate with cocoa. Milk chocolate works, but it’s less intense.
2. Can I substitute almonds with other nuts?
Yes, toasted almonds bring a smoky crunch and aroma, but pecans or walnuts can swap in if needed. Toast them first for best flavor.
3. Are these bars dairy-free?
Absolutely. Coconut oil or vegan butter work well for dairy-free options, though they may alter the richness slightly.
4. How long should I chill the bars?
Chill the mixture in the fridge for at least an hour until it’s firm and set. It should hold shape and feel slightly crackly when sliced.
5. My chocolate seized, what do I do?
If the chocolate seizes, add a teaspoon of vegetable oil and stir gently until smooth again. It helps loosen the texture.
6. How do I get clean cuts?
Use a sharp knife, wiped clean between cuts, to get neat, clean slices. Chill the bars thoroughly first for best results.
7. Can I make these ahead?
You can prepare the chocolate mixture the night before. Keep in a sealed container in the fridge for a quick, ready-to-go treat.
8. How long do these last?
Store in an airtight container in the fridge for up to a week. For longer, freeze wrapped bars for up to a month, thaw in the fridge.
9. Can I reheat these bars?
Reheat very gently in a warm oven or microwave for a few seconds to soften, but watch for melting or burning.
10. How can I enhance the flavor?
For extra flavor, sprinkle flaky sea salt on top before chilling. It enhances the chocolate and almonds with a salty crunch.
Making these no bake chocolate almond bars is like capturing a moment of simple joy—rich, crunchy, and just a little messy in the best way. They remind me that sometimes, the best treats are the easiest to pull together, especially when you need a quick fix for sweet cravings.
Sharing them with friends or sneaking a quiet moment alone with a square feels like a tiny celebration. It’s a recipe that’s honest, forgiving, and perfect for those days when you want something satisfying without fuss.

Hi, I’m Mia Bennett, the chef and storyteller behind Grounding in Tradition. I’m so glad you’re here. This blog is my way of preserving the flavors, techniques, and rituals that shaped me as both a cook and a professional chef. Grounding in Tradition is not about trends or shortcuts. It is about honoring where food comes from, understanding the hands that prepare it, and carrying forward recipes that deserve to be remembered.


Leave a Reply