
Sometimes, I crave a dessert that’s quick, no-fuss, and hits that nostalgic sweet spot. These no-bake chocolate coconut bars are exactly that—rich, chewy, with just enough crunch from toasted coconut. They’re my go-to when I want something satisfying without turning on the oven or fussing with complicated recipes.
What makes this recipe special isn’t just the ease, but how remarkably adaptable it is. I’ve swapped ingredients, added a pinch of sea salt, or used dark chocolate for depth. It’s a simple treat that feels like a small act of self-care, especially when life gets chaotic and I need a little sweet moment that’s honest and unpolished.
This recipe is inspired by the idea of reclaiming childhood comfort foods, but with a grown-up twist. It’s about creating a no-bake treat that’s simple enough for weeknights but indulgent enough to feel like a little victory. The process is almost meditative—melting, mixing, pressing—no oven required, just a good spoon and a bit of patience.
The story behind this recipe
This recipe came from a lazy Sunday afternoon craving that turned into a little kitchen experiment. I remembered how my grandma used to keep a stash of coconut and chocolate bars in the pantry—simple, no-fuss treats that were more about flavor than fuss. One day, I decided to recreate that vibe, but without turning on the oven or complicated ingredients. Now, it’s my go-to when I need a quick sweet fix, especially when I want something rich but still easy enough to whip up in minutes.
Key Ingredients Breakdown
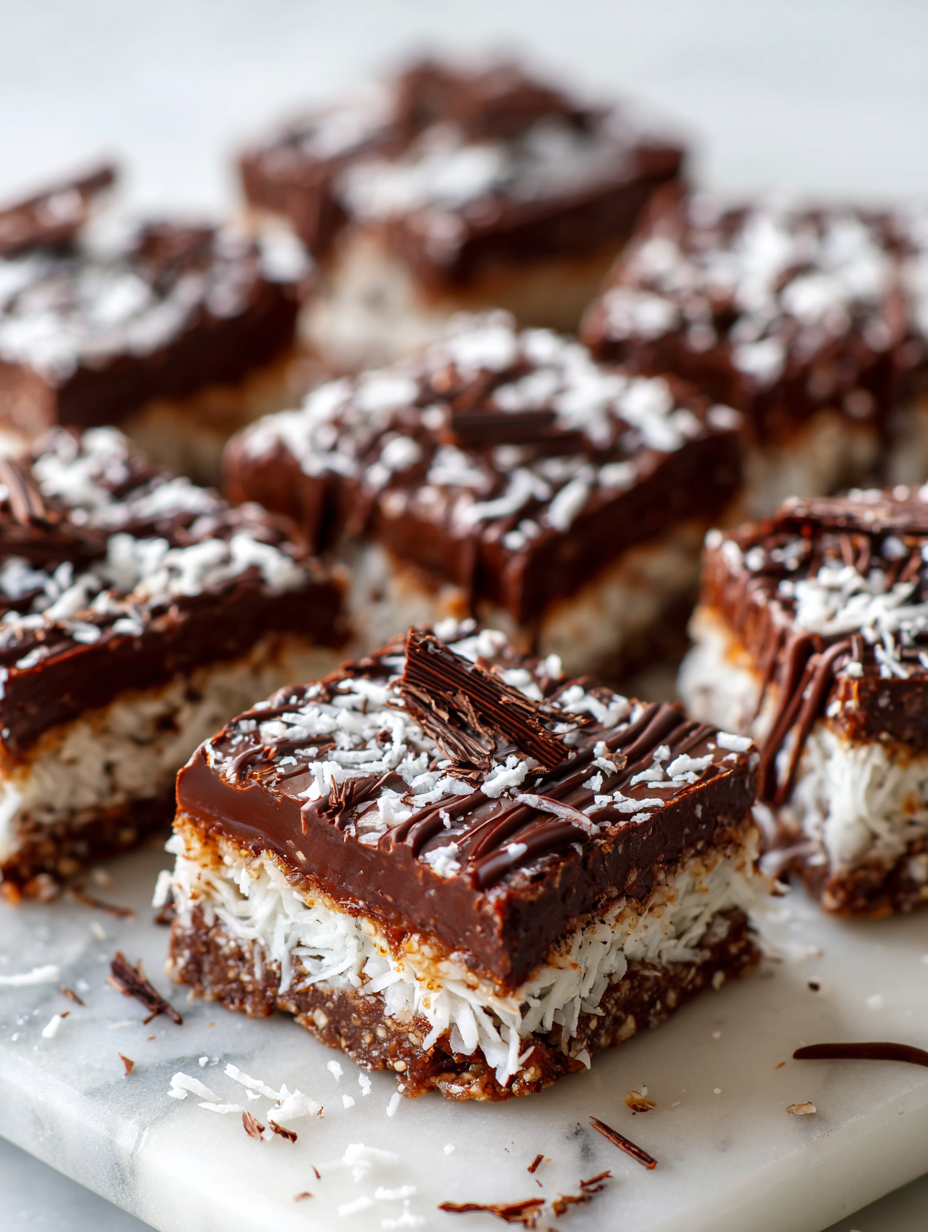
- Coconut flakes: I like using toasted, golden flakes—they add a smoky, caramel aroma that makes the bars feel richer. Skip to unsweetened if you prefer less sweetness.
- Dark chocolate: I melt smooth, bittersweet chocolate for a deep flavor that balances the coconut. If you only have milk chocolate, just expect a milder, sweeter finish.
- Butter: I use real butter for that glossy, velvety coating. For a dairy-free version, coconut oil works but won’t give quite the same richness.
- Sweetened condensed milk: It’s the glue that makes everything stick together. If you want to skip it, try almond or cashew cream, but expect a less chewy texture.
- Vanilla extract: I love a splash of vanilla—it amplifies the chocolate and coconut flavors. Use a tiny pinch of sea salt to enhance the sweetness if desired.
- Salt: Just a pinch makes the flavors pop and balances the sweetness. Don’t skip it unless you want a more one-dimensional taste.
- Optional add-ins: Dried cherries or chopped nuts can bring a surprise crunch or tartness—think of it as a little unexpected joy in each bite.
Spotlight on key ingredients
Coconut flakes:
- I prefer toasted, golden flakes—they add a smoky, caramel aroma that deepens the flavor. Unsweetened works if you want less sweetness.
- Dark chocolate: I melt smooth, bittersweet chocolate for a rich, intense flavor. Milk chocolate will soften the bittersweet edge, making it milder and creamier.
Dark chocolate:
- Sweetened condensed milk: It’s the glue that binds everything. If you want dairy-free, try coconut cream—expect a slightly less chewy texture but still luscious.
- Butter: I use real butter for that glossy coat. Coconut oil works as a dairy-free alternative, but it leaves a more subtle richness and a hint of coconut aroma.
Notes for ingredient swaps
- Dairy-Free: Swap butter for coconut oil or vegan butter. Expect a slightly different richness and a hint of coconut aroma.
- Sweetened Coconut: Use unsweetened coconut flakes for a less sweet, more natural coconut flavor. Toast them a bit longer for extra toasty notes.
- Chocolate: Substitute with dark chocolate chips or dairy-free chocolate. The flavor remains rich, but the melt might be a touch less silky.
- Condensed Milk: Try coconut cream or a thickened nut milk for a dairy-free, slightly less chewy bar. Expect a subtler sweetness.
- Add-ins: Chopped nuts or dried fruit can be swapped in. Nuts add crunch, dried fruit offers tart bursts—think of it as a texture upgrade.
- Sweetener: Honey or maple syrup can replace condensed milk. Use slightly less, as they are sweeter and more liquid.
- Flavored Extracts: Almond or peppermint extract can add a different aromatic punch. Use sparingly, as they’re more potent.
Equipment & Tools
- 20cm (8-inch) square pan: To set and hold the mixture as it firms.
- Heatproof spatula: To fold ingredients and smooth the surface.
- Mixing bowl: For melting chocolate and mixing ingredients.
- Parchment paper: To prevent sticking and make removal easier.
Step-by-step guide to no bake bars
- Gather your equipment: a 20cm (8-inch) square pan, a heatproof spatula, a mixing bowl, and a parchment paper-lined tray for setting.
- In a microwave-safe bowl, melt 200g (7 oz) of dark chocolate on 50% power in 30-second bursts, stirring each time until smooth. (Approx. 1-2 minutes total).
- In a separate bowl, toast 1 cup of shredded coconut in a dry skillet over medium heat, stirring constantly, until golden and fragrant (~3-4 minutes). Keep an eye on it to prevent burning.
- Add 1/2 cup of unsalted butter to the melted chocolate, stirring until fully incorporated and glossy. Let it cool slightly for 1-2 minutes.
- Stir in 1/2 cup of sweetened condensed milk and 1 teaspoon vanilla extract until well combined. The mixture should be smooth and slightly thickened.
- Pour the toasted coconut into the chocolate mixture, gently folding until evenly coated. If the mixture feels too stiff, add a teaspoon of milk to loosen it slightly.
- Transfer the mixture to your prepared pan. Use a spatula to press it evenly into the corners and smooth the top. Lightly tap the pan to settle the mixture.
- Refrigerate uncovered for at least 2 hours, or until firm and set. For best results, leave it overnight.
- Once set, lift the slab out using the parchment paper and cut into bars or squares with a sharp knife. Serve immediately or store.
Refrigerate uncovered for at least 2 hours until firm. Once set, cut into bars and serve. Keep leftovers in an airtight container in the fridge for up to a week, or freeze for longer storage.
How to Know It’s Done
- Chocolate and coconut mixture is glossy and holds shape when pressed.
- Bars are firm and hold together when cut, with no sticky or mushy texture.
- Golden toasted coconut adds aroma and crunch contrast.
No-Bake Chocolate Coconut Bars
Ingredients
Equipment
Method
- Line your square pan with parchment paper, leaving some overhang for easy removal.
- In a microwave-safe bowl, melt the dark chocolate in 30-second bursts, stirring between each, until the chocolate is smooth and glossy.
- In a dry skillet over medium heat, toast the shredded coconut flakes, stirring constantly until they turn golden and fragrant—this should take about 3-4 minutes.
- Pour the melted butter into the warm, glossy chocolate and stir until fully combined, creating a smooth mixture.
- Add the sweetened condensed milk and vanilla extract to the chocolate mixture, stirring until everything is well incorporated and the mixture is thick and shiny.
- Gently fold the toasted coconut flakes into the chocolate mixture, ensuring they are evenly coated and distributed.
- Transfer the mixture to your prepared pan, using a spatula to press it down evenly and smooth out the surface.
- Refrigerate the pan uncovered for at least 2 hours, or until the mixture is firm and set.
- Once firm, lift the set mixture out of the pan using the parchment overhang and cut into bars or squares.
- Serve immediately, or store in an airtight container in the fridge for up to a week for best freshness and texture.
Pro tips for perfect bars
- Use high-quality chocolate for a glossy, smooth melt that coats the palate.
- Toast coconut flakes until golden—this enhances aroma and adds a smoky crunch.
- Melt chocolate slowly on 50% power in short bursts—avoid overheating to prevent seizing.
- Press mixture firmly into the pan—use the back of a spoon or spatula for even density.
- Chill uncovered for at least 2 hours—this helps bars set and develop a clean, sharp edge.
- Add a pinch of sea salt after melting—heightens chocolate and coconut flavor contrast.
- Use a sharp knife warmed slightly in hot water—makes clean cuts without cracking.
Common mistakes and how to fix them
- FORGOT to level the chocolate when melting → Use a spatula to scrape smooth, even heat.
- DUMPED too much coconut into mixture → Fold gently to avoid breaking the bars’ structure.
- OVER-TORCHED the chocolate → Remove from heat immediately; stir until glossy and smooth.
- MISSED chilling time → Refrigerate at least 2 hours for proper setting and clean cuts.
Quick Fixes & Pantry Swaps
- When mixture feels too stiff, splash in a teaspoon of warm milk to loosen it.
- If bars crack when cutting, chill longer or warm the knife in hot water first.
- DUMPED too much coconut? Gently fold to redistribute without breaking the mixture.
- Splash melted chocolate with a pinch of salt to deepen flavor and reduce bitterness.
- Patch over cracks by pressing extra mixture into the gaps before chilling again.
Prep, store, and reheat tips
- Prepare the mixture and press into the pan up to 24 hours in advance for a quick set time later.
- Store the uncut bars in an airtight container lined with parchment in the fridge for up to 5 days; the flavors deepen and the texture firms up.
- Freeze the cut bars for up to 3 months; wrap individually in plastic wrap for easy grab-and-go treats.
- Reheat slightly in a warm (about 30°C/86°F) oven or microwave for a few seconds to soften the edges—just enough to bring back that fudgy, melt-in-your-mouth feel, with a rich aroma of chocolate and coconut.
Top questions about no bake bars
1. How long should I chill the bars?
Keep the mixture chilled until firm, about 2 hours, to prevent sticking and ensure clean cuts.
2. Can I make these vegan?
Yes, using dairy-free chocolate and coconut oil makes them suitable for vegans, but expect a slightly different melt and flavor.
3. How do I prevent the bars from melting?
To prevent melting when serving, refrigerate the bars and serve straight from the fridge for that firm, chewy texture.
4. What if my mixture is too thick?
If your mixture feels too stiff, add a teaspoon of warm milk or coconut cream to loosen it up before pressing into the pan.
5. Which chocolate is best for melting?
Use high-quality dark chocolate for a glossy, rich melt that coats the palate with deep cocoa flavor.
6. How do I toast coconut properly?
Stir constantly when toasting the coconut to avoid burning and ensure an even, golden color with smoky aroma.
7. Should I toast the coconut?
For a more intense coconut flavor, use toasted flakes; for milder, use untoasted or unsweetened flakes.
8. How should I store leftover bars?
Wrap the cut bars tightly and store in the fridge for up to a week, or freeze for longer freshness.
9. How do I melt chocolate without burning it?
When melting chocolate, do it slowly at medium power in short bursts to prevent seizing and burning.
10. Can I add salt to the recipe?
If you want a more decadent flavor, add a pinch of sea salt after melting the chocolate to enhance richness and contrast.
These bars are a little reminder that sometimes the simplest ingredients, when combined with a bit of patience, create something unexpectedly satisfying. They’re perfect for moments when I need a quick, honest treat that doesn’t ask for much fuss or fancy equipment.
And honestly, sharing these with friends or family feels more genuine than any store-bought gift—something about that homemade touch, the smell of melting chocolate, and the crunch of toasted coconut, makes it all special. Sometimes, it’s these small, imperfect moments that stick the longest in memory.

Hi, I’m Mia Bennett, the chef and storyteller behind Grounding in Tradition. I’m so glad you’re here. This blog is my way of preserving the flavors, techniques, and rituals that shaped me as both a cook and a professional chef. Grounding in Tradition is not about trends or shortcuts. It is about honoring where food comes from, understanding the hands that prepare it, and carrying forward recipes that deserve to be remembered.


Leave a Reply