
These no-bake chocolate rice bars are like a quick hug from childhood, but with a grown-up twist. There’s something about the crunch of rice cereal combined with rich, melting chocolate that just hits the right spot—no oven required, just a little stirring and waiting. I love how they come together fast, making them perfect for those times when a sweet craving hits and I want something satisfying without the fuss.
What really makes these bars stand out is how flexible they are. You can toss in some nuts, dried fruit, or a pinch of sea salt—whatever you have in your pantry. It’s almost like a little kitchen remix each time, but the core remains simple and honest. It’s a treat that feels homemade but doesn’t demand much prep, perfect for busy afternoons or spontaneous snack attacks.
This recipe is all about reclaiming childhood snack magic with minimal fuss, perfect for when you crave something sweet but want to keep it simple and unpolished.
The story behind this recipe
This recipe was born out of a sleepy afternoon craving for something sweet and crunchy, but I didn’t want to turn on the oven. I remember rummaging through my pantry, grabbing rice cereal and melting chocolate in a makeshift double boiler. The moment I pressed the mixture into a pan, I realized how much I missed those quick, no-fuss treats from my childhood—simple, honest, and just enough to satisfy that little sweet tooth. Now, it’s become my go-to for when I need a quick fix without the clutter of baking.
Ingredient breakdown
- Chocolate: I prefer a good quality dark chocolate—it melts smoothly and gives a rich, slightly bitter contrast to the sweet rice cereal. You can swap for milk chocolate if you want it milder and creamier, but the texture might be a bit softer.
- Rice cereal: The crunch is what makes these bars satisfying. I like plain rice puffs, but you could try adding some toasted oats for extra nuttiness or a bit of quinoa for a health boost. Keep it light so the chocolate still shines.
- Butter: I use unsalted butter for a clean, creamy melt that binds everything together. If you’re dairy-free, coconut oil works, but it can make the bars slightly softer and coconutty in flavor, which isn’t a bad thing.
- Sweetener: Just a touch of honey or maple syrup helps everything stick. If you need a vegan option, agave syrup is a good swap. It pairs beautifully with the chocolate’s richness and adds a hint of floral sweetness.
- Add-ins (nuts, dried fruit): I love tossing in chopped almonds or dried cranberries for texture and bursts of flavor. If you’re nut-free, try toasted coconut flakes or seeds to keep that satisfying crunch.
- Salt: A pinch of sea salt enhances the chocolate and balances the sweetness. You can skip it if you prefer a more subdued flavor, but I find it makes everything taste more vibrant.
- Vanilla extract: Just a splash deepens the chocolate flavor and rounds everything out. You can experiment with a bit of espresso powder for a mocha kick or skip it altogether for simplicity.
Spotlight on key ingredients
Chocolate:
- I prefer a good quality dark chocolate—it melts smoothly and gives a rich, slightly bitter contrast to the sweet rice cereal. You can swap for milk chocolate if you want it milder and creamier, but the texture might be a bit softer.
- Rice cereal: The crunch is what makes these bars satisfying. I like plain rice puffs, but you could try adding some toasted oats for extra nuttiness or a bit of quinoa for a health boost. Keep it light so the chocolate still shines.
- Butter: I use unsalted butter for a clean, creamy melt that binds everything together. If you’re dairy-free, coconut oil works, but it can make the bars slightly softer and coconutty in flavor, which isn’t a bad thing.
Rice cereal:
- Chocolate: I prefer a good quality dark chocolate—it melts smoothly and gives a rich, slightly bitter contrast to the sweet rice cereal. You can swap for milk chocolate if you want it milder and creamier, but the texture might be a bit softer.
- The crunch is what makes these bars satisfying. I like plain rice puffs, but you could try adding some toasted oats for extra nuttiness or a bit of quinoa for a health boost. Keep it light so the chocolate still shines.
- Butter: I use unsalted butter for a clean, creamy melt that binds everything together. If you’re dairy-free, coconut oil works, but it can make the bars slightly softer and coconutty in flavor, which isn’t a bad thing.
Notes for ingredient swaps
- Chocolate: I prefer a good quality dark chocolate—it melts smoothly and gives a rich, slightly bitter contrast to the sweet rice cereal. You can swap for milk chocolate if you want it milder and creamier, but the texture might be a bit softer.
- Rice cereal: The crunch is what makes these bars satisfying. I like plain rice puffs, but you could try adding some toasted oats for extra nuttiness or a bit of quinoa for a health boost. Keep it light so the chocolate still shines.
- Butter: I use unsalted butter for a clean, creamy melt that binds everything together. If you’re dairy-free, coconut oil works, but it can make the bars slightly softer and coconutty in flavor, which isn’t a bad thing.
- Sweetener: Just a touch of honey or maple syrup helps everything stick. If you need a vegan option, agave syrup is a good swap. It pairs beautifully with the chocolate’s richness and adds a hint of floral sweetness.
- Add-ins (nuts, dried fruit): I love tossing in chopped almonds or dried cranberries for texture and bursts of flavor. If you’re nut-free, try toasted coconut flakes or seeds to keep that satisfying crunch.
- Salt: A pinch of sea salt enhances the chocolate and balances the sweetness. You can skip it if you prefer a more subdued flavor, but I find it makes everything taste more vibrant.
- Vanilla extract: Just a splash deepens the chocolate flavor and rounds everything out. You can experiment with a bit of espresso powder for a mocha kick or skip it altogether for simplicity.
Equipment & Tools
- 20×20 cm (8×8 inch) pan: Holds the mixture and shapes the bars
- Heatproof bowl: Melts the chocolate evenly over simmering water
- Spatula: Folds the mixture and presses it into the pan
- Parchment paper: Prevents sticking and aids removal
- Sharp knife: Slices the set bars cleanly
Step-by-step guide to no bake bars
- Gather your equipment: a 20×20 cm (8×8 inch) square pan, a heatproof bowl, a spatula, and parchment paper. Line the pan with parchment for easy removal.
- In a heatproof bowl, melt 200g (7 oz) of dark chocolate over a pot of simmering water (about 80°C/176°F). Stir until smooth and glossy, then remove from heat.
- In a large mixing bowl, combine 3 cups of rice cereal. Pour the melted chocolate over, and gently fold with a spatula to coat evenly. You want the cereal to be well coated but not soggy.
- If adding extras like nuts or dried fruit, fold them in now, distributing evenly through the mixture.
- Transfer the mixture into your prepared pan. Use the spatula or the back of a spoon to press down firmly, creating an even layer. Pressing well helps the bars hold together later.
- Let the mixture cool at room temperature for about 15 minutes, then transfer to the fridge. Chill for at least 2 hours, or until firm and set.
- Once firm, lift the mixture out of the pan using the parchment paper. Place on a cutting board and slice into bars or squares with a sharp knife.
- For a cleaner cut, run the knife under hot water before slicing and wipe clean between cuts. Store in an airtight container in the fridge for up to a week.
Chill the bars in the fridge for at least 2 hours until firm. Slice into squares, serve directly or store in an airtight container. Let come to room temp for a few minutes before eating for optimal texture.
How to Know It’s Done
- Chocolate is fully melted, smooth, and shiny.
- Mixture is evenly coated and well pressed in the pan.
- Bars are firm and set after refrigeration, with clean edges.
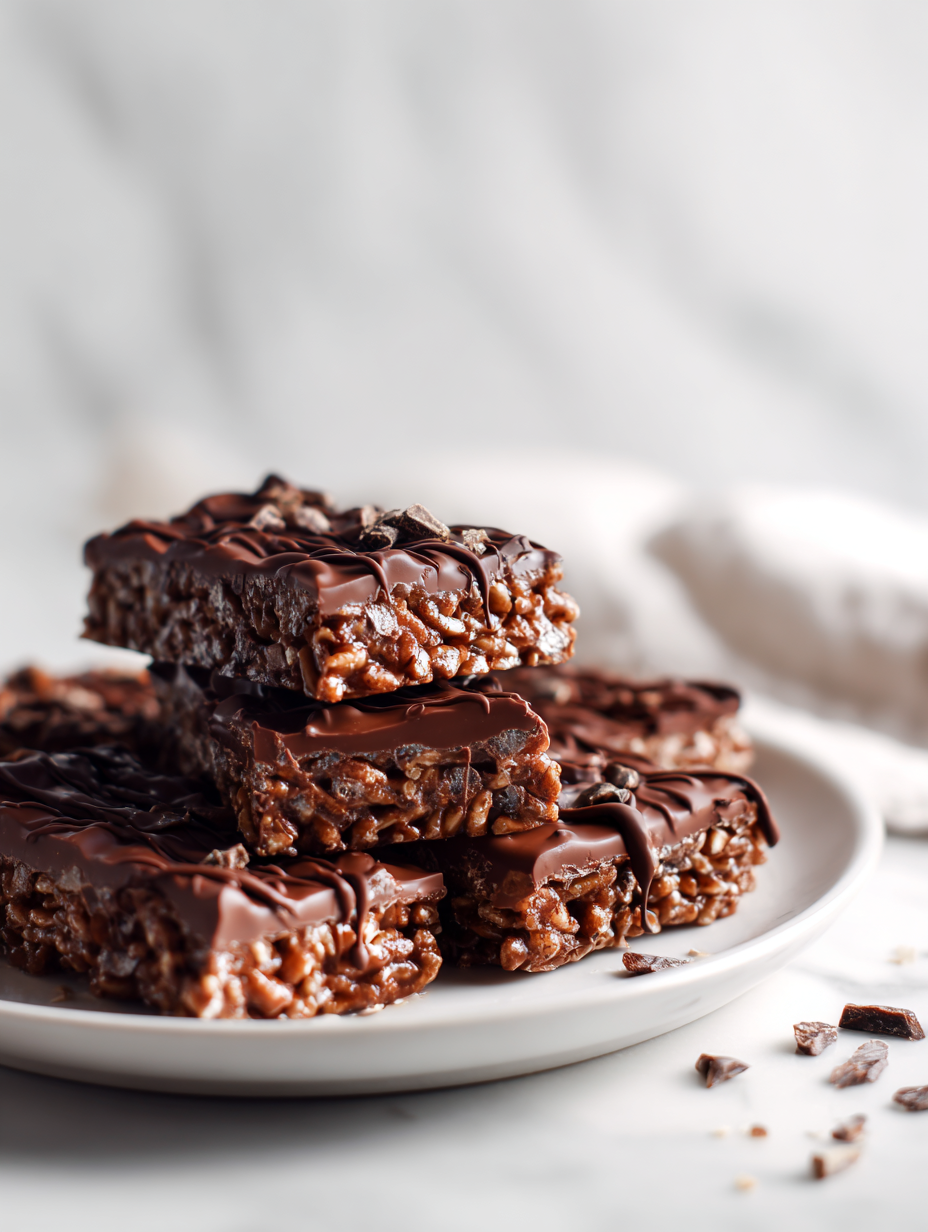
No-Bake Chocolate Rice Bars
Ingredients
Equipment
Method
- Chop the dark chocolate into small pieces and place it in a heatproof bowl.
- Set the bowl over a pot of simmering water and gently melt the chocolate, stirring constantly until smooth and glossy. This creates a rich, fragrant aroma.
- In a large mixing bowl, measure out the rice cereal and set aside. Add the unsalted butter and honey (or maple syrup) to the melted chocolate, stirring until the mixture is smooth and well combined.
- Pour the melted chocolate mixture over the rice cereal and gently fold with a spatula, coating all the cereal evenly. You should see a shiny, chocolate-covered crunch forming.
- If you're adding nuts or dried fruit, fold them in now, distributing evenly throughout the mixture.
- Transfer the mixture into your prepared pan lined with parchment paper. Use the back of a spatula or a clean spoon to press down firmly, creating an even, compact layer that will hold together well once chilled.
- Sprinkle a pinch of sea salt on top for a flavor boost, then place the pan in the fridge. Chill for at least 2 hours, or until the mixture is firm and set.
- Once chilled and firm, lift the uncut block out of the pan using the parchment paper. Place it on a cutting board and cut into squares or bars with a sharp knife. Wipe the knife with warm water between cuts for clean edges.
- Arrange the bars on a plate or store in an airtight container in the fridge. For the best texture and shine, serve slightly chilled or at room temperature.
Notes
Pro tips for perfect bars
- Melt chocolate gently over low heat to prevent burning and maintain a glossy finish.
- Mix in rice cereal quickly once chocolate is melted to keep the crunch intact.
- Press the mixture firmly into the pan to ensure clean slicing and compact bars.
- Use a hot knife when cutting to get smooth, neat edges without crumbling.
- Chill the bars at least 2 hours; longer for a firmer texture and easier slicing.
- If the mixture feels too soft, return to fridge for an additional 30 minutes before slicing.
- For extra shine, lightly brush cooled bars with a bit of melted chocolate before serving.
Common mistakes and how to fix them
- FORGOT to level the mixture → Press firmly to prevent crumbling.
- DUMPED in too much chocolate → Use measured amounts for balance.
- OVER-TORCHED the chocolate → Remove from heat once smooth, avoid burning.
- MISSED the chilling step → Ensure complete set before slicing for clean edges.
Quick fixes and pantry swaps
- When mixture is too soft → Splash in a little extra melted chocolate to firm it up.
- If bars crack when slicing → Patch with a tiny drizzle of melted chocolate on the edges.
- Dumped in too much rice cereal → Shield with a light hand next time, less is more.
- Over-torched chocolate → Rescue by stirring in a teaspoon of coconut oil for gloss and looseness.
- When bars stick to the pan → Wipe with a paper towel dipped in warm water before pressing again.
Prep, store, and reheat tips
- Prepare the mixture in advance and keep it covered in the fridge for up to 24 hours; the chocolate may firm up slightly, but it’ll soften quickly once handled.
- Store the finished bars in an airtight container in the fridge for up to a week. The chocolate keeps its sheen, but the bars stay chewy and satisfying.
- For longer storage, freeze the bars in a single layer wrapped tightly in plastic wrap, then transfer to a freezer-safe container; they keep well for up to a month. Thaw in the fridge for a few hours before serving.
- Reheating isn’t necessary—if you want a melty chocolate experience, microwave a bar for 10 seconds until just softened, then enjoy the glossy, oozy texture. Be cautious; it can go from perfect to melt-in-your-mouth fast.
Top questions about no bake rice bars
1. Can I use different types of chocolate?
Use high-quality dark chocolate for a smooth melt and richer flavor, but milk chocolate works if you prefer milder sweetness.
2. Can I substitute the rice cereal?
Yes, you can swap rice cereal for crushed graham crackers or cornflakes for a different crunch and flavor profile.
3. How can I make these dairy-free?
Coconut oil can replace butter for a dairy-free version, but it may make the bars softer and add a subtle coconut flavor.
4. How do I know when the bars are set?
Chill the mixture for at least 2 hours until firm. If it’s still soft, refrigerate longer or press down more firmly when packing in the pan.
5. What add-ins work well?
Adding nuts or dried fruit adds texture and flavor. Toast nuts beforehand for extra crunch and aroma.
6. How should I store these?
Store in an airtight container in the fridge for up to a week. For longer storage, freeze for up to a month, then thaw slowly.
7. What if the mixture is too soft?
If the mixture feels too soft, refrigerate it for 30 minutes or add a bit more melted chocolate to firm it up.
8. How do I cut the bars cleanly?
Use a hot knife to slice cleanly. Wipe the knife between cuts for neat edges and prevent sticking.
9. How can I make the bars more appealing?
For a glossy finish, brush cooled bars with melted chocolate. For extra crunch, sprinkle some sea salt on top before setting.
10. Any tips for melting chocolate?
When melting chocolate, do so gently over low heat or a double boiler to prevent burning and maintain shine.
These bars are a reminder that sometimes the simplest treats hold the most nostalgia. They come together quickly, with just a few pantry staples, making them perfect for spontaneous sweet cravings. Plus, the rich chocolate and crispy rice texture make each bite a little moment of comfort.
In a season of busy days and fleeting moments, this no-bake recipe offers a straightforward way to satisfy that sweet tooth without fuss. They’re imperfect, honest, and just the kind of homemade snack that feels like a small, sweet victory whenever you need one.