
This no-bake coconut date bar recipe is my go-to when I want something sweet and filling without the fuss of turning on the oven. It’s funny how a handful of simple ingredients can come together into something so satisfying, especially when you’re short on time or just craving that chewy, coconutty bite. I’ve made these dozens of times, tweaking the texture and sweetness until they’re just right, and I finally settled on a version that’s honestly addicting.
What I love most is how flexible it is—you can toss in a handful of nuts, sprinkle some cacao nibs, or keep it pure with just dates and coconut. Plus, the process is almost meditative: blend, press, chill, and you’re done. It’s become a small ritual during busy mornings or lazy afternoons, a quick way to get a wholesome treat that feels indulgent but isn’t loaded with refined sugar or preservatives.
In a world where we’re constantly rushing, this recipe reminds me that sometimes, the best things come from simplicity. There’s no oven heat, no complicated steps—just honest ingredients coming together naturally. It’s a little act of self-care on a hectic day, a way to satisfy my sweet tooth without guilt, and a reminder that good food doesn’t need to be complicated.
Focusing on the overlooked art of making a satisfying, wholesome treat that requires zero oven time, perfect for busy mornings or lazy afternoons when comfort food is just a few ingredients away.
The story behind this recipe
- This recipe actually started as a way to use up a surplus of dates and shredded coconut I had lying around after a particularly bumpy baking phase. I wanted something that felt comforting, sweet, but also quick to throw together without heating up the kitchen. The first batch was a bit too crumbly, but the chewy, sticky texture was exactly what I was craving.
- One afternoon, I was feeling pretty overwhelmed, and I remembered how my grandma used to keep a stash of simple, no-fuss treats in her kitchen. That memory of her pressing ingredients into a tin, with the smell of toasted coconut in the air, pushed me to perfect this recipe. Now, it’s become a little ritual—pressing, chilling, and snacking whenever I need a moment of calm.
- It’s kind of funny how the simplest ingredients—dates, coconut, a pinch of salt—can come together to make something so satisfying. No fuss, no oven, just honest food that feels like a small act of kindness. These bars remind me that sometimes, the best comfort is the kind you make yourself, quick and easy, with ingredients you trust.
Ingredient breakdown
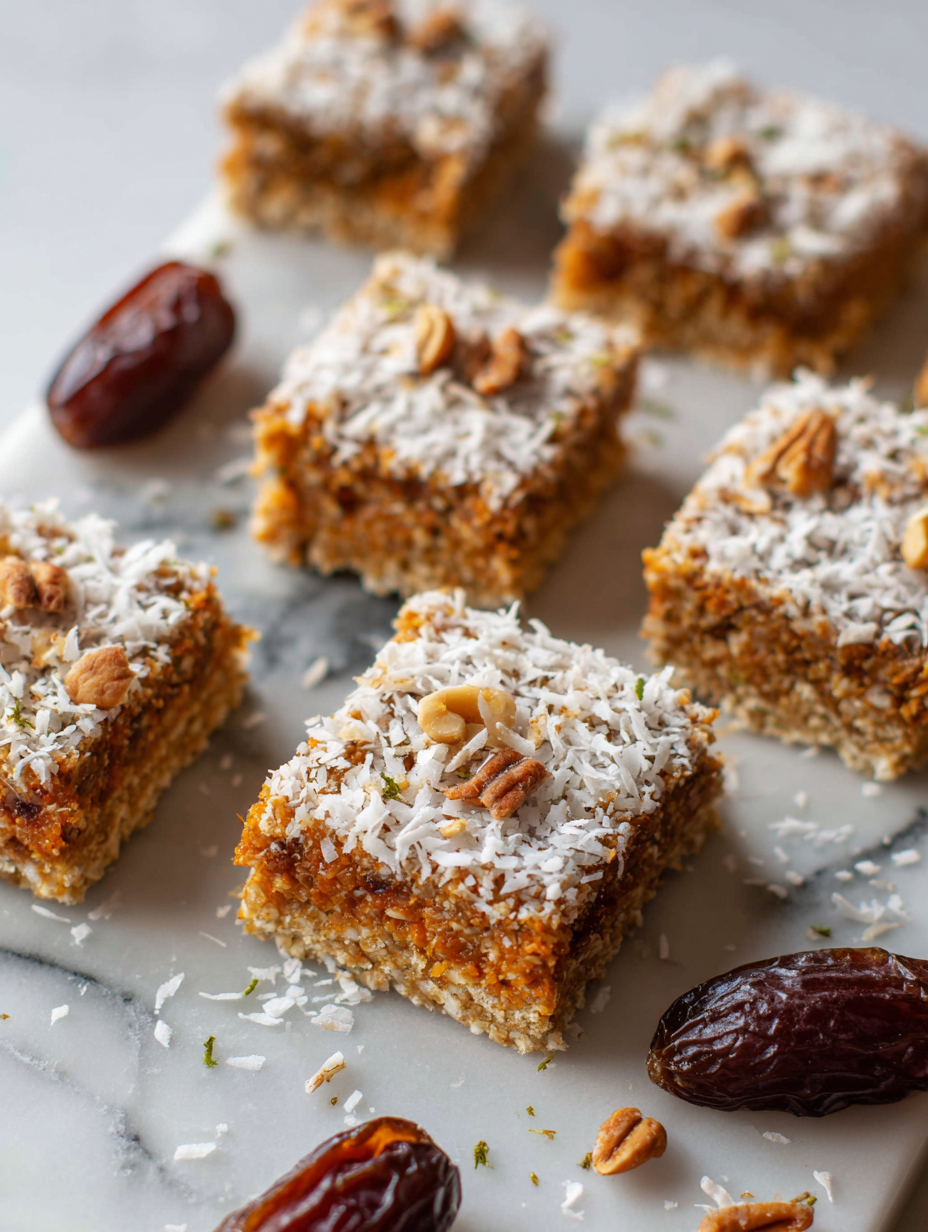
- Medjool dates: I love how soft and caramel-like they are—perfect for a sticky, sweet base. If yours are a bit dry, soak them in warm water for 10 minutes to get that oozy texture.
- Desiccated coconut: It adds that shredded, chewy bite I crave. Toast a little before mixing if you want a deeper, nutty aroma, but plain works just fine if you prefer a lighter flavor.
- Almond butter: I prefer natural, creamy almond butter—it binds everything together and adds a subtle nutty richness. If you’re out, peanut or cashew butters are decent swaps, just watch for added sugars.
- Sea salt: It’s a tiny pinch that heightens the sweetness and coconut flavor. Don’t skip it—it keeps the bars from tasting flat. Try flaky sea salt for a slight crunch on top.
- Vanilla extract: Just a splash transforms the flavor profile into something warm and inviting. If you want a more intense vanilla punch, double the amount, but be careful not to overpower the coconut.
- Optional add-ins: Chopped nuts, cacao nibs, or dried fruit—whatever you like. I toss in a handful of pistachios for a pop of color and crunch, but keep it simple if you prefer pure coconut and date.
- Coconut oil: A little melted helps everything blend smoothly. If your mixture feels too dry, a teaspoon of warm coconut oil can help it press into the pan easily and add a glossy finish.
Spotlight on key ingredients
Medjool dates:
- I love how soft and caramel-like they are—perfect for a sticky, sweet base. If yours are a bit dry, soak them in warm water for 10 minutes to get that oozy texture.
- Desiccated coconut: It adds that shredded, chewy bite I crave. Toast a little before mixing if you want a deeper, nutty aroma, but plain works just fine if you prefer a lighter flavor.
Almond butter:
- Coconut oil: A little melted helps everything blend smoothly. If your mixture feels too dry, a teaspoon of warm coconut oil can help it press into the pan easily and add a glossy finish.
- I prefer natural, creamy almond butter—it binds everything together and adds a subtle nutty richness. If you’re out, peanut or cashew butters are decent swaps, just watch for added sugars.
Notes for ingredient swaps
- Dairy-Free: Use coconut oil instead of butter for a richer, dairy-free option that enhances the coconut flavor.
- Nut-Free: Swap almond butter with sunflower seed butter to keep it nut-free without sacrificing creaminess.
- Sweetener Variations: Incorporate a splash of honey or maple syrup if you prefer a slightly sweeter, more caramelized taste.
- Coconut Type: Use shredded sweetened coconut for a more pronounced coconut flavor or unsweetened for a subtler taste.
- Date Alternatives: Medjool dates are soft and sticky, but pitted dried figs or apricots can work in a pinch, offering different fruity notes.
- Add-ins: Mix in chopped nuts, cacao nibs, or dried fruit to customize texture and flavor, but keep in moderation to maintain cohesion.
- Flavor Boost: A few drops of almond or coconut extract can intensify the scent and overall coconutty aroma.
Equipment & Tools
- 20cm (8-inch) square baking pan: Holds the mixture and shapes the bars.
- Parchment paper: Prevents sticking and makes removal easier.
- Food processor: Blends dates and ingredients into a sticky paste.
- Spatula or spoon: Transfers and presses the mixture into the pan.
- Sharp knife: Cuts the set mixture into bars.
Step-by-step guide to no bake coconut date bars
- Gather your equipment: a 20cm (8-inch) square baking pan, a spatula or spoon, a sharp knife, and a piece of parchment paper for lining.
- Line your pan with parchment paper, leaving some overhang for easy removal later. This makes it easier to lift out the bars.
- In a food processor, combine 1 ½ cups pitted Medjool dates (roughly 12-14), and pulse until they form a sticky, cohesive paste, about 30 seconds. If dry, soak dates in warm water for 10 minutes then drain thoroughly before processing.
- Add 1 cup desiccated coconut, 2 tablespoons almond butter, ½ teaspoon sea salt, and 1 teaspoon vanilla extract to the processor. Pulse until mixture is well combined, sticky, and slightly crumbly but holds together when pressed. If too dry, add a teaspoon of melted coconut oil and pulse again.
- Transfer the mixture to the prepared pan. Using a spatula or your fingers, press it evenly into the pan, making sure it’s compact and smooth on top. Press firmly for a dense texture.
- Place the pan in the fridge for at least 2 hours, or until the mixture firms up and is firm to the touch. For best results, cover with plastic wrap or foil while chilling.
- Once set, lift the mixture out using the parchment overhang. Place on a cutting board and cut into 8-10 bars with a sharp knife. If the mixture cracks, gently press it back together.
- Finish by optionally sprinkling with flaky sea salt or cacao nibs for extra flavor. Serve immediately or store for later.
Refrigerate the bars for at least 2 hours until firm. Slice into clean, even pieces. Serve immediately or store in an airtight container in the fridge for up to a week. For longer storage, freeze and thaw as needed, feeling for a chewy texture when ready.
How to Know It’s Done
- Mixture holds together when pressed, not crumbly.
- Bars are firm but not hard after chilling, with a sticky, chewy texture.
- Even pressing results in smooth, uniform bars with no gaps or cracks.
No-Bake Coconut Date Bars
Ingredients
Equipment
Method
- Line your baking pan with parchment paper, leaving overhang on the sides for easy removal.
- Place the pitted Medjool dates into a food processor and blend until they form a sticky, cohesive paste, about 30 seconds. If they seem dry, soak them in warm water for 10 minutes beforehand, then drain thoroughly.
- Add the desiccated coconut, almond butter, sea salt, and vanilla extract to the processor. Pulse until the mixture is well combined, sticky, and slightly crumbly but able to hold together when pressed. If it’s too dry, drizzle in a teaspoon of melted coconut oil and pulse again.
- Transfer the mixture to your prepared pan. Using a spatula or your fingers, press it evenly into the corners and smooth out the top, pressing firmly to compact everything tightly.
- Place the pan in the fridge and chill for at least 2 hours, or until the mixture feels firm and set to the touch.
- Once chilled and firm, lift the mixture out using the parchment overhang. Transfer to a cutting board and cut into 8-10 bars with a sharp knife. If the mixture cracks, simply press it back together gently.
- Optionally, sprinkle with flaky sea salt or cacao nibs for added flavor and texture. Serve immediately or store in an airtight container in the fridge for up to a week.
Top tips for perfect bars
- Bolded mixture: Keep your mixture slightly crumbly but sticky enough to press into the pan—if it’s too dry, add a touch more coconut oil.
- Chill for texture: Refrigerate at least 2 hours until firm. The colder, the better the chewiness and cohesion.
- Press firmly: Use the back of a spatula or your fingers to press the mixture evenly—firm pressure ensures no gaps.
- Add-ins last: Sprinkle nuts or cacao nibs on top after pressing—press lightly so they stick without sinking in too deep.
- Avoid overheating: When melting coconut oil, keep heat low—just until it’s liquid, to prevent unnecessary aroma or flavor changes.
- Use parchment: Line your pan with parchment paper for easy removal and clean edges—no sticking or crumbling.
- Slice with sharp knife: For clean cuts, warm your knife under hot water, then dry before slicing—less crumbling, cleaner lines.
Common mistakes and how to fix them
- FORGOT to measure ingredients precisely → Use a scale for accuracy.
- DUMPED mixture into pan without pressing → Firmly press for dense bars.
- OVER-TORCHED coconut or nuts → Keep an eye to prevent burning, stir frequently.
- MISSED chilling time → Chill until firm, at least 2 hours, for proper setting.
Quick fixes and pantry swaps
- If mixture is crumbly, splash in a tiny bit more coconut oil to bind easily.
- When bars crack while slicing, warm your knife for cleaner cuts.
- Splash a few drops of water on your toasted coconut for a smoky, rich aroma.
- Patch cracks by pressing mixture back together with damp fingers for seamless bars.
- Shield delicate toppings with a light sprinkle of sea salt to enhance flavor.
Prep, store, and reheat tips
- Pre-chop and soak dates ahead—keeps prep quick and prevents sticking when blending.
- Store cut bars in an airtight container in the fridge for up to a week; they firm up and stay chewy.
- For longer storage, freeze bars wrapped individually—defrost at room temperature until soft and fragrant.
- Chilled bars develop a slightly firmer, more cohesive texture; bring to room temp for softer bite before serving.
- Reheat slightly in the microwave for 10 seconds if you prefer a warmer, gooey consistency—watch for melting or over-softening.
Top questions about no bake coconut date bars
1. How do I soften dry dates for the recipe?
Medjool dates are soft and caramel-like, perfect for a sticky base. If yours are dry, soak them in warm water for 10 minutes to make them oozy and easier to blend.
2. Can I use sweetened coconut instead of unsweetened?
Using shredded, unsweetened coconut gives a chewy, nutty flavor. Toast it lightly for extra aroma or skip if you want a lighter taste.
3. What nut butter can I substitute if I don’t have almond butter?
A splash of almond or other nut butter helps bind the mixture and adds a subtle nutty note. If out, peanut or cashew butter work well, just watch for added sugars.
4. How long should I chill the bars?
Chill the bars in the fridge for at least 2 hours until firm. Proper chilling makes them chewy and holds them together without crumbling.
5. What can I do if the mixture is too dry?
If the mixture feels too crumbly, add a teaspoon of melted coconut oil to help it come together smoothly.
6. How do I cut the bars without cracking them?
Use a sharp knife warmed under hot water for clean cuts. This prevents cracks and crumbling when slicing the set bars.
7. How should I store leftovers?
Store the bars in an airtight container in the fridge for up to a week. For longer storage, freeze wrapped bars for up to a month.
8. Can I skip the salt or toppings?
Adding a pinch of sea salt enhances sweetness and coconut flavor, while flakes on top add a pleasant crunch.
9. Should I toast the coconut before using?
For a richer flavor, toast your coconut before blending. It brings out a smoky, nutty aroma that deepens the overall taste.
10. What if I can’t press the mixture into the pan?
If mixture is too sticky to press, refrigerate it for 15 minutes to firm up before shaping into bars.
These no-bake coconut date bars are a simple reminder that good things can come from just a handful of ingredients and a bit of patience in the fridge. They’re perfect for grabbing when you need a quick, wholesome snack that’s honest and satisfying. Sometimes, the best treats are the ones you make yourself, quietly, with no fuss and lots of flavor.
In a world full of complicated desserts, I keep coming back to these because they’re honest, unpretentious, and just right—no oven required. They’re a small act of kindness for your taste buds, especially when you want something sweet but don’t want to overthink it. A little bit of simplicity goes a long way, after all.

Hi, I’m Mia Bennett, the chef and storyteller behind Grounding in Tradition. I’m so glad you’re here. This blog is my way of preserving the flavors, techniques, and rituals that shaped me as both a cook and a professional chef. Grounding in Tradition is not about trends or shortcuts. It is about honoring where food comes from, understanding the hands that prepare it, and carrying forward recipes that deserve to be remembered.


Leave a Reply