
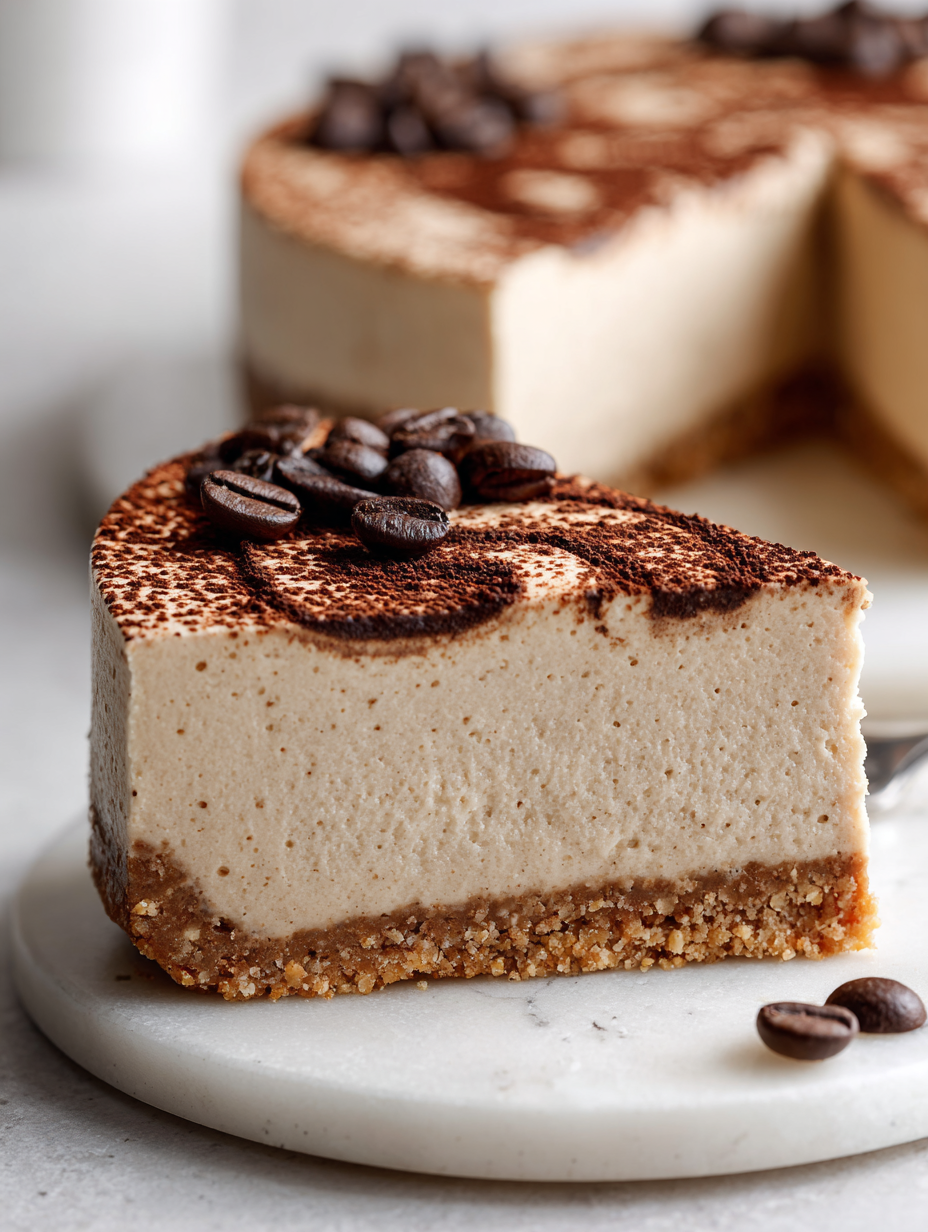
This no bake coffee cheesecake is my go-to when I need something quick but still crave that deep, roasted coffee flavor. It’s honestly a lifesaver for spontaneous get-togethers or when I forget to plan ahead. The best part? No oven required, so I can whip it up in no time, even after a long day.
I love how the creamy texture contrasts with that sharp coffee punch. It’s like a little jolt of energy in dessert form, perfect for mornings after or late-night wind-downs. Plus, it’s surprisingly forgiving—no bulging crust or cracked surface, just smooth, rich, and chilled.
When I first made this, I was surprised how easily the flavors melded without heat. It’s become my favorite way to enjoy coffee without brewing a pot or fussing with complicated recipes. Sometimes, simplicity really does taste the best.
This recipe is designed for those who love the kick of coffee but want a dessert that’s quick, no fuss, and perfect for spontaneous gatherings. It’s about capturing that rich, slightly bitter coffee note in a creamy, chilled cheesecake without turning on the oven—because sometimes, saving energy and time makes all the difference.
Coffee’s Unexpected Dessert Twist
- This dessert feels like a secret indulgence I can make in minutes, even when I’m exhausted.
- There’s a weird satisfaction in how quickly it comes together, no oven, no fuss, just flavor.
- I still get a thrill tasting that punch of coffee paired with the creamy, chilled base.
- Every time I serve it, I feel a little proud of turning simple ingredients into something special.
- It’s a nostalgic reminder of lazy weekend mornings, but with a grown-up, sophisticated twist.
The spark behind this coffee treat
- This recipe came about one late afternoon when I was craving coffee but also needed something cool and creamy. Instead of brewing a pot and waiting for it to cool, I decided to incorporate coffee flavors into a no-bake cheesecake. It’s become my go-to for those moments when time is tight but I still want a rich, satisfying dessert.
- The idea struck me while I was juggling a mountain of work and remembered how coffee can energize both the body and the spirit. I wanted something that captured that bold, roasted aroma without turning on the oven or fussing over layers. Now, it’s a staple for spontaneous gatherings or when I need a quick pick-me-up dessert.
- heading: ‘The spark behind this coffee treat’
Historical and Trend Insights
- This recipe has roots in the no-bake desserts popular during wartime shortages, when oven use was limited.
- Coffee-flavored desserts gained popularity in Europe in the early 20th century, often as a luxurious treat for almost any occasion.
- The combination of caffeine and dairy in a cold dessert was seen as both energizing and soothing, appealing to busy, modern lifestyles.
- In recent years, no bake cheesecakes have surged in popularity thanks to their simplicity and the ability to customize flavors easily.
- This particular coffee cheesecake variation is inspired by Italian tiramisu, reimagined in a quick, chilled form.
Ingredient breakdown: key components
- Cream cheese: I love how it becomes luxuriously smooth and almost melts in your mouth; if yours is too firm, let it soften at room temp first.
- Espresso powder: Adds that intense, smoky coffee punch; if you prefer milder, reduce by half or substitute with instant coffee granules.
- Crushed graham crackers: They form that familiar buttery, crisp crust; for a nutty twist, try digestive biscuits or even Oreo crumbs for richer flavor.
- Heavy cream: Whips into soft peaks, giving the cheesecake its creamy body; for a lighter version, try coconut cream, but expect a subtler flavor.
- Sugar: I use a touch more for balance—makes the coffee pop even more; if you’re cutting carbs, try a granular sweetener, but expect a different texture.
- Gelatin (optional): Keeps it firm and sliceable; if you skip it, the dessert will be softer and more mousse-like, so chill longer to set.
- Liqueur (like Kahlua): I like the hint of depth it adds; skip if you want pure coffee flavor or if serving to kids, but it really elevates the aroma.
Spotlight on key ingredients
Espresso powder:
- I love how it boosts the coffee aroma, giving a smoky, intense flavor that wakes up your palate.
- It dissolves quickly, leaving no gritty texture, and becomes more concentrated as it sits, deepening the flavor.
Cream cheese:
- I find it becomes luxuriously smooth and melts in your mouth, especially when softened properly beforehand.
- Its tang balances the sweetness and coffee bitterness, and it can sometimes firm up if too cold—best to soften at room temp.
Notes for ingredient swaps
- Dairy-Free: Swap cream cheese for coconut cream or a dairy-free cream cheese alternative. Expect a slightly different tang and creaminess.
- Sugar Alternatives: Use honey or maple syrup instead of sugar for a more complex sweetness. The flavor will be richer and slightly more floral.
- Crust Variations: Replace graham crackers with digestive biscuits or crushed cookies like Oreos for a different, richer flavor and texture.
- Coffee Substitutes: Instant espresso can be replaced with strong brewed coffee or a coffee-flavored syrup for a milder or more intense coffee hit.
- Gelatin-Free: Omit gelatin and increase chilling time. Your cheesecake will be softer and mousse-like, with a more delicate set.
- Vegan Version: Use plant-based cream cheese and coconut milk, and substitute gelatin with agar-agar. Expect a different, more coconut-forward flavor.
- Add-Ins: Mix in chocolate chips, chopped nuts, or flavored liqueurs to customize the cheesecake’s flavor profile to your taste.
Equipment & Tools
- Springform pan: To shape and contain the cheesecake as it sets.
- Mixing bowls: For preparing crust and filling components.
- Whisk and spatula: To blend and fold ingredients smoothly.
- Food processor or rolling pin: To crush crackers into fine crumbs.
- Knife: To slice the finished cheesecake cleanly.
Step-by-step guide to no bake coffee cheesecake
- Gather your equipment: a 20cm (8-inch) springform pan, a mixing bowl, a spatula, and a whisk. Have your ingredients ready on the counter.
- Line the springform pan with parchment paper or spray with non-stick spray for easy removal later.
- Crush 200g (7 oz) of graham crackers into fine crumbs using a food processor or by placing them in a zip-top bag and crushing with a rolling pin. Mix with 50g (1/4 cup) melted butter until evenly coated.
- Press the crumb mixture into the bottom of the prepared pan, spreading evenly with the back of a spoon or your fingers. Chill in the fridge for 15 minutes to set.
- In a mixing bowl, beat 300g (10.5 oz) softened cream cheese until smooth and creamy, about 2 minutes on low speed.
- Dissolve 2 tbsp of espresso powder in 2 tbsp hot water. Let cool slightly, then mix into the cream cheese along with 1/4 cup sugar and 1 tsp vanilla extract. Whisk until well combined.
- In a separate bowl, whip 1 cup heavy cream until soft peaks form, about 3-4 minutes. Gently fold into the coffee mixture in thirds, maintaining volume.
- If using gelatin, sprinkle 1 tsp of powdered gelatin over 2 tbsp cold water, let bloom for 5 minutes, then warm gently until dissolved. Stir into the filling mixture.
- Pour the filling over the chilled crust, smoothing the top with a spatula. Tap the pan gently on the counter to eliminate air bubbles.
- Refrigerate the cheesecake for at least 4 hours, preferably overnight, until set and firm to the touch. Avoid moving it during this time.
- Before serving, run a thin knife around the edges of the pan to loosen, then carefully remove the springform ring. Slice with a sharp knife, wiping between cuts.
- Finish with a dusting of cocoa powder or a drizzle of chocolate syrup if desired. Serve chilled and enjoy.
Chill the cheesecake uncovered in the fridge for at least 4 hours or overnight. Before serving, run a knife around the edge of the pan to loosen, then remove the sides carefully. Decorate with cocoa powder or chocolate drizzle if you like. Serve straight from the fridge for best texture and flavor.
How to Know It’s Done
- The top should be firm and slightly wobbly but not liquid.
- Edges are clean and smooth when sliced with a sharp knife.
- The crust is crisp and holds shape when removed from the pan.
No-Bake Coffee Cheesecake
Ingredients
Equipment
Method
- Begin by crushing the graham crackers into fine crumbs using a food processor or placing them in a zip-top bag and crushing with a rolling pin. Mix the crumbs with the melted butter until evenly coated, then press this mixture firmly into the bottom of a prepared springform pan. Chill in the fridge for 15 minutes to set.
- While the crust chills, dissolve the espresso powder in 2 tablespoons of hot water, stirring until completely smooth. Let it cool slightly.
- In a large mixing bowl, beat the softened cream cheese until smooth and creamy, about 2 minutes. Add the cooled espresso mixture, sugar, vanilla, and gelatin (if using), then beat until fully combined.
- In a separate bowl, whip the chilled heavy cream until soft peaks form. Gently fold the whipped cream into the coffee mixture in thirds, maintaining the airy texture.
- If using gelatin, sprinkle it over cold water and let it bloom for 5 minutes. Warm gently until dissolved, then stir into the filling mixture.
- Pour the filling over the chilled crust, smoothing the top with a spatula. Tap the pan gently on the counter to remove any air bubbles and ensure an even surface.
- Refrigerate the cheesecake for at least 4 hours or overnight until fully set and firm. This allows the flavors to meld and the texture to become smooth and luscious.
- Once chilled, run a sharp knife dipped in hot water around the edge of the pan to loosen the sides. Carefully remove the springform ring.
- Slice with a warm, sharp knife for clean cuts. Serve plain or with a dusting of cocoa powder or a drizzle of chocolate syrup for extra flair.
- Enjoy your rich, creamy coffee cheesecake chilled and fresh for a delightful treat that’s both quick and impressive!
Pro tips for perfect cheesecake
- Use room temperature cream cheese to ensure a silky, lump-free filling.
- Dissolve espresso powder in hot water fully to prevent gritty texture in the cheesecake.
- Press the crumb mixture firmly into the pan for an even, compact crust that holds well.
- Fold whipped cream gently into the coffee mixture to maintain airy texture and volume.
- Chill the assembled cheesecake for at least 4 hours or overnight to achieve perfect set and flavor melding.
- Run a warm knife around the edge before slicing to get clean, neat slices every time.
- Dust with cocoa powder or drizzle chocolate just before serving for a professional finish.
Common mistakes and how to fix them
- FORGOT to chill the crust properly → Chill for at least 15 minutes before filling.
- DUMPED the gelatin directly into hot liquid → Dissolve gelatin fully before mixing into the filling.
- OVER-TORCHED the crust → Keep an eye and remove when golden and crisp, not dark.
- MISSED the sensory check for set → Gently shake the cheesecake; it should wobble slightly but hold shape.
Quick fixes and pantry swaps
- If/When the cheesecake cracks, gently cover with cocoa powder or chocolate shavings for a polished look.
- Splash cold water on the springform pan’s sides if sticking to release smoothly.
- Patch a crumbly crust by pressing extra crumbs firmly onto the base; chill again briefly.
- Shield over-torched edges with a piece of foil and lower oven temperature next time.
- When in doubt, freeze small portions to quickly rescue over-soft cheesecake slices.
Prep, store, and reheat tips
- Prepare the crust and press it into the pan up to a day in advance. Keep covered in the fridge for a crisp base.
- Assemble the filling a few hours ahead, then cover and refrigerate. The flavors meld beautifully overnight, intensifying the coffee aroma.
- The cheesecake will keep well for up to 2 days in the fridge. Its texture remains smooth and creamy, with no separation or watery surfaces.
- To reheat or serve chilled, simply slice directly from the fridge. For a slightly softer texture, let it sit at room temperature for 10 minutes—smells of rich coffee and sweet cream will waft up.
Top questions about no bake coffee cheesecake
1. Can I use light cream cheese?
Use full-fat cream cheese for a rich, smooth texture. Reduced-fat versions may make it less creamy.
2. Can I use instant coffee instead of espresso powder?
Yes, dissolve instant coffee in hot water, then add to the filling. Adjust strength to taste.
3. How long should I chill the cheesecake?
Chill the cheesecake for at least 4 hours, ideally overnight, to ensure it’s firm and slices cleanly.
4. Can I make this vegan or dairy-free?
Yes, you can substitute coconut cream for heavy cream, but expect a subtler flavor and slightly softer texture.
5. Can I prepare the crust in advance?
Crust can be made a day ahead. Keep it covered in the fridge to maintain crispness.
6. How do I get neat slices?
Use a sharp knife dipped in hot water for clean slices. Wipe clean between cuts for neat edges.
7. Can I make it without gelatin?
Omitting gelatin will make the cheesecake softer and mousse-like; chill longer to set fully.
8. How can I enhance the flavor?
Add a splash of vanilla extract or a dusting of cocoa powder for extra flavor accents.
9. What if my cheesecake cracks?
If cracks form, smooth the surface with a warm spatula or dust with cocoa powder for a polished look.
10. When should I serve the cheesecake?
Serve directly from the fridge for best texture and flavor. Let sit at room temp 10 mins for softer slices.
This no bake coffee cheesecake is a reminder that sometimes, the best desserts come together with minimal fuss and maximum flavor. It’s perfect for those moments when you need something rich, energizing, and ready in no time. Sharing it feels like passing along a little secret—one that always surprises and delights.
In a world that moves fast, this simple, chilled treat stands out as a small victory of effortless indulgence. Whether it’s a spontaneous gathering or a quiet night in, it’s a dessert that feels just right—rich, smooth, and quietly satisfying. No matter when I make it, I’m reminded that good things don’t always need to be complicated.