
This no bake strawberry cheesecake is one of those recipes I turn to when the weather pushes me toward cooler, fuss-free desserts. There’s something about the simplicity of no oven, just chilling and layering, that makes it feel almost effortless—yet always impressive. Plus, it’s a great way to highlight fresh strawberries without cooking them down into jam or compote.
I love how it captures that perfect balance between creamy tang and bright, juicy fruit, especially during strawberry season when everything tastes like it’s just picked. It’s the kind of dessert that feels like a little celebration in every slice—no stress, just good ingredients coming together. And honestly, I find myself making it more often than I’d admit, especially when I want something sweet but don’t want to heat up the kitchen.
This recipe is perfect for those who want a stunning, fresh dessert without turning on the oven, especially during hot summer days when heat is the last thing you need. It’s about capturing the vibrant, juicy essence of strawberries and creamy cheese in a no-fuss, chilled treat. I love how it feels like a little celebration in every bite—simple, honest, and refreshingly different from traditional baked cheesecakes.
A Fresh Take on No-Bake Cheesecake
- Biting into this dessert feels like a burst of summer in my mouth—bright, juicy, and just the right amount of sweet.
- I used to think no-bake desserts wouldn’t satisfy that creamy, dense cheesecake craving, but this recipe proved me wrong.
- Sharing this with friends always brings a little moment of joy—watching their faces light up is priceless.
- There’s a nostalgic comfort in the familiar tang of cream cheese paired with the fresh sweetness of strawberries that keeps me coming back.
The story behind this recipe
- This recipe was born out of a lazy summer afternoon, when I had a handful of ripe strawberries and a craving for something cool and creamy. I didn’t want to fuss with baked bases or complicated layers—just something straightforward, fresh, and satisfying. The idea of skipping the oven felt like a small rebellion against the heat and the usual fuss of desserts.
- I remember the first time I made it, I was surprised how quickly it came together—crushing biscuits, mixing cream cheese, and folding in the strawberries felt almost meditative. Sitting in that warm kitchen, I realized how little it takes to turn simple ingredients into a real treat. Now, whenever strawberries are at their peak, I reach for this no-bake cheesecake as a go-to for easy gatherings or quiet weekends.
- I love the contrast of the creamy filling with the bright, juicy berries—each bite feels like a little burst of summer. It’s become my favorite way to impress without stress, especially when time’s tight. Plus, it’s a recipe I keep coming back to, especially when I want something homemade but don’t want to turn on the oven or spend hours in the kitchen.
Historical Tidbits
- This no bake strawberry cheesecake has roots in mid-20th-century dessert innovation, when refrigeration started making chilled treats more accessible.
- It became popular in the 1970s as a quick, impressive dessert option that required no oven, fitting busy family schedules.
- The combination of fresh strawberries and cream cheese reflects a trend toward lighter, fruit-forward desserts during the summer months.
Ingredient breakdown: key components
- Cream cheese: I prefer full-fat for that rich, velvety texture that melts in your mouth, but low-fat can work if you’re watching calories—just expect a slightly lighter bite.
- Strawberries: Fresh, ripe berries are non-negotiable—they bring that oozy, sweet-tart burst that makes every bite lively. Frozen strawberries can be a decent stand-in if fresh aren’t in season, but they tend to be more watery.
- Graham cracker crumbs: I grind my own for a finer texture, which makes the crust more cohesive. If you use pre-made, just give it a quick smell test—sometimes they pick up a stale note.
- Unsalted butter: Melted butter binds the crumbs with a glossy sheen. If you only have salted butter, cut back on the added salt in the crust, or it might taste a little off.
- Powdered sugar: Adds just enough sweetness to the crust and topping without overpowering. Sifting it before mixing keeps the crust smooth and clump-free.
- Heavy cream: Whipped to soft peaks, it gives that airy lift to the filling. Use chilled cream and a cold bowl—otherwise, it takes longer to whip and might be runny.
- Lemon juice: Brightens the whole thing up with a citrusy zing that cuts through the richness. If lemons aren’t available, a splash of bottled lemon concentrate can do the trick, but fresh is best.
Spotlight on key ingredients
Cream cheese:
- I love the way it’s silky and rich, almost melts on your tongue, especially at room temp. You want it soft enough to blend smoothly, but not so warm it’s runny.
- Strawberries: Their bright, juicy burst is what makes this cheesecake special. When ripe, they ooze sweet juice and have a vibrant, red glow. Frozen berries work if fresh aren’t available, but they tend to be more watery and need draining.
Strawberries:
- They’re the star, so fresh and ripe makes all the difference. Their sweetness and slight tartness add that lively, oozy punch to each bite. When sliced, they release a fragrant, fruity aroma that’s pure summer.
- Garnishing with extra strawberries or a drizzle of berry syrup really elevates the look and flavor, making each slice feel like a little celebration of the season.
Notes for ingredient swaps
- Dairy-Free: Coconut cream can replace heavy cream for a rich, dairy-free alternative that still whips well, but it may add a subtle coconut flavor.
- Lower-Sugar: Use a sugar substitute like erythritol or stevia in the crust and topping if you want to cut sweetness without losing the texture.
- Gluten-Free: Swap graham cracker crumbs for almond flour or gluten-free biscuit crumbs. Expect a nuttier flavor and slightly different texture.
- Vegan: Vegan cream cheese (like cashew-based) and coconut whipped cream will keep it plant-based, but taste and texture will be a bit lighter and more delicate.
- Strawberries: Frozen strawberries work in a pinch, especially if fresh are unavailable, but they can release more water, so drain well before folding in.
- Crust Base: Oreos (dairy-free if needed) make a richer, chocolaty crust. Just remove the cream filling if you want less sweetness.
- Flavor Boost: Add a splash of vanilla extract or a hint of balsamic vinegar to enhance berry sweetness and add complexity.
Equipment & Tools
- Springform pan: To shape and hold the cheesecake while it sets.
- Food processor or zip-top bag and rolling pin: To crush the graham crackers evenly.
- Mixing bowl: To mix and fold the filling ingredients.
- Spatula: To smooth and fold ingredients gently.
- Whisk or electric mixer: To whip the heavy cream to soft peaks.
- Knife: To slice strawberries and serve clean slices.
Step-by-step guide to no bake cheesecake
- Gather your equipment: a 20cm (8-inch) springform pan, a food processor or zip-top bag and rolling pin, a mixing bowl, and a spatula.
- Crush the graham crackers: in the food processor until fine, or place in a zip-top bag and crush with a rolling pin. Measure out about 1 1/2 cups of crumbs.
- Mix the crust: combine the crumbs with 4 tbsp melted unsalted butter and 2 tbsp powdered sugar. Stir until evenly coated and crumbly.
- Press the crust: transfer to the springform pan. Use the back of a spoon or a flat-bottomed glass to press evenly into the bottom. Chill in the fridge for 15 minutes to firm up.
- Prepare the filling: in a large bowl, beat 250g (8 oz) softened cream cheese until smooth and creamy, about 2 minutes. Add 1/4 cup powdered sugar and beat again until combined.
- Add the strawberries: roughly chop 1 cup fresh strawberries. Gently fold them into the cream cheese mixture, trying not to break them down too much. Add a squeeze of lemon juice for brightness.
- Whip the cream: in a chilled bowl, whip 1 cup heavy cream to soft peaks, about 3-4 minutes. Gently fold the whipped cream into the strawberry mixture until just combined.
- Assemble the cheesecake: pour the filling over the chilled crust. Use a spatula to smooth the top. Cover with plastic wrap and refrigerate for at least 4 hours, preferably overnight.
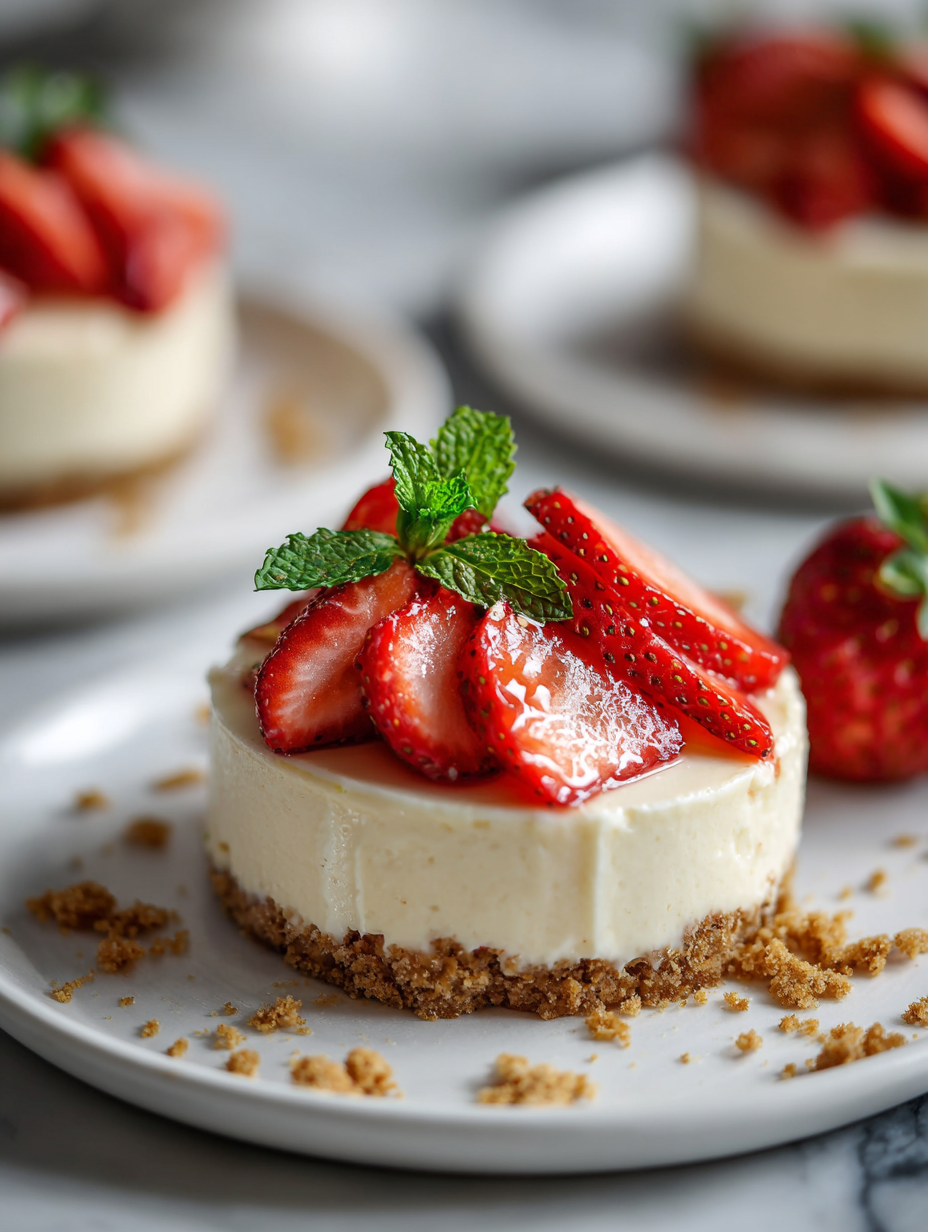
- Finishing touches: before serving, garnish with additional strawberries or a drizzle of berry syrup if desired. Lightly press the fruit into the surface for presentation.
- Serve chilled: remove from the fridge, release the springform sides carefully, and slice with a warm knife for clean cuts. Enjoy the fresh, creamy, strawberry flavor.
Chill the assembled cheesecake for at least 4 hours, preferably overnight, to fully set. Before serving, gently remove the sides of the springform pan, garnish as desired, and slice with a warm knife for clean cuts.
How to Know It’s Done
- Crust is firm and holds shape when pressed.
- Cheesecake filling is set but still creamy, with a jiggle in the center.
- Surface appears smooth with no cracks or cracks starting to form.
No-Bake Strawberry Cheesecake
Ingredients
Equipment
Method
- Place the graham cracker crumbs in a food processor or put them in a zip-top bag and crush with a rolling pin until fine. Transfer to a bowl.
- Mix the melted butter and 2 tablespoons of powdered sugar into the crumbs until evenly coated and crumbly.
- Press the crumb mixture firmly into the bottom of a springform pan, using the back of a spoon or a flat-bottomed glass to create an even layer. Chill in the fridge for 15 minutes to set.
- In a large bowl, beat the softened cream cheese with a hand or stand mixer until smooth and creamy, about 2 minutes. Add the 1/4 cup of powdered sugar and beat until combined.
- Gently fold in the chopped strawberries and a squeeze of lemon juice into the cream cheese mixture, just until evenly incorporated. The mixture will be slightly chunky with fruit.
- In a chilled bowl, whip the heavy cream with a whisk or electric mixer until soft peaks form, about 3-4 minutes. The cream should hold gentle peaks and sound slightly airy.
- Gently fold the whipped cream into the strawberry and cream cheese mixture in three additions, folding carefully to keep the mixture light and airy.
- Pour the filling over the chilled crust, smoothing the top with a spatula. Cover with plastic wrap and refrigerate for at least 4 hours or overnight to set.
- Before serving, garnish the top with additional strawberries or a drizzle of berry syrup if desired. Slice with a warm knife for clean cuts.
- Serve chilled, enjoying the creamy, fruity layers with a bright, juicy burst in every bite.
Tips & Tricks for Perfect Results
- Bolded Mini-Head: Chill the crust thoroughly before adding filling to prevent sogginess and ensure clean slices.
- Bolded Mini-Head: Use cold heavy cream and a chilled bowl to whip faster and achieve fluffier peaks.
- Bolded Mini-Head: Gently fold strawberries into the filling to keep the mixture airy and avoid deflating the whipped cream.
- Bolded Mini-Head: Press the crust firmly with the back of a spoon or glass to create an even, compact base.
- Bolded Mini-Head: Let the cheesecake set overnight in the fridge for the best texture and flavor melding.
- Bolded Mini-Head: For clean slices, dip your knife in warm water and wipe after each cut to prevent sticking.
- Bolded Mini-Head: Garnish with fresh strawberries just before serving to keep them bright and juicy.
Common mistakes and how to fix them
- FORGOT to chill the crust? Fix by refrigerating for 15 minutes before filling.
- DUMPED too much liquid from strawberries? Drain thoroughly or add a bit more cream cheese.
- OVER-TORCHED the crust edges? Cover with foil or reduce oven heat if baking to prevent burning.
- MISSED the sensory check? The filling should jiggle slightly in the center when ready.
Quick fixes and pantry swaps
- When strawberries release too much juice, splash a little lemon juice to brighten flavors.
- If crust crumbles, patch with a damp finger and press back into shape quickly.
- Splash cold water on a cracked cheesecake surface to reduce cracking before serving.
- DUMPED too much liquid from strawberries? Drain thoroughly or add a bit more cream cheese.
- When in doubt, swap graham crackers for digestive biscuits for a nuttier, more complex crust.
Prepping and Storing Tips
- Prepare the crust and press it into the pan up to a day in advance; keep refrigerated for a firm, crisp base.
- Assemble the cheesecake filling a few hours ahead; it stays creamy and well-flavored when chilled overnight.
- Cover the cheesecake tightly with plastic wrap and store in the fridge for up to 2 days; the flavors meld beautifully and the texture stays smooth.
- Refrigerate leftovers for up to 3 days; the cheesecake remains firm and the strawberries stay juicy, but the topping may soften slightly.
- To reheat for a warm snack, briefly microwave slices at low power (about 10 seconds) until just softened—observe for melty edges and fragrant strawberries.
Top questions about no bake strawberry cheesecake
1. Can I use frozen strawberries?
Use ripe, juicy strawberries for the best ooze and flavor. Frozen berries work if fresh aren’t available, but drain excess water first.
2. Can I substitute frozen strawberries?
Yes, but thaw and drain them thoroughly to prevent excess moisture that can make the filling runny.
3. Why is my cream cheese lumpy?
Cream cheese should be softened to room temperature for smooth mixing. Cold cheese clumps and is harder to blend.
4. Can I use low-fat cream cheese?
Use full-fat cream cheese for rich, velvety texture. Light versions are okay but may be less creamy.
5. How long should I chill the cheesecake?
Chill your crust and filling well—at least 4 hours, ideally overnight. This helps it set and slice cleanly.
6. Can I substitute the crust ingredients?
Yes, you can swap graham cracker crumbs with digestive biscuits or almond flour for different textures and flavors.
7. Should I add lemon to the filling?
Add a squeeze of lemon juice to brighten the flavor and enhance the strawberries’ natural sweetness.
8. How do I know when the whipped cream is done?
Whip the heavy cream until soft peaks form—about 3-4 minutes on medium-high speed. Use chilled bowls and cream.
9. My cheesecake cracked. What now?
If the cheesecake cracks, refrigerate it longer or smooth out minor cracks with a spatula. Avoid overmixing the filling.
10. How should I store leftovers?
Keep leftovers refrigerated, covered, for up to 2 days. Let sit at room temperature for a few minutes before slicing for best texture.
This no bake strawberry cheesecake is more than just a dessert; it’s a quick moment of summer I can summon anytime. The blend of tangy cream cheese and juicy berries feels like a fresh breath when I need it most. It’s simple, honest, and always a bit of a celebration without the fuss.
Whenever I make this, I remember that great things often come from the simplest ingredients. It’s the kind of treat that makes me pause and enjoy the little joys—cool, creamy, and bursting with fruit. Sometimes, that’s exactly what a busy life calls for.