
Getting that perfect sear on scallops isn’t just about the ingredients; it’s about the subtle dance of heat. Too hot, and they burn before they cook through; too gentle, and they won’t develop that lustrous, golden crust. I’ve learned to pay close attention to the pan’s temperature, making tiny adjustments as I go — this small detail can turn a good sear into a great one.
There’s something satisfying about the process — the sizzle when the scallops hit the hot pan, the way they shift and jiggle, revealing that initial caramelization. It’s a brief window, but it’s enough to elevate a simple ingredient into something memorable. Mastering this precise heat control has made me appreciate how much finesse can be packed into a quick, seemingly straightforward step.
Focusing on the overlooked importance of precise heat control to achieve perfect caramelization and tenderness in scallops, highlighting how slight adjustments can make or break the sear.
The subtle art of heat mastery
- Searing scallops feels like capturing a fleeting moment of perfection, each time I get that caramel crust just right, I feel a quiet pride.
- I remember the chaos of my first attempt—scallops sticking, overcooking—until I learned that patience and heat are my best friends in the kitchen.
- There’s a nostalgic joy in the simple act of searing, reminding me of family dinners where everyone gathers around the stove, sharing stories over sizzling scallops.
- Achieving that perfect sear makes me feel a bit like a magician—transforming a humble ingredient into something golden and irresistibly tender.
- Sometimes, I get so lost in the process that I forget I’m cooking, but the smell of seared scallops always pulls me right back to the moment.
The story behind this recipe
- Searing scallops has always been a lesson in patience for me. I vividly recall the first time I tried, rushing the heat and ending up with rubbery, overcooked outsides. It took a few burnt attempts to realize that gentle, controlled heat is the secret to that perfect caramel crust and tender interior. That moment of figuring out the right pan temperature felt like unlocking a hidden skill, one that makes the whole process feel almost meditative.
- Every time I cook scallops this way, I think about how small adjustments—like a slight turn of the heat or a quick flip—can make all the difference. It’s a dance of timing and temperature, and when it clicks, the aroma of seared scallops filling the kitchen is pure satisfaction. This dish reminds me that sometimes, simplicity paired with attention can turn a humble ingredient into something truly special.
- heading: ‘The subtle art of heat mastery’
Contextual origin, trivia, or history
- Pan searing scallops became popular in French cuisine, where the emphasis on precise heat control highlights the finesse of French techniques.
- Historically, scallops were a delicacy reserved for special occasions due to their prized status and the skill required to cook them perfectly.
- In coastal regions, indigenous peoples used simple heat and natural fats to sear scallops, a method that has evolved but remains fundamentally the same.
- The term ‘searing’ in cooking dates back to ancient techniques where high heat was used to lock in juices and develop flavor quickly.
Ingredient breakdown: key components
- Scallops: Fresh, dry scallops are key—wet ones steam instead of sear, losing that lovely crust. Look for firm, slightly translucent flesh for the best sear.
- Salt: I prefer kosher salt for seasoning—coarse grains help draw out moisture and enhance that salty, umami punch. Adjust to taste before searing.
- Oil: I use a high-smoke-point oil like grapeseed or clarified butter—sizzle should be loud and aromatic, not smoky or bitter. Skip the butter if it burns easily.
- Lemon: Bright, citrusy lemon juice adds a zesty contrast. Squeeze just before serving to keep that fresh, zingy aroma intact.
- Pepper: Freshly ground black pepper adds mild heat and earthiness, but I sometimes swap in a pinch of smoked paprika for a subtle smoky note that complements the crust.
- Optional herbs: A sprig of thyme or a bit of chopped parsley can be added at the end for freshness, but I keep it simple to highlight the scallops’ natural flavor.
Spotlight on key ingredients
Scallops:
- Fresh, dry scallops are crucial—they sear beautifully and develop that signature caramelized crust. Avoid wet scallops, which steam instead of sear, losing that lovely texture.
- Salt: Coarse kosher salt helps draw out moisture and enhances flavor. It’s easier to control seasoning and crust development with larger grains.
Lemon:
- Oil: High-smoke-point oils like grapeseed or avocado are my go-tos—they shimmer loudly when hot, signaling it’s time to sear. Skip butter unless you’re okay with a lower smoke point or a quick burn.
- Bright, citrusy lemon juice just before serving lifts the dish. Its zesty aroma complements the richness of the scallops and cuts through the buttery sear.
Notes for ingredient swaps
- Seafood Alternatives: Use diver scallops if available for a sweeter, more intense flavor. Frozen scallops can work in a pinch but thaw thoroughly and pat dry to avoid excess moisture.
- Oil Choices: Grape seed or avocado oil have high smoke points and neutral flavors. For a richer sear, clarified butter is great but watch it closely to prevent burning.
- Salt: Coarse sea salt enhances crust development. Fine table salt can be used but be mindful of quantity to avoid over-salting.
- Lemon: Fresh lemon juice adds brightness. For a different note, lime or a splash of white wine vinegar can brighten the dish similarly.
- Pepper: Freshly ground black pepper offers mild heat. Smoked paprika provides a smoky depth if you want a more complex crust flavor.
- Herbs: Parsley, chives, or tarragon can be added at the end. If you prefer a herbaceous note, basil or dill work well too, but keep it light.
Equipment & Tools
- Cast iron skillet: Provides even, high heat for a crisp sear.
- Tongs: To flip and handle scallops gently.
- Paper towels: To pat scallops dry and ensure proper searing.
- Lemon squeezer: To add fresh lemon juice for brightness.
Step-by-step guide to pan searing
- Equipment & Tools: Use a heavy-bottomed skillet—preferably cast iron—for even heat. Tongs for flipping, a small spoon for lemon juice, and a paper towel for patting dry.
- Pat scallops dry with paper towels—moisture is the enemy of a good sear. Season generously with kosher salt on both sides.
- Heat the skillet over medium-high heat—aim for about 190°C / 375°F. Wait until the pan is hot enough that a drop of water sizzles immediately.
- Add a thin layer of oil—just enough to coat the bottom. Let it shimmer but not smoke. Carefully place scallops in the pan, spaced apart.
- Sear without moving for about 1.5–2 minutes. Look for a golden-brown crust forming at the edges. If sticking, wait a bit longer; don’t rush flipping.
- Flip scallops gently with tongs or a spatula. Sear the other side for another 1.5–2 minutes. They should develop a similar crust and be slightly translucent inside.
- Check for doneness: the scallops should jiggle just slightly when moved, and the surface should be caramelized. If overcooked, they turn rubbery and pale.
- Optional—add a squeeze of lemon and a sprinkle of pepper. Remove scallops from pan and let rest briefly for juices to settle.
- Resting & Finishing: Plate immediately, drizzle with lemon juice, and garnish if desired. Serve hot for best texture and flavor.
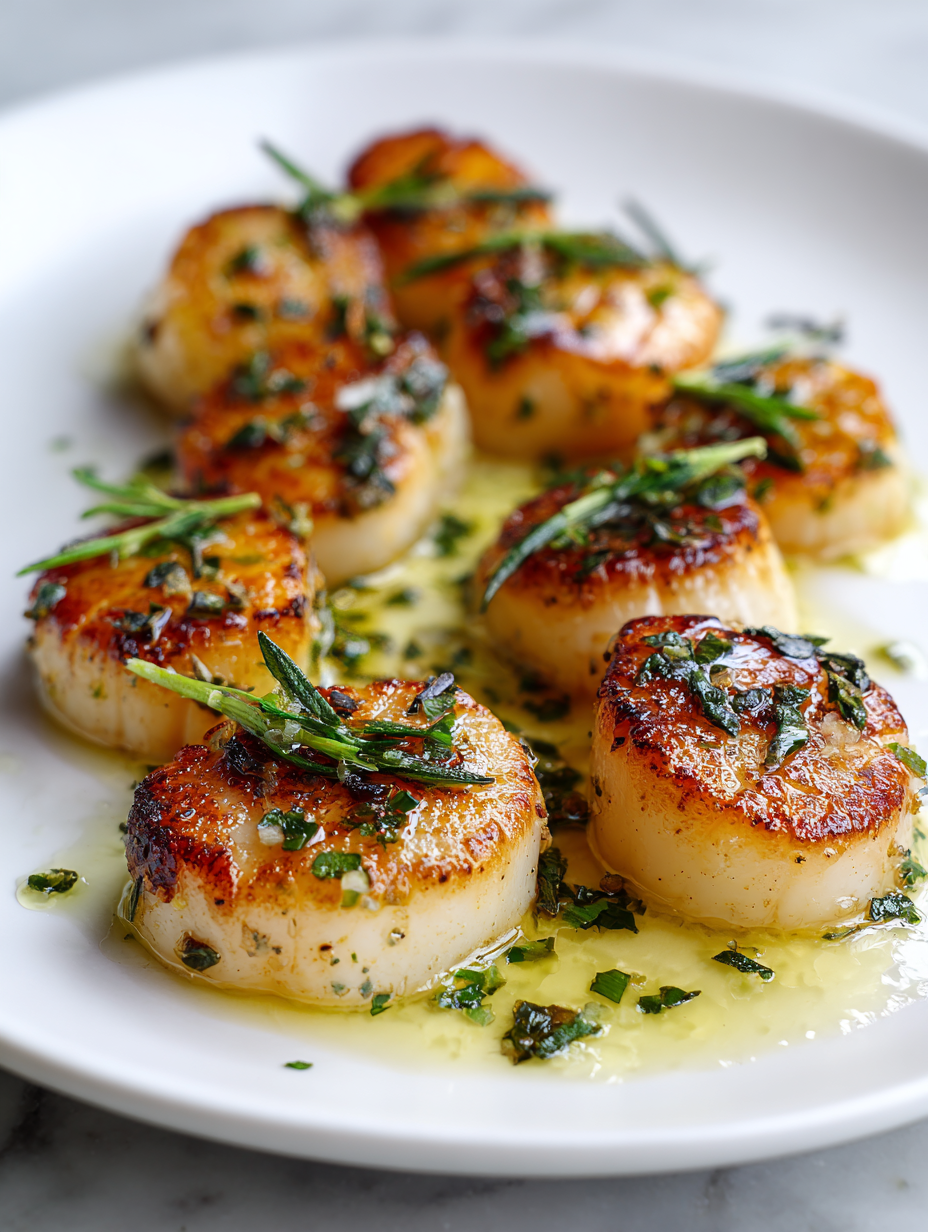
- Checkpoints & How to Know It’s Done: The edges are golden and crisp, scallops jiggle lightly—just cooked through but not rubbery, and smell sweet and nutty.
Remove scallops from pan and let rest for 1 minute. Finish with fresh lemon and a light sprinkle of salt. Serve immediately to enjoy the contrast of crispy exterior and tender interior.
How to Know It’s Done
- Golden-brown crust with a slight caramel aroma.
- Scallops jiggle gently without feeling mushy inside.
- Internal temperature around 55–60°C / 130–140°F for tender, just-cooked scallops.
Perfect Pan-Seared Scallops
Ingredients
Equipment
Method
- Pat the scallops dry thoroughly with paper towels to remove excess moisture, which helps achieve that perfect sear. Sprinkle generously with kosher salt on all sides.
- Place a cast iron skillet on the stove and turn the heat to medium-high. Let it warm for a few minutes until it’s hot enough that a drop of water sizzles immediately upon contact.
- Add the grapeseed oil to the hot skillet, swirling it around to coat the bottom evenly. Wait until the oil shimmers and just begins to smoke lightly, indicating it’s ready.
- Carefully place the scallops into the skillet, spacing them apart to prevent sticking. You should hear a loud sizzle as they hit the hot oil—this is the sound of an ideal sear.
- Let the scallops cook undisturbed for about 1.5 to 2 minutes, watching for a golden-brown crust to form at the edges. They may slightly jiggle but should not move excessively or stick.
- Using tongs, gently flip each scallop and cook the other side for another 1.5 to 2 minutes until it develops a similar golden crust. The scallops should be firm yet tender when pressed lightly.
- Once both sides are seared and caramelized, squeeze fresh lemon juice over the scallops for brightness. Add freshly ground black pepper if desired, and give the pan a quick shake to distribute the flavors evenly.
- Remove the scallops from the skillet and let them rest on a plate for about a minute. This brief pause allows the juices to redistribute, keeping them moist and tender.
- Plate the scallops immediately, spooning any pan juices over the top for extra flavor. Garnish with additional herbs or lemon if desired, and serve while hot for the best contrast between crispy crust and delicate interior.
Notes
Pro tips for perfect scallops
- Preheat thoroughly: Ensure your pan is hot enough—about 190°C / 375°F—so scallops hit that sizzling surface immediately.
- Pat dry with care: Moisture is the enemy; use paper towels to dry scallops thoroughly before seasoning and searing.
- Use high-smoke-point oil: Grape seed or avocado oil creates a loud shimmer and crackle—perfect for that crusty exterior.
- Don’t overcrowd: Sear in batches if needed; overcrowding lowers pan temperature, resulting in steaming instead of searing.
- Flip once: Wait until a golden crust forms, about 1.5–2 minutes, then flip gently. Rushing leads to tearing or sticking.
- Watch the heat: If scallops start to burn or smoke, lower the heat slightly—consistent temperature is key for even searing.
- Finish with lemon: Just before serving, squeeze fresh lemon juice over scallops to add brightness and balance the richness.
Common mistakes and how to fix them
- FORGOT to dry scallops thoroughly → They won’t sear properly; pat dry before cooking.
- DUMPED oil into a cold pan → Always heat oil until shimmering before adding scallops.
- OVER-TORCHED the pan → Keep heat moderate; high heat burns scallops and creates bitterness.
- MISSED the sear timing → Sear for 1.5–2 minutes per side; avoid flipping too early or late.
Quick fixes and pantry swaps
- If scallops stick, splash a bit more oil and let the pan reheat briefly.
- When scallops are rubbery, ensure they’re not overcooked; remove from heat immediately.
- Dumped too much oil? Wipe the pan quickly and start with a fresh layer for a crisp sear.
- When the pan smokes excessively, lower the heat and add a pinch of salt to absorb excess moisture.
- Patch a burnt crust by deglazing the pan with lemon juice or wine for added flavor.
Prep, store, and reheat tips
- Pat scallops dry and season ahead of time; keep covered in the fridge for up to 2 hours to enhance flavor and ensure dryness for a better sear.
- Store uncooked, dry scallops in an airtight container in the fridge; use within 24 hours for optimal freshness and texture.
- Cooked scallops can be refrigerated in an airtight container for up to 2 days. Reheat gently in a hot pan for 30 seconds per side until just warmed, aiming for a slight shimmer and aroma of caramelized crust.
- Freezing scallops is possible but may affect texture. Wrap tightly in plastic and use within 1 month. Thaw slowly in the fridge, pat dry for best searing results.
- Avoid reheating scallops multiple times; they tend to become rubbery. Serve freshly seared or reheat minimally to preserve tenderness and flavor.
Top questions about pan seared scallops
1. How do I choose the best scallops?
Use dry, fresh scallops—wet ones steam instead of sear, losing that crisp exterior. Look for firm, slightly translucent flesh.
2. Why is my scallop surface soggy or sticking?
Pat scallops dry thoroughly with paper towels before seasoning—moisture prevents proper browning and can cause sticking.
3. How hot should my pan be?
Heat your pan until a drop of water sizzles immediately—aim for about 190°C / 375°F—then add oil for perfect searing.
4. How long should I sear each side?
Sear scallops for about 1.5–2 minutes per side until golden and caramelized. Don’t flip too early or they’ll tear.
5. What oil is best for searing scallops?
Use high-smoke-point oil like grapeseed or avocado. If the oil smokes excessively, lower the heat slightly to avoid bitterness.
6. How do I know when scallops are done?
Cook until scallops jiggle slightly when moved and have a golden crust. They should be just cooked through, tender, and not rubbery.
7. When should I add lemon juice?
Add a squeeze of lemon juice just before serving for brightness. Too early, and the flavor dulls; too late, it’s lost.
8. Why are my scallops steamed instead of seared?
Overcrowding the pan lowers temperature and causes steaming instead of searing. Cook in batches if necessary.
9. My scallops stick to the pan, what now?
If scallops stick, splash a little more oil, wait for the pan to reheat, and gently loosen with tongs.
10. Can I reheat cooked scallops?
Reheat gently in a hot pan for about 30 seconds per side, aiming for a slight shimmer and aroma of caramelized crust.
Seared scallops are more than just a quick seafood fix; they’re a lesson in patience and precise heat. When done right, that crusty exterior gives way to tender, sweet flesh—a texture and flavor that’s hard to beat. It’s a simple dish, but mastering the sear makes all the difference in elevating your cooking game.
In these busy times, a well-seared scallop plate feels like a small celebration—something to savor and remember. When I finally nail that perfect caramel crust, I feel a quiet pride that keeps me coming back for more, experimenting and tasting along the way.

Hi, I’m Mia Bennett, the chef and storyteller behind Grounding in Tradition. I’m so glad you’re here. This blog is my way of preserving the flavors, techniques, and rituals that shaped me as both a cook and a professional chef. Grounding in Tradition is not about trends or shortcuts. It is about honoring where food comes from, understanding the hands that prepare it, and carrying forward recipes that deserve to be remembered.


Leave a Reply