
There’s something about a homemade cheese ball that immediately takes me back to family get-togethers. The imperfect, hand-rolled shape and the varied coatings—cracked pepper, chopped nuts, paprika—bring a sense of charm and nostalgia. It’s messy, it’s casual, and it’s full of stories, no matter how many times I make it, it feels like a little celebration in itself.
This recipe is about embracing the imperfect. I love how a cheese ball can be a centerpiece that invites everyone to dig in with their hands, sharing bites and laughs. It’s a comfort food that’s more than just a snack; it’s a vessel for memories, a reminder that sometimes, the best moments are unpolished and spontaneous.
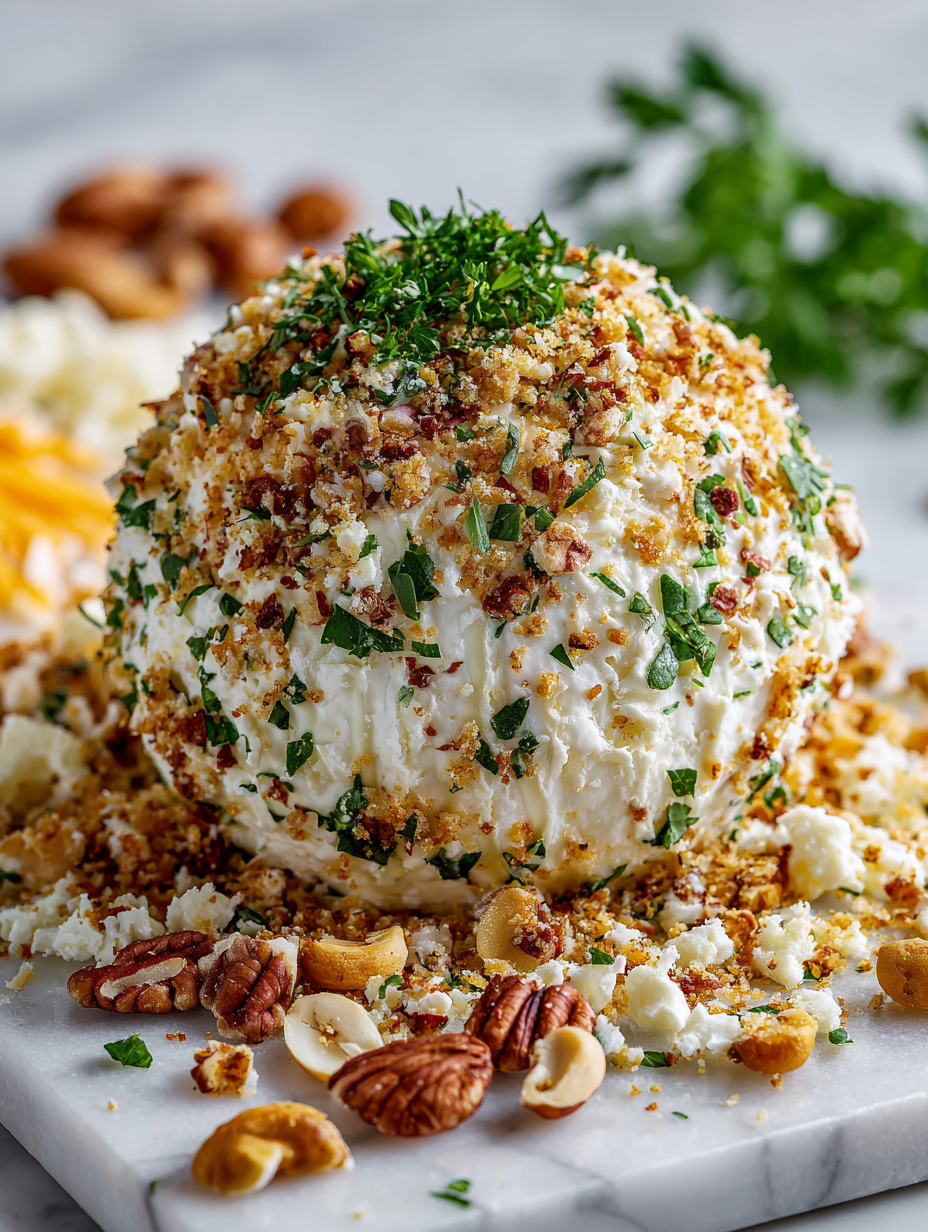
Focusing on the nostalgic charm of a homemade cheese ball, this recipe explores how its imperfect, hand-rolled shape and varied coatings evoke memories of family gatherings and casual celebrations, making it more than just a snack—it’s a imperfectly perfect centerpiece full of stories and personal touches.
Embracing Imperfection in Every Roll
- Making this cheese ball feels like a warm hug after a hectic day, the smell of creamy cheese and toasted nuts always calms me.
- I remember my first attempt — it was a total mess, but somehow, everyone loved the rustic, lumpy shape and all the imperfect cracks.
- There’s a weird pride in rolling these balls; it’s a simple act that always makes me feel connected to family traditions.
- I love how a cheese ball can be both nostalgic and surprisingly versatile, fitting into casual gatherings or fancy appy platters.
- Every time I make it, I think of summer picnics and lazy afternoons, the kind of moments worth savoring over a spread of snacks.
The charm of imperfect cheese balls
Making cheese balls has always been a bit of a spontaneous act for me. I remember the first time I tossed together ingredients without a real plan, just eyeballing the cheese, herbs, and nuts. That rough, imperfect shape turned out to be exactly what made it feel welcoming and homemade. Since then, it’s become a staple for casual gatherings, where the best part isn’t the look, but the messy, joyful sharing around the table.
Cheese Ball Trivia & Origins
- Cheese balls gained popularity in mid-20th century America as a festive, communal appetizer for parties and family gatherings.
- Originally, cheese balls were often coated with crushed nuts or dried herbs before the rise of more colorful coatings like paprika or sesame seeds.
- Many believe the cheese ball’s roots trace back to old European cheese spreads, adapted by American hosts for easy serving and sharing.
- The hand-rolled, imperfect shape of cheese balls makes them uniquely nostalgic, evoking a time when presentation was secondary to flavor and fun.
- In the 1950s and 60s, cheese balls became a staple in holiday buffets, celebrated for their simplicity, portability, and crowd-pleasing appeal.
Ingredient breakdown: key components
- Cream cheese: I love how it’s silky and spreads easily—use softened to avoid lumps, and consider a touch of sour cream if you want extra tang.
- Cheddar cheese: Sharp, crumbly, and full of flavor; I prefer aged cheddar for depth, but a mild one can make it more kid-friendly.
- Herbs & spices: Parsley, garlic powder, and paprika add brightness and warmth; don’t be shy—smell as you go to balance the flavors.
- Nuts or coating: Chopped pecans or walnuts give crunch and richness; toast them lightly for a deeper aroma, or skip if nut allergies are a concern.
- Optional add-ins: Diced bacon or olives can bring a salty punch; fold them in gently so they’re evenly distributed and not overwhelming.
- Binding agent: A dash of mayonnaise or Greek yogurt can help keep everything together if your mixture feels too dry; add gradually and test for creaminess.
- Coating options: Crushed crackers, pretzels, or even everything bagel seasoning work wonderfully; pick one based on the flavor profile you want to highlight.
Spotlight on key ingredients
Cream cheese and Cheddar cheese:
- Cream cheese: I love how it’s silky and spreads easily—use softened to avoid lumps, and consider a touch of sour cream if you want extra tang.
- Cheddar cheese: Sharp, crumbly, and full of flavor; I prefer aged cheddar for depth, but a mild one can make it more kid-friendly.
Notes for ingredient swaps
- Dairy-Free: Swap cream cheese for a cashew-based spread or dairy-free cream cheese. It won’t be as silky but still creamy and tangy.
- Cheddar Cheese: Use Monterey Jack or Colby for a milder flavor, or a sharp Gouda for a more complex bite.
- Herbs & Spices: Fresh herbs like chives or basil can replace parsley; dried herbs are fine but less vibrant aroma.
- Nuts or Coating: Use toasted sunflower seeds or crispy chickpeas for crunch if nuts are an issue or want a different flavor.
- Optional Add-ins: Diced sun-dried tomatoes or roasted red peppers add a sweet, smoky note—fold them in gently for bursts of flavor.
- Binding Agent: Mayonnaise or sour cream can be substituted for Greek yogurt if you prefer a richer, tangier finish.
- Coating Options: Crushed pretzels or panko breadcrumbs give a different crunch and saltiness—try sesame seeds for nuttiness.
Equipment & Tools
- Mixing bowl: Combine and blend ingredients smoothly.
- Spatula: Mix ingredients thoroughly and scrape sides.
- Plastic wrap: Shape and chill the cheese mixture easily.
- Serving platter: Display the finished cheese ball attractively.
- Small plates: Hold different coatings for rolling.
- Knife or offset spatula: Help with shaping and serving.
Guide to Making a Cheese Ball
- Gather all ingredients: softened cream cheese, shredded cheddar, herbs, nuts, and optional add-ins. Preheat your fridge to chill the assembled cheese ball later.
- In a mixing bowl, combine 8 oz of softened cream cheese with 1 cup shredded cheddar. Mix until smooth and creamy, breaking up lumps with a spatula.
- Add 1 teaspoon garlic powder, 1 tablespoon chopped fresh parsley, and 1 teaspoon smoked paprika. Mix well to evenly distribute the herbs and spices. Smell to ensure balance—bright and warm.
- Fold in 1/4 cup finely chopped nuts, toasted lightly if desired, for crunch. For a more playful variation, sprinkle in diced olives or crumbled bacon at this stage.
- Scoop the mixture onto a piece of plastic wrap. Shape into a rough ball, gently rolling it between your hands. Don’t worry about perfect symmetry—rustic is good.
- Wrap tightly and chill in the fridge for at least 1 hour. This allows flavors to meld and makes the ball easier to handle for coating.
- Prepare your coatings: crushed crackers, toasted nuts, or sesame seeds. Spread each on separate plates for rolling.
- Remove the chilled cheese ball from the fridge. Unwrap and roll it gently in your chosen coating, pressing lightly to adhere. A cracked surface adds charm.
- Place the coated cheese ball on a serving platter. Let it sit at room temperature for about 10 minutes to soften slightly and enhance flavor before serving.
- Serve with an assortment of crackers, sliced baguette, or crisp veggie sticks. The texture should be firm yet creamy, with a fragrant, nutty aroma.
Chill the assembled cheese ball for at least an hour, preferably longer, to firm up. Serve at room temperature for best flavor and texture. Keep leftovers covered in the fridge for up to 3 days, letting it sit out for 10 minutes before serving again.
How to Know It’s Done
- Color: Coated surface should be evenly crusted and golden or lightly toasted.
- Texture: When pressed gently, the ball should hold shape but yield slightly, indicating proper chilling.
- Aroma: Smell for a fragrant mix of herbs, cheese, and toasted nuts—no overpowering sourness or stale odors.
Homemade Cheese Ball
Ingredients
Equipment
Method
- Place the softened cream cheese and shredded cheddar in a large mixing bowl.
- Mix them together thoroughly with a spatula until the mixture is smooth, creamy, and free of lumps.
- Add garlic powder, chopped parsley, and smoked paprika to the cheese mixture.
- Stir well to evenly distribute the herbs and spices, releasing a fragrant aroma as you mix.
- Fold in the chopped nuts, ensuring they are evenly incorporated for crunch and richness.
- Scoop the cheese mixture onto a piece of plastic wrap and gently shape it into a rough ball, pressing and molding with your hands.
- Wrap the shaped cheese ball tightly with the plastic wrap and refrigerate for at least 1 hour to allow the flavors to meld and the shape to firm up.
- Prepare your coatings on small plates—crushed crackers, toasted nuts, sesame seeds, or herbs—so they are ready for rolling.
- Remove the cheese ball from the fridge, unwrap it, and gently roll it in your chosen coating, pressing lightly to ensure it adheres well.
- Place the coated cheese ball on a serving platter and let it sit at room temperature for about 10 minutes to soften slightly and enhance flavor.
- Serve with an assortment of crackers, sliced baguette, or fresh veggie sticks, and enjoy the rustic, cheesy, and nutty flavors.
Notes
Pro tips for cheese ball perfection
- Bolded mini-head: Chill the mixture thoroughly to prevent cracking when rolling.
- Bolded mini-head: Use room-temperature ingredients for smoother blending and easier shaping.
- Bolded mini-head: Lightly toast nuts or coatings for a richer aroma and crunch.
- Bolded mini-head: When rolling in coatings, press gently to ensure adherence without cracking.
- Bolded mini-head: Rest the cheese ball at room temperature for 10 minutes before serving to soften slightly.
- Bolded mini-head: Incorporate herbs gradually, tasting to avoid overpowering the cheese flavor.
- Bolded mini-head: Keep the coated cheese ball in the fridge, but serve at room temp for optimal flavor.
Common cheese ball mistakes and fixes
- FORGOT to measure ingredients accurately → Use standard measuring tools for consistency.
- DUMPED in all the herbs at once → Add herbs gradually, tasting as you go for balance.
- OVER-TORCHED the coating → Keep an eye and turn frequently to avoid burning.
- MISSED resting time → Chill the cheese ball thoroughly for better shape and flavor.
Quick fixes and pantry swaps
- If the cheese ball cracks when rolling, splash a bit of warm water on your hands and reshape gently.
- When coatings fall off, patch with a light press and chill briefly to help them stick better.
- DUMPED too much salt? Rinse and mix in a fresh batch of cheese mixture for balance.
- OVER-TORCHED the coating? Shield with a sprinkle of fresh herbs or a quick brush of olive oil and toast again.
- Serve immediately if you want a shimmer of fresh coating; refrigerate for a firmer bite and deeper flavor.
Prep, store, and reheat tips
- Prepare the cheese mixture and shape the ball up to a day in advance. Wrap tightly and store in the fridge. The flavors meld and the texture firms up, making it easier to coat later. The aroma of herbs and cheese intensifies, inviting anticipation.
- You can coat the cheese ball a few hours ahead of serving. Keep it covered in the fridge; the coating will set slightly and the flavors deepen. Let it sit at room temperature for about 10 minutes before serving to soften the surface and enhance taste.
- Store leftovers in an airtight container in the fridge for up to 3 days. The texture will become firmer, and the flavors mellow. For best texture, let it sit out for 10 minutes before serving again, when it’s creamy and fragrant.
- Reheating isn’t necessary—serve straight from chilled or at room temp. If you want a softer, warmer experience, gently warm in a low oven (about 150°C/300°F) for 5-8 minutes, until just fragrant and slightly softened. Sensory cue: smell the cheesy, nutty aroma as it warms.
Top Questions About Cheese Ball
1. What exactly is a cheese ball?
A cheese ball is a creamy, savory mixture of cheeses, herbs, and spices shaped into a round and coated with nuts, herbs, or crackers. It’s perfect for casual gatherings and makes a fun, imperfect centerpiece.
2. What are the main ingredients?
Cream cheese is the base, giving it a silky texture. Sharp cheddar adds flavor, and herbs brighten it up. Nuts or coatings add crunch and visual appeal.
3. How long should I chill the cheese ball?
Chill it in the fridge for at least an hour to let flavors meld and make shaping easier. Serve at room temp for a softer bite and richer flavor.
4. Can I make it in advance?
You can prepare the mixture a day ahead, shape it, and keep it covered in the fridge. Coatings can be added a few hours before serving to keep it fresh and crunchy.
5. How do I choose the best coatings?
Use toasted nuts for extra aroma and crunch. Fresh herbs like parsley or chives add brightness, while dried herbs deepen the flavor. Diced bacon or olives bring salty, savory notes.
6. What if the cheese ball cracks or falls apart?
If the cheese mixture is too soft, chill it longer. If cracks form when rolling, dampen your hands slightly. Overly dry coatings can be spritzed with water or a quick brush of olive oil.
7. What coatings work best?
Use a variety of coatings: crushed crackers, toasted nuts, sesame seeds. Mix and match based on flavor and texture preference. Toast nuts lightly for a richer aroma.
8. Can I freeze a cheese ball?
Yes, you can freeze the shaped cheese ball for up to a month. Wrap it tightly, then thaw in the fridge overnight before coating and serving. The texture remains creamy and flavorful.
9. When is a good time to serve a cheese ball?
It’s a flexible dish, great for holiday buffets, casual parties, or quick snack platters. Its nostalgic charm makes it a conversation-starter and a comforting treat.
10. How can I personalize my cheese ball?
Feel free to customize with spicy peppers, different cheeses, or even sweet elements like honey or dried fruit. Keep in mind, stronger flavors will influence the overall profile.
This cheese ball isn’t just a nostalgic throwback; it’s a messy, inviting centerpiece that sparks conversations and shared bites. Its imperfect shape and varied coatings remind us that good food doesn’t have to be perfect to be memorable.
Whenever I make this, I think about how simple ingredients can come together to create something comforting and fun. It’s a reminder that the best moments often happen around a table, with hands covered in cheese and laughter filling the room.

Hi, I’m Mia Bennett, the chef and storyteller behind Grounding in Tradition. I’m so glad you’re here. This blog is my way of preserving the flavors, techniques, and rituals that shaped me as both a cook and a professional chef. Grounding in Tradition is not about trends or shortcuts. It is about honoring where food comes from, understanding the hands that prepare it, and carrying forward recipes that deserve to be remembered.


Leave a Reply